Overview
PanoramaWeb (
https://panoramaweb.org), the public Panorama server hosted at the University of Washington is being increasingly used by researchers to host data processed in Skyline for sharing with collaborators and for referencing in published papers. Users on PanoramaWeb are given their own projects over which they have full administrative control. The ease of uploading Skyline documents to Panorama combined with the ability to configure permissions and folder structure makes PanoramaWeb an attractive choice for hosting and sharing data from Skyline centric workflows. It also makes it possible for users to provide public access to data for fulfilling journal submission requirements. Several papers have already been published that reference supplementary Skyline documents hosted on PanoramaWeb. However, data in user projects remains under the control of the user, and may be edited or deleted post publication.
To address this concern, PanoramaWeb now hosts a public repository called "Panorama Public" where users may submit supplementary data contained in their projects on PanoramaWeb. The repository provides a permanent location for data to be referenced in publications. Upon submission, a copy of the data contained in the user project is made to Panorama Public. This copy includes user interface elements such as wiki pages, charts and other supplementary figures which were added by the user to their project. Data copied to Panorama Public is read-only, ensuring its availability in the original form accepted for publication. Permissions to the data in Panorama Public are managed as required -- private with access to reviewers while the manuscript is in review and public after the paper has been accepted.
In this tutorial you will you will prepare a folder on PanoramaWeb for submitting to Panorama Public. This will involve uploading documents related to a manuscript and building a custom user interface around the data. Finally, you will go through the steps of submitting the folder to Panorama Public. A large part of this tutorial covers adding custom user interface elements to enhance the presentation and provide context to the supplementary data contained in a folder on PanoramaWeb. If you already have a folder that is ready for publication, you can skip to the section "Submitting to Panorama Public" that covers the steps required for submitting data to Panorama Public.
In this tutorial you will use several features that are part of LabKey Server (
https://www.labkey.org), the data management platform behind Panorama, to create a user interface for your supplementary data on PanoramaWeb. Links to detailed documentation provided by labkey.org on individual features are included in the tutorial in yellow boxes like the one below. Please note that these links are not part of the tutorial and are only meant to provide more detailed information on a particular feature in LabKey Server. The link below takes you to the main documentation page on labkey.org.
Getting Started
To start the tutorial, download the following ZIP file:
Extract the files to a folder on your computer, like:
C:\UsersYour_Username\Documents
This will create a new folder:
C:\Users\Your_Username\Documents\SubmitToPanoramaPublic
It will contain all the necessary files for this tutorial.
The data used in this tutorial was published in
Abbatiello et al. 2013, where the authors described a system suitability protocol (SSP) that helps to ensure reproducible analyte quantification measurements within a lab or across multiple laboratories with different MS instrument platforms. The SSP was evaluated in 11 laboratories on a total of 15 different instruments, and the data analyzed in Skyline. The resulting Skyline documents were uploaded to PanoramaWeb and made publicly available at:
The data for this tutorial contains Skyline documents from 3 of the participating laboratories, of which one used a ThermoFisher TSQ Vantage instrument and the other two used the SCIEX 4000 QTRAP instrument.
In the following sections you will:
- Create a folder on PanoramaWeb and upload Skyline documents to the folder.
- Add wiki pages with text, supplementary figures and tables.
- Prepare the folder for submission by providing an abstract, organism, instrument information etc.
- Submit to Panorama Public.
Signing Up for an Account on PanoramaWeb
This tutorial assumes that you will be working in a sub-folder of the "Tutorials" project on PanoramaWeb, the Panorama server hosted by the MacCoss lab at the University of Washington. However, if you already have a project on this server, you are welcome to work in a sub-folder of your project, and skip to the next step.
To request a folder on PanoramaWeb for working through this tutorial, fill out the sign-up form on this page:
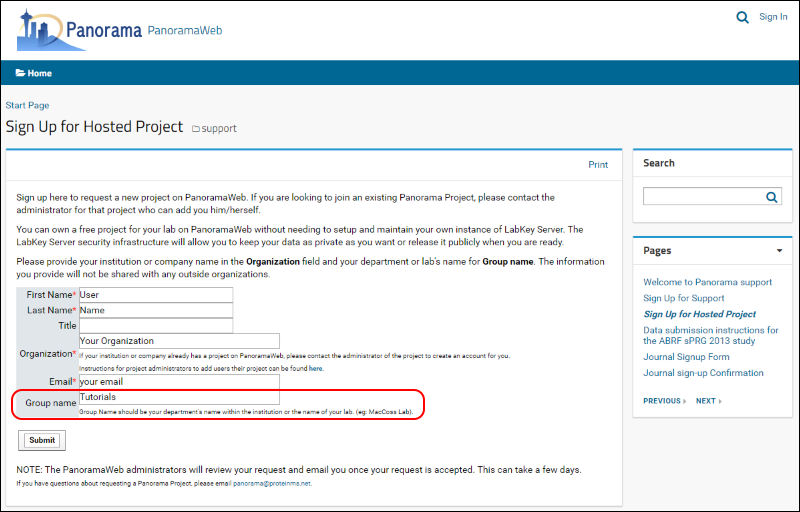
Once your request is approved, a folder with full administrative rights will be created for you in the "Tutorials" project on PanoramaWeb. You will also receive a welcoming email with a link to complete your account registration by choosing a password.
Creating a Folder in Panorama
Sign in to PanoramaWeb at
https://panoramaweb.org with your username and password. If you are working in the "Tutorials" project follow these steps to navigate to your folder under this project:
- Click the Projects tab in the upper right corner (shown below) to see a list of all the projects to which you have access on the server.
- Click the "Tutorials" project.
- On the project homepage, hover over the project name in the menu bar below the Panorama icon and click on the folder that was created for you. We will use "Your_Username" as the folder name only as an example. Your folder name will be different.

NOTE: Most of the Panorama features that you will explore in the rest of the tutorial require that you have administrative permissions in the folder that you are working in. If you are working in your sub-folder in the "Tutorials" project you are the administrator of the folder. If, however, you are working in another project on PanoramaWeb you must contact your project administrator to ensure that you have administrative permissions.
You will now create a subfolder where you will upload Skyline documents and add other supplementary information for a manuscript. To create a sub-folder for this tutorial, do the following:
- Click the new folder icon shown in the image below.

- In the Create Folder form, enter "System Suitability Study" in the folder Name field.
- Select the Panorama option under Folder Type, as shown below.
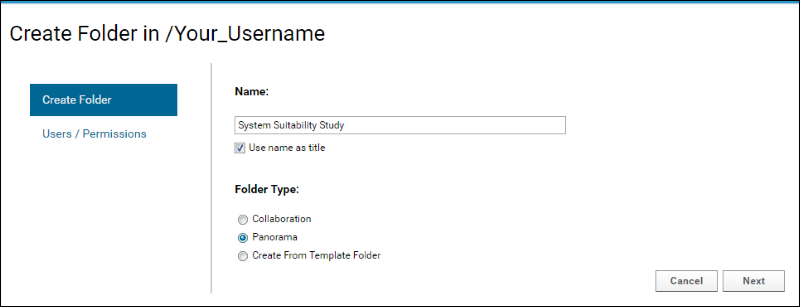
- Click the Next button.
- On the Users/Permissions page accept the default selection (Inherit From Parent Folder).
- Click the Next button.
- On the Configure Panorama Folder page accept the default selection (Experimental data).
- Click the Finish button.
After successful folder creation, you will be taken to the home page of the "System Suitability Study" folder. You are now ready to upload Skyline documents to this folder.
Uploading Skyline Documents to Panorama
From the tutorial files downloaded earlier, open the "Study9S_Site52_v1.sky" file in Skyline either by double-clicking on the file in Windows Explorer or in Skyline, on the
File menu, click
Open (
Ctrl-O). This file contains measured results for 22 peptides from one of the participating labs in the system suitability study (
Abbatiello et al. 2013). To upload this document to the folder you just created on Panorama, follow these steps:
- Click on the Upload to Panorama button in the Skyline toolbar, shown in the image below. Alternatively, on the File menu, click Upload to Panorama.
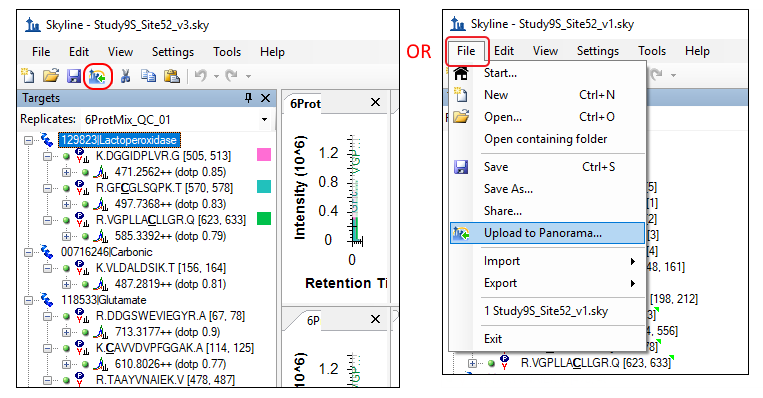
If you have not yet set up a Panorama server in Skyline, you will see the following message.
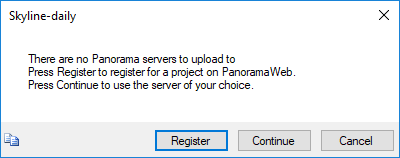
- Click the Continue button.
Do the following in the
Edit Server form:
- Enter "https://panoramaweb.org" in the URL field.
- Enter your email address and password on PanoramaWeb.
- Click the OK button.
Skyline will display a
Upload Document form with the folders available to you on PanoramaWeb.
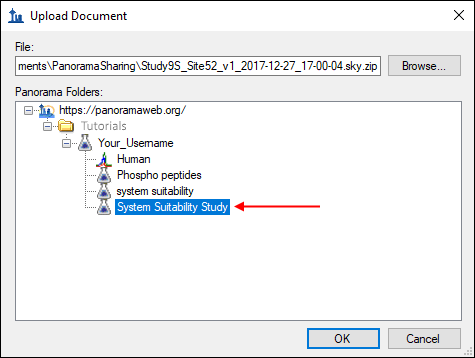
- In the Panorama Folders field, navigate to and select the "System Suitability Study" folder that you just created on Panorama.
- Click the OK button.
Wait for the document import to complete. When asked whether you want to view the file in Panorama, click
No.
Follow the same steps to upload the other two Skyline files in the tutorial data – "Study9S_Site56_v1.sky" and "Study9S_Site65_v1.sky" to your "System Suitability Study" folder on PanoramaWeb.
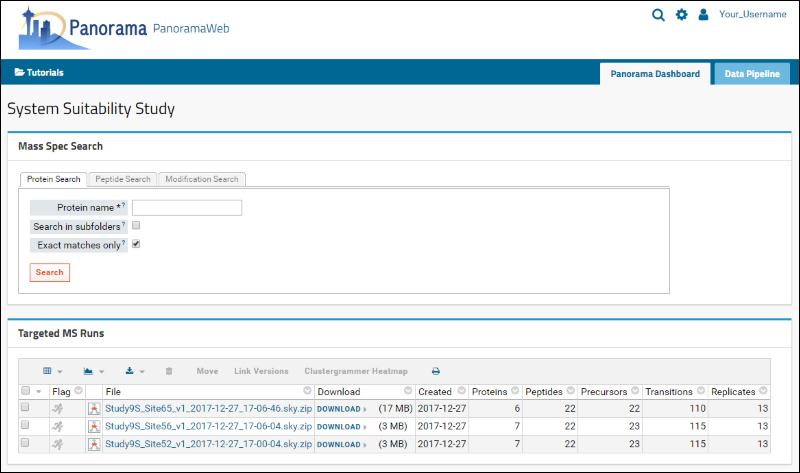
Once all three documents have been imported into Panorama, go back to the web-browser where the home page of the "System Suitability Study" folder should still be open. Refresh the page (F5 in most browsers) and you will see the three files that you just uploaded in the Targeted MS Runs table.
Customizing Grid Views in Panorama
Click on "Study9S_Site56_v1.sky.zip" in the
Targeted MS Runs table to open the details page for the document. The
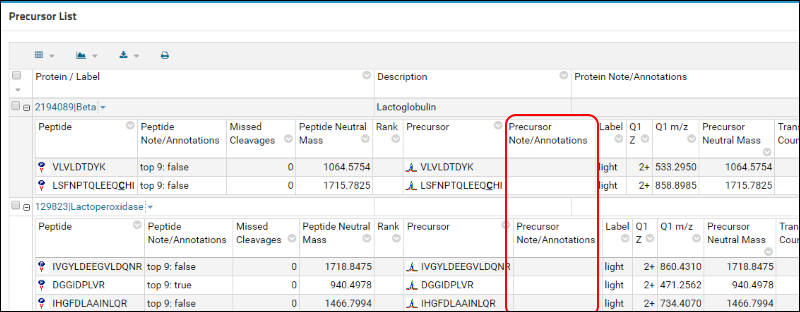
Precursor List table on this page displays a list of precursors in this Skyline document. The
Precursor Note/Annotations column in the table, highlighted in the image below, is blank since the researchers did not define any custom precursor annotations in this document.
Do the following to hide this column from the default grid view:
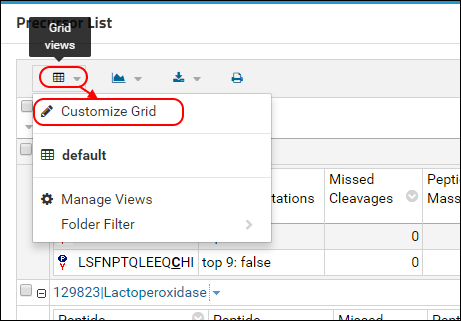
- Click the (Grid Views) button at the top of the table, just under the Precursor List title.
- Select Customize Grid from the drop-down menu.
In the customization form that appears, you will see a
Selected Fields panel, to the right, that lists the columns that are currently displayed.
- Scroll down, then hover over Precursor Note/Annotations below Precursor in the Selected Fields panel and click the (remove) icon.
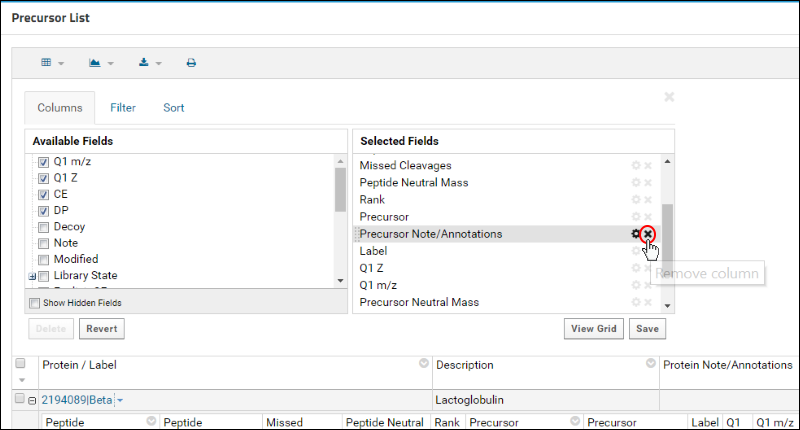
- Click the Save button.
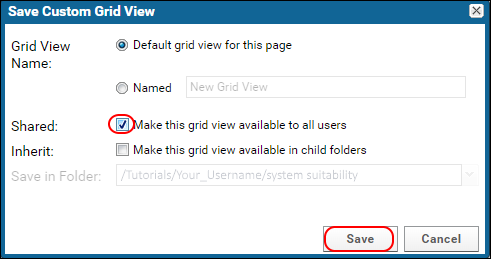
- In the Save Custom View form, check Make this grid view available to all users.
This will ensure all users with access to this folder see the same table columns.
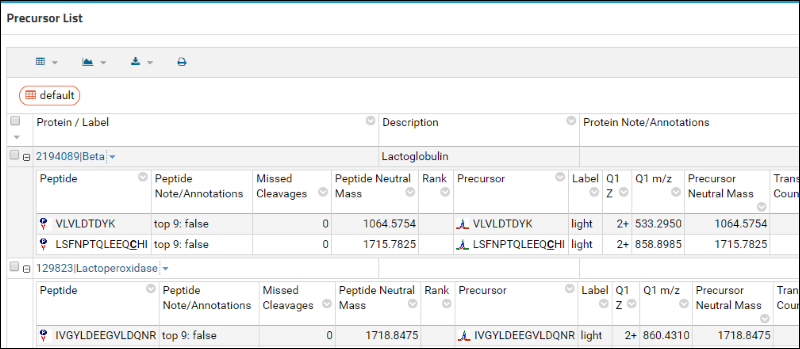
The Precursor Note/Annotations columns should no longer be displayed, as shown below:
Go back to the home page of the "System Suitability Study" folder by clicking on the
folder-name link near the top of the page as shown here:
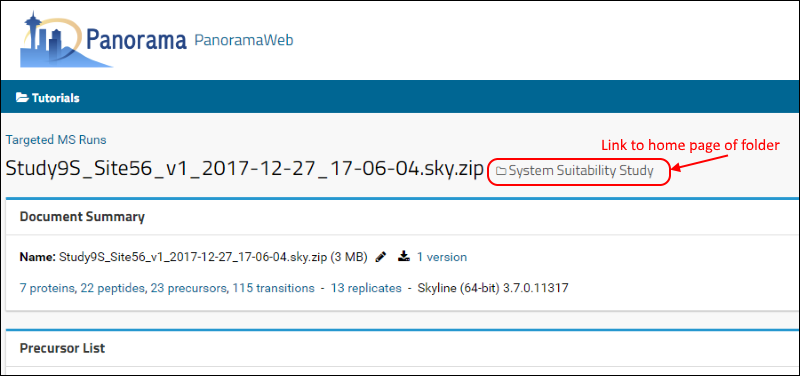
TIP: This folder name link is provided on all pages within the folder except the main home page and provides a quick way to navigate to the home page of that folder.
Click on "Study9S_Site52_v1.sky.zip" in the
Targeted MS Runs table. The default view for the
Precursor List table for this document should not have the
Precursor Note/Annotations column. Custom grid views defined once in a folder apply to all Skyline documents uploaded to the folder. The "default" grid we saved our changes to is shown by default.
Creating Wiki Pages on Panorama
Wiki pages allow you to add content, including file attachments, to your folders on Panorama. You will now create a wiki page to display a supplementary figure (Supplementary Figure 3A) from the original paper along with a figure caption. This figure displays normalized peak areas for the 9 best peptides identified in the study (
Abbatiello et al. 2013), across 10 replicates in each site. The original figure has a plot for each of the 15 sites in the study. "SupplFig_3A.png" in the tutorial files has plots for the 3 sites for which Skyline files are included in the tutorial.
Navigate back to the "System Suitability Study" folder home page. To add a wiki page in the folder, we first need to enter "Page Admin Mode" to add a new wiki web part to the folder page.
Do the following:
- In the header, click the (gear) icon to open the Admin menu. Select Page Admin Mode.

- From the <Select Web Part> drop-down menu that will appear at the bottom left of the folder home page, scroll down and select Wiki.
- Click the Add button.
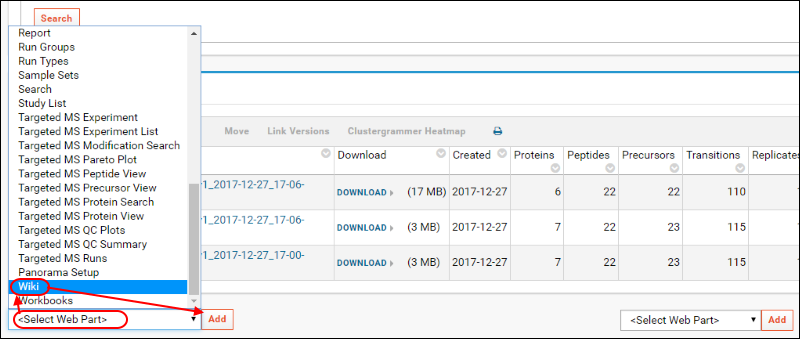
A box titled
Wiki will be added under the
Targeted MS Runs box that should look like this:

- Click the Create a new wiki page link to open the wiki editor.
- Enter "supplementary_figure_3A" in the Name field. The name must be unique in the folder and typically does not contain spaces.
- Enter "Supplementary Figure 3A" in the Title field. The title is the display title and has no restrictions on uniqueness or spaces for display.
- In the Body (HTML) field select the Visual tab if it is not already selected.
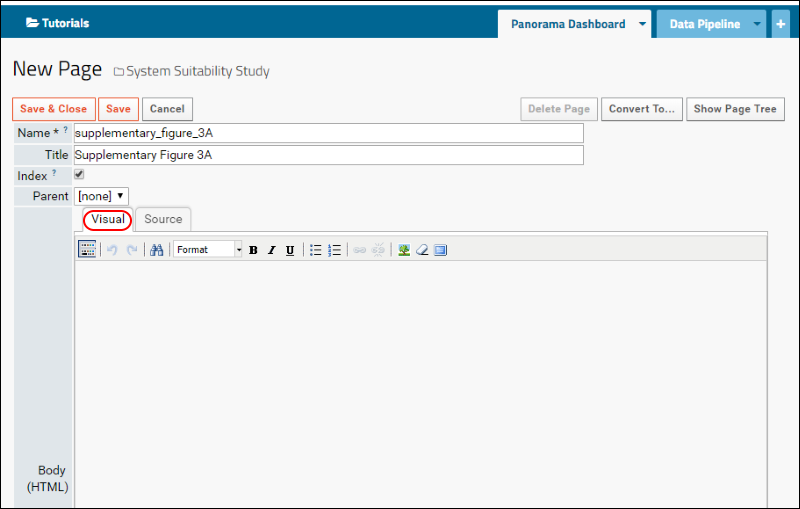
- In Notepad or another text editor open the file "SupplFig_3A_caption.txt" contained in the tutorial data you downloaded. Copy and paste the contents of this file into the Body (HTML) field.
- You can format the text using the options available in the formatting toolbar. - Remove any preformatting by selecting the text and choosing the format "Paragraph".
- Select the title of the figure caption ("Supplementary Figure 3A") and make it bold by clicking the B button in the toolbar. You can see more formatting options in the toolbar by clicking the Show/hide toolbars button at the left corner of the toolbar.

- Upload an image file to display on the wiki page:
- Scroll down, if you need to, to the Files field at the bottom of the wiki editor.
- Uncheck the Show Attached Files checkbox.
- Click the Attach a file link and click the Choose File button that appears.
- Navigate to the folder where you downloaded the tutorial data and select "SupplFig_3A.png".
- Click on the Open button.
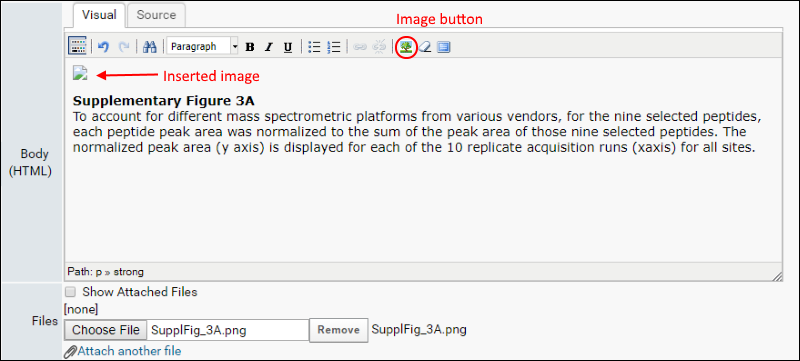
- Add the image to the wiki page:
- Place the mouse cursor just before the figure title in the Body(HTML) field.
- Click the Insert/edit image icon
 in the toolbar.
- Enter "SupplFig_3A.png" in the Image URL field of the Insert/edit image dialog.
- Click Insert in the dialog.
- Press the "Enter" key on your keyboard once so that the image title is below the image icon in the Body(HTML) field. At this time the actual image will not appear in the editor.
The Body (HTML) field should look like this:
- Click the Save & Close button at the top left of the wiki editor.
You will be taken back to the "System Suitability Study" folder home page. You should see the wiki page that you just created at the bottom of the page. It should look like this:

A note about "Web Parts" in LabKey Server:
The wiki page that you just created appears on the folder home page in a box with a border and a title that is referred to as a "web part". Web parts are user interface panels that can be added or removed from folder pages by folder administrators when they are in
page admin mode. Each web part provides a way for users to view and/or interact with some part of the data contained in the folder. For example, the Wiki web part displays the contents of a specific wiki page. The list of available web parts can be accessed from the two <Select Web Part> menus at the bottom of the folder home page – one on the left side and the other on the right side. The two menus have different sets of available web parts. Web parts selected from the menu on the bottom left of the page are wider and get added to the left side of the page, and those selected from the menu on the bottom right get added to a narrower column on the right side of the page.
The title bar of a web part has controls (available to folder administrators in page admin mode) for moving it up and down the page, relative to other web parts. These controls appear in the right side of the title bar for the wider web parts, shown in the image below.
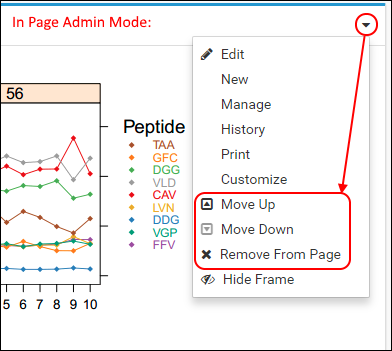
The term "web part" will be used in the remainder of the tutorial to refer to these user interface elements.
You will now add a table of contents for easy navigation to the wiki pages.
- Scroll down to the bottom of the page.
- Choose Wiki Table of Contents from the <Select Web Part> drop-down menu at the bottom right of the page.
- Click the Add button.
This will add a narrower web part titled Pages to the right side of the folder home page as shown below. Links to all the wiki pages that you add in this folder will appear in this web part.

- Change the title of the web part by clicking the (triangle) drop-down icon in the title bar and selecting Customize. If you are still in page admin mode, you will see additional options on this menu.
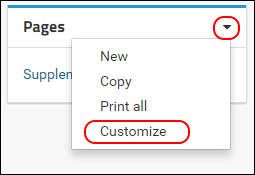
- Enter "Figures & Tables" as the title (leave the folder path as is) and click the Submit button. The table of contents web part on the home page should now display the updated title. This webpart will allow you to easily navigate to all the wiki pages in this folder as you add additional figures and tables in new wikis.
You will now create another wiki page where you will add a supplementary Excel table containing the retention time drift information. This table has been taken from the original paper and data filtered to the three sites for which Skyline files are included in this tutorial.
- Add a new wiki page by clicking the drop-down icon in the title bar (which should now read Figures & Tables) of the Wiki Table of Contents web part.
- Select New from the menu.
Do the following in the wiki editor:
- Enter "supplementary_table_6" in the Name field.
- Enter "Supplementary Table 6" in the Title field.
- In the Body (HTML) field select the Visual tab if it is not already selected.
- In Notepad or another text editor open the file "SupplTable_6_caption.txt" contained in the tutorial data. Copy and paste the contents of this file in the Body (HTML) field.
- Remove any preformatting by selecting the text and choosing the format "Paragraph".
- Format the text using options available in the formatting toolbar. For example, you can make the title ("Supplementary Table 6") bold.
- In the Files field at the bottom of the wiki editor click the Attach a file link and click the Choose File button.
- Navigate to the folder where you downloaded the tutorial data and select "SupplTable_6.xlsx".
- Click the Open button if double clicking does not attach the file and close the popup.
- Notice that we are leaving the Show Attached Files checkbox checked this time.
- Click Save & Close at the top of the wiki editor.
The new wiki page should look like this:

Viewers can click on the attached file to download it.
Notice that we did not create a new wiki
web part for this wiki, so you are viewing the wiki page itself. By default, a search box and a Wiki Table of Contents web part with the title
Pages is shown. This web part should display the titles of the two wiki pages you have in the folder. You can click on a title to view either wiki page.
Go back to the home page of the folder by clicking the
System Suitability Study link near the top of the page. Notice on the home page that the
Figures & Tables is displayed in the table of contents web part here.
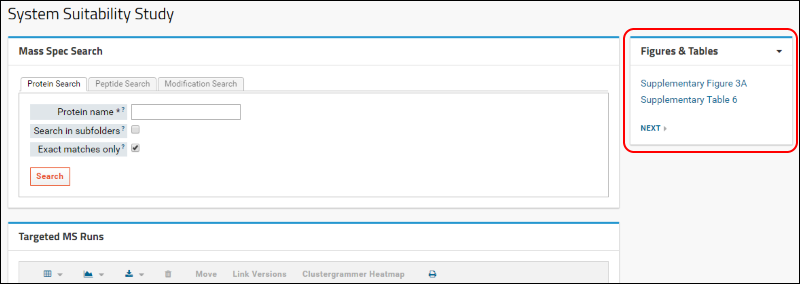
Since the wiki pages can now be accessed via the table of contents web part, you can remove the wiki web part that is displaying "Supplementary Figure 3A" from the folder home page.
- Scroll down, if you need to, so that the title bar of the wiki web part is visible.
- From the (triangle) menu, select Remove From Page.
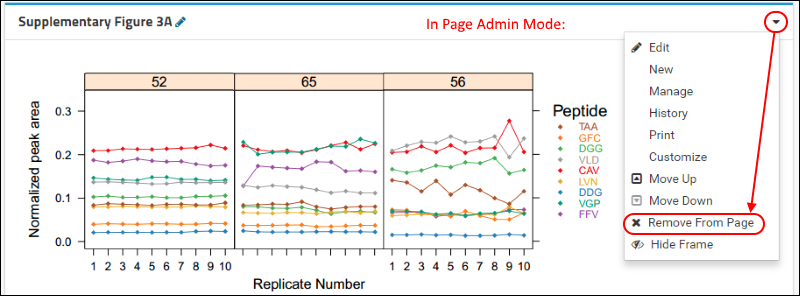
- If you do not see this option, first reenter page admin mode by selecting: Page Admin Mode in the header.
- Notice that the wiki itself is still available from the table of contents. Removing the web part did not remove the underlying content.
Submitting to Panorama Public
Folders containing supplementary data intended for publication to Panorama Public have to be annotated with a description of the experiment. This includes information such as an abstract, experiment and sample descriptions, organism, MS instruments used etc. To add experiment annotations to the folder, do the following:
- Go back to the home page of the System Suitability Study folder, if you are not already there.
- Re-enter > Page Admin Mode if you are not already in this mode.
- Select Targeted MS Experiment from the <Select Web Part> menu at bottom-left of the page.
- Click the Add button.
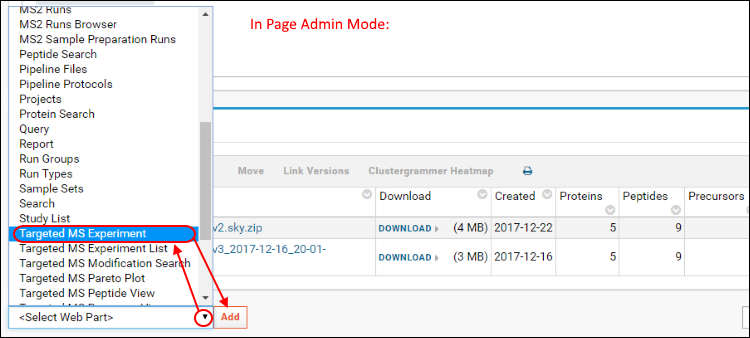
This action will add a web part titled
Targeted MS Experiment at the bottom of the page that looks like this:

- While in page admin mode, you can change the layout of the folder home page to move the Targeted MS Experiment webpart to the top of the page.
- Move the Targeted MS Experiment web part above the Targeted MS Runs web part by selecting Move Up from the (triangle) menu in the web part title bar.
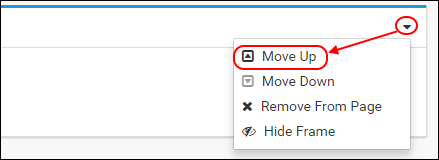
- Scroll to the top of the page and remove the Mass Spec Search web part by selecting > Remove From Page in its title bar.
- Click Exit Admin Mode at the top of the page to hide the page layout editing features.
Next, create the experiment:
- Click the Create New Experiment link in the Targeted MS Experiment web part.
- In the Targeted MS Experiment form enter "System Suitability Study" in the Title field.
- Enter "TSQ Vantage, 4000 QTRAP" in the Instrument field
- In Notepad or another text editor open the file "Abstract.txt" included in the tutorial data. Copy the contents of the file and paste in the Abstract field of the form.
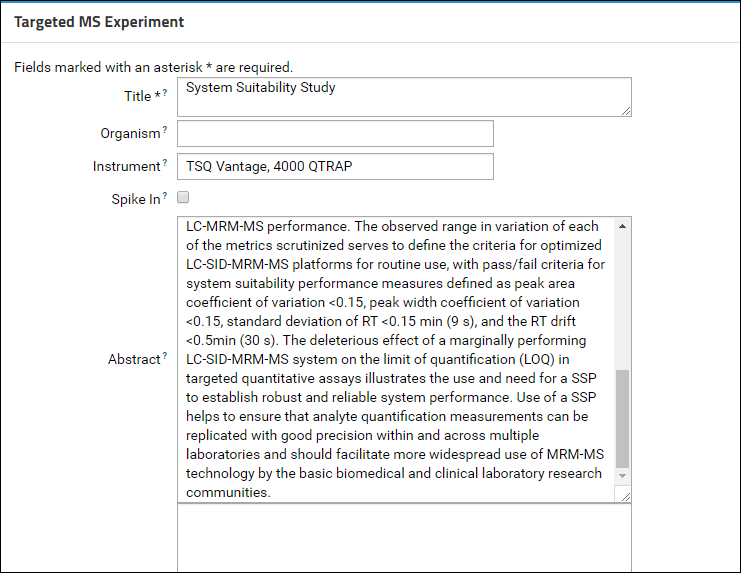
- Click the Submit button at the bottom of the form.

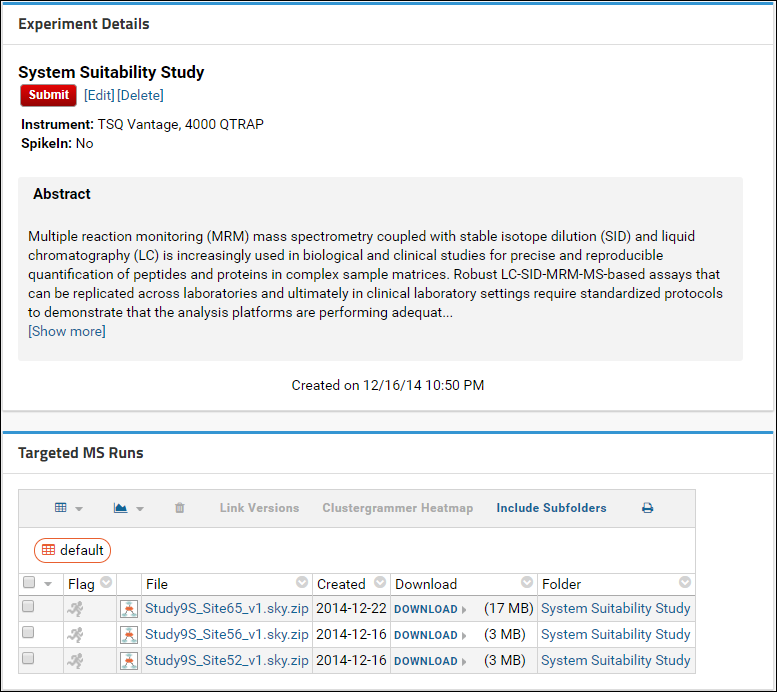
You will be taken to the experiment details page. All the Skyline documents you upload to this folder will get added to the experiment and will appear in the
Targeted MS Runs table. In this tutorial you have uploaded all the Skyline files to a single folder. If, however, your data is organized in subfolders, you will see a panel titled
Subfolders. You can click the
Include Subfolders button in this panel to include data from subfolders in your experiment prior to submitting to Panorama Public. You can find more details on
this documentation page.
Navigate back to the folder home page by clicking the
System Suitability Study link near the top of the page.

To submit to Panorama Public, click the red
Submit button in the
Targeted MS Experiment web part.
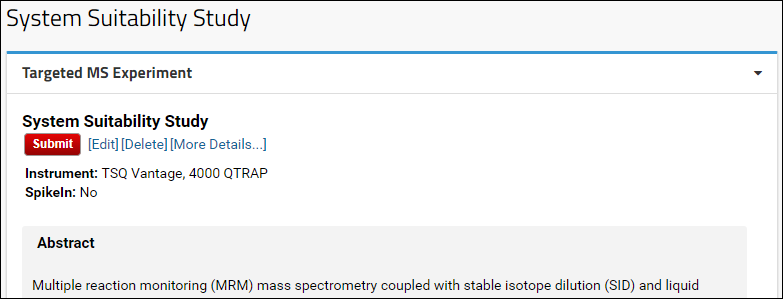
You will be presented with a form that looks similar to the image below:
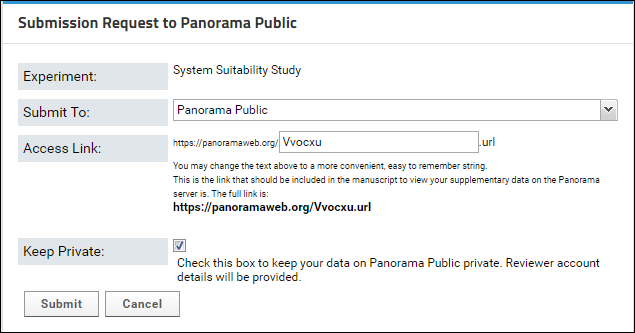
In the
Submission Request to Panorama Public form do the following:
- If you were working in a folder with real data for a manuscript, you would select "Panorama Public" from the drop-down list next to the Submit To option (it is the default, shown above). For this tutorial, select "Panorama Public Tutorial".
- Enter "publication _tutorial_<your_ folder_name>" in the Access Link field. Replace <your_ folder_name> with the name of your folder in the "Tutorials" project. For example, if you folder name is "Your_Username" enter "publication_tutorial_Your_Username" in the textbox. The URL displayed below the textbox will be updated as you type in the textbox. Once you have finished typing the URL should read (for folder "Your_Username")
https://panoramaweb.org/publication_tutorial_Your_Username.url
- Uncheck the Keep Private checkbox. If you were submitting data for a manuscript undergoing peer review you could keep the Keep Private box checked. This will ensure that when the data is copied to Panorama Public, it will be kept private with read-only access to the submitter. Another read-only reviewer account will be created for the data, and account details provided to the submitter. These account details can be conveyed to the journal where the manuscript is submitted.

The
Access Link provided in the UI in bold is the link that you will include in your manuscript to link to supplementary data on Panorama Public that can be viewed in a web browser. Initially, this link points to your folder on PanoramaWeb. But once a copy of your data has been made to Panorama Public, it will link to the location of the copied data on Panorama Public. This will be the permanent location of your supplementary data on Panorama Public.
The
Submission Request to Panorama Public form allows you to "build" this access link. The initial part of the link remains constant: https://panoramaweb.org/. You can choose a string to complete the link (highlighted in yellow below).
https://panoramaweb.org/
choose_a_string.url
The initial value entered in the
Access Link field is a randomly generated alphanumeric string. You can replace it with a convenient, easy to remember string. This string has to be unique across all the experiments submitted to Panorama Public. You may get an error if the link you entered is already in use for another experiment on Panorama Public. If this happens change the text and try again.
NOTE: Panorama Public is a now a member repository of the
ProteomeXchange consortium. Data submitted to Panorama Public that fulfills ProteomeXchange submission requirements will be assigned a ProteomeXchange ID and announced on
ProteomeCentral. When you click the
Submit button in the form your data will be checked for completeness for a ProteomeXchange submission. If there is missing information, such as missing raw data or missing metadata, it will be listed on a page after you click the Submit button. You can click the submit button again after you have provided all the missing information. Alternatively, if you do not want a ProteomeXchange ID for your submission you can proceed to the submission form by clicking the Continue without ProteomeXchange ID link. For more details refer to this documentation page:
Submit Data to Panorama Public
When the form is submitted successfully you will be taken to the experiment details page.
In the
Experiment Details box, you will see a red "Copy Pending!" message, circled below. This message will disappear once your data has been copied to Panorama Public. Any changes that you make in the folder, such as adding/removing Skyline documents or wiki pages, or changing the layout of the page will also get copied when a copy is made to Panorama Public. At the bottom of the page, in the
Submission table, you will see the
Access Link that you created for this experiment. The
Copied column, circled below will be blank until a copy has been made successfully.
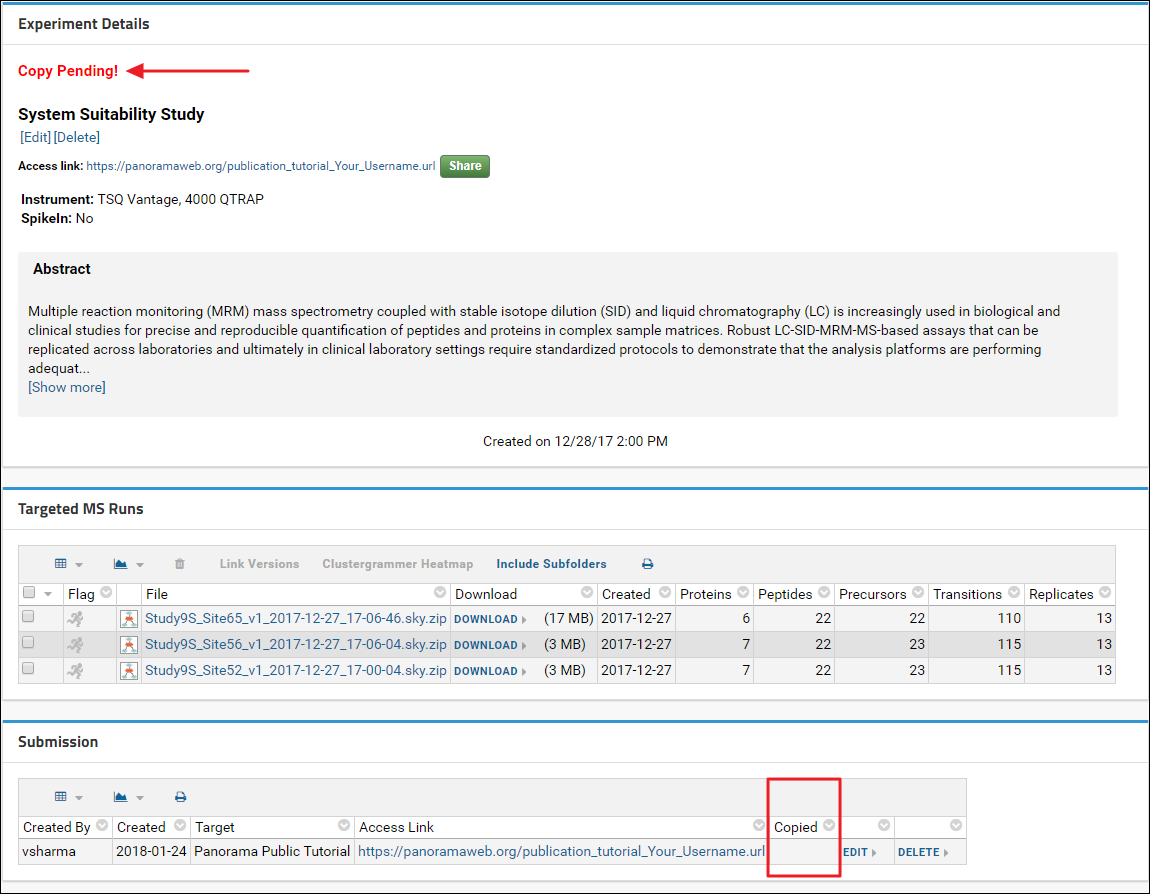
Once the data has been copied this column will display the date when the data was copied. You will also receive an email informing you that the data was successfully copied to Panorama Public. At that point if you click on the value in the
Access Link column you will be taken to the folder where your data was copied on Panorama Public and you can verify that the data, folder layout, and views were copied accurately.
Requests to copy data are handled by Panorama Public administrators within a week of submission. Once your data has been successfully copied to Panorama Public you will receive a confirmation email. If you requested that your data on Panorama Public be kept private (e.g. for a manuscript under peer review), the confirmation email will also include reviewer account details. You can pass on the account details to the journal where you are submitting your manuscript.
Reference List
1. Abbatiello, S. E., Mani, D. R., Schilling, B., MacLean, B., Zimmerman, L. J., Feng, X., … Carr, S. A. (2013). Design, Implementation and Multisite Evaluation of a System Suitability Protocol for the Quantitative Assessment of Instrument Performance in Liquid Chromatography-Multiple Reaction Monitoring-MS (LC-MRM-MS). Molecular & Cellular Proteomics : MCP, 12(9), 2623–2639. doi:10.1074/mcp.M112.027078
 If you have not yet set up a Panorama server in Skyline, you will see the following message.

 This action will add a web part titled Targeted MS Experiment at the bottom of the page that looks like this:
 Navigate back to the folder home page by clicking the System Suitability Study link near the top of the page.