Table of Contents |
guest 2024-12-26 |
Release Notes
Create a Folder in Panorama
Folder Navigation in Panorama
Adding Users to a Project
Import Data Into Panorama
Adding Links in Wiki Pages
Panorama Public
Submit Data to Panorama Public
Upload Raw Data
Upload Supplementary Files
Include Subfolders in a Panorama Public Submission
Data Validation for ProteomeXchange
Finding Unimod Matches
Download Data From Panorama Public
Quality control with AutoQC
Lindsay Pino's AutoQC Setup Tutorial
Upgrading to AutoQC Loader 24.1.0.x
AutoQC Loader Documentation
AutoQC Loader 1.1.0.20237 Documentation
Recovering configurations for a broken installation
Install Panorama
Documentation
- Create a Folder in Panorama
- Folder Navigation in Panorama
- Adding Users to a Project
- Import Data Into Panorama
- Upload Raw Data
- Upload Supplementary Files
- Include Subfolders in Panorama Public Submission
- Submit Data to Panorama Public
- Data Validation for ProteomeXchange
- Finding Unimod matches
- Adding Links in Wiki Pages
- Download Data From Panorama Public
- Quality Control with AutoQC
- Document Version Tracking
- Install Panorama
Release Notes
Version 24.11, released November 2024
View the LabKey Server 24.7 release notes.Version 24.7, released July 2024
- Improved axis scaling and display of upper and lower bounds defining outliers in QC plots.
- Performance improvements for some reporting of transition-level data.
Version 24.3, released March 2024
- Outlier thresholds can be customized per metric, making instrument tracking folders more relevant to specific needs. (docs)
- Improvements to Panorama dashboard and plot options. (docs)
- Support for peak shape scores, including kurtosis, skewness, and more.
- Improved Multi-Attribute Method reporting.
Version 23.11, released November 2023
- Panorama is compatible with the Skyline 23.1 file format beginning with version 23.7.3. (learn more)
LabKey Server General Enhancements
- The page for managing short URLs uses a standard grid, making it easier to use and faster to load. (docs)
- Administrators can improve security by selecting a new, stronger, entropy-based password rule. Site administrators of production deployments will now see a warning if they use the "Weak" password option, which will be removed entirely in the next major release. (docs)
- Individual fields in Lists, Datasets, Sample Types, and Data Classes, can be defined to require that every value in that column of that table must be unique. (docs)
Version 23.7, released July 2023
- Use a Calendar View to easily visualize performance and utilization of instruments over time. (docs) Also available in 23.3.6
- Improved outlier indicators make it easier to see the severity of an issue at a glance. (docs) Also available in 23.3.6
- Panorama will be compatible with the upcoming Skyline 23.1 file format beginning with version 23.7.3.
LabKey Server General Enhancements
- Permissions for an existing user can be updated to match those of another user account. (docs)
- Export a folder archive containing metadata-only by excluding all data. (docs)
- Administrators can configure the retention time for audit log events. (docs)
Version 23.3, released March 2023
- New Panorama MAM report for early-stage post-translational modification (PTM) with improved formatting and layout. (docs)
- New QC plots let you track the trailing mean and %CV of any QC folder metric over a specified number of runs. (docs) Also available in 22.11.6.
- An example of using a custom run-scoped metric has been added to the documentation and examples available on PanoramaWeb. Capture and track Peptide ID Count following these steps. (example)
LabKey Server General Enhancements
- Enhancements have been made to clarify the options of importing new data, updating existing data, and merging both update and new data in the same import. (docs)
- Administrators are now proactively warned about "unknown modules," modules that were previous installed but no longer exist in the current deployment. Administrators are encouraged to delete these modules and their schemas. (details)
Version 22.11, released November 2022
Panorama
- Protein groups (mapping a peptide to multiple possible proteins) will be represented in Panorama folders when a Skyline document. (docs) Also available in version 22.7.2.
- Performance and plotting improvements for QC folders with many samples. (docs)
- Support for z+1 and z+2 ions.
- Amino acid indices within protein sequences are based at 1 (instead of 0) for consistency with Skyline. (docs) Also available in version 22.7.2.
LabKey Server General Enhancements
- New role available: Editor without Delete. Users with this role can read, insert, and update information but cannot delete it. (docs)
- Lists can use definitions that are shared across multiple containers, improving the ability to use them for cross-folder data consistency. (docs)
Version 22.7, released July 2022
Panorama
- Protein Sequence Coverage maps provide a heatmap style view of peptide intensity and confidence scores. (docs)
- Include annotations, guide sets, and customized view settings when you export or copy a Panorama QC folder. (docs)
- Consistency improvements in the interface for excluding/including precursors and viewing grids. (docs)
- Option to split precursor and transition series on chromatogram plots. (docs)
- Quick links make it easier to subscribe to per-folder outlier email notifications. (docs)
- Improved and streamlined QC Plot user interface. (docs) These changes are also available in version 22.3.4.
- When showing all series in a single plot, hovering over a point highlights the selected series.
- Points in plots are no longer shown as different shapes; all points are now circles, with excluded data shown as an open circle.
- Streamlined interface for QC plots, including removal of the small/large option, adjusted spacing for better display, and rearrangement of the plot checkboxes and options.
- Always include full +/- 3 standard deviation range in QC plots.
- Support for crosslinked peptides, including improvements in multi-attribute method reporting about how and where peptides are linked. (docs) Also available in version 22.3.6.
LabKey Server General Enhancements
- Use wiki aliases to redirect legacy links when page names change. (docs)
- New options to clear all objects and reset default selections on the export folder/study objects page make it easier to select the desired content of a folder or study archive. (docs)
Version 22.3, released March 2022
Panorama
- Configure which peptide and small molecule precursors are tracked for system suitability, so that you can focus on the most relevant ones. (docs)
- Set the default view for QC plots for providing customized and consistent views to users. (docs)
- Improvements to Reproducibility Report: Select either light/heavy ratio or peak areas. (docs)
- Performance of AutoQC plots has been improved.
Distribution Changes
- Panorama is available for on-premise installation only with Premium Editions of LabKey Server through the Panorama Partners Program.
- PanoramaWeb remains a public Panorama server hosted at the University of Washington where laboratories and organizations can own free projects. It is not impacted by the above distribution change. Sign up here.
Upcoming Distribution Changes
- Beginning with LabKey Server version 22.4 (April 2022), support for Java 16 will be removed. Before upgrading, Java will need to be upgraded to a supported version of JDK 17.
- Beginning with version 22.4 (April 2022), support for Microsoft SQL Server 2012 as the primary database for LabKey Server will be removed. Before upgrading, your database will need to be upgraded to a supported version of Microsoft SQL Server.
Version 21.11, released November 2021
Panorama
- When viewing a protein or molecule list, multiple peptides and molecules chromatograms are plotted together. (docs)
- Monitor iRT metrics (slope, intercept, and r-squared correlation) to track system suitability. (docs)
- Integrate Panorama with LabKey Sample Manager (docs)
Operations/Development
- Release 21.11 of LabKey Server no longer supports Java version 14 or 15. We recommend upgrading to Java 17 for long term support. (docs)
- Running under JDK 16 or 17 still requires use of special JVM flags. (docs)
- Support for PostgreSQL 9.6 has been removed. Before upgrading, PostgreSQL must be upgraded to a supported version.
Upcoming Distribution Changes
- Beginning with version 22.3 (March 2022), Panorama will be available only with Premium Editions of LabKey Server through the Panorama Partners Program. It will no longer be included in the Community Edition.
- Please contact LabKey if you are interested in joining the Panorama Partners.
- Users with projects on PanoramaWeb will not be impacted by this change.
Version 21.7, released July 2021
Panorama
- Reproducibility Report - Now integrated into chromatogram libraries, assess inter- and intra-day variation based on raw, normalized, or calibrated values, along with calibration curve and figures of merit data. (docs)
- Improved navigation and summarization for calibration curve and figure of merit reporting. (docs) | (docs)
- Pressure Traces - In QC folders, use pressure traces as sources for metrics to monitor for system suitability and identify column and other problems. (docs)
Operations/Development
- Support for PostgreSQL 9.5.x has been removed. Before upgrading, PostgreSQL must be upgraded to a supported version.
- Support for Apache Tomcat 8.5.x has been deprecated and will be removed in 21.8.0. Please upgrade to Tomcat 9.0.x ASAP. (docs)
- The build has been updated to use Gradle 7, which now allows building LabKey from source with JDK 16. Running under JDK 16 still requires use of a couple special JVM flags. (docs)
Version 21.3, released March 2021
Panorama
- Link from Experiment data to QC folder - Panorama automatically links data in Experiment folders to the QC folder(s) that contain data from the same instrument, making it quick to see how the instrument was performing at the time of acquisition. (docs)
- Instrument summary on replicate page - Easily see which instruments acquired the data in a Skyline document. (docs)
- Always include guide set data in QC plots - When zooming in to view QC data for a specific date range, juxtapose the guide set data that's being used to identify outliers. (docs)
- MxN reproducibility reports - New reporting summarizes intra- and inter-day variability for peptides within a protein to assess its reproducibility. (docs)
- PDF and PNG plot exports - Many Panorama reports are now rendered as vector-based plots in the web browser for better clarity and offer PDF and PNG export formats. (docs | docs)
- Reduced memory usage during import - Importing large Skyline documents uses 80% or less memory, offering much better performance and scaling. (docs)
- Enhanced chromatogram library exports - Chromatogram libraries (.clib files) now include additional optimization and ion mobility information. (docs)
Operations/Development
- Java 13 No Longer Supported - LabKey has removed support for JDK 13. Before upgrading LabKey Server, Java must be upgraded to a supported version.
- Upgrade all LabKey Dependencies - We strongly recommend that, as part of your LabKey Server upgrade, you also upgrade all major LabKey dependencies to the latest point releases: AdoptOpenJDK 15 64-bit (x64) with HotSpot JVM, Tomcat 9.0.x, and PostgreSQL 13.x.
- Upgrade Instructions - Follow the steps in this topic to upgrade to the latest release of LabKey Server: Upgrade Instructions
- Support for running under the upcoming JDK 16 release is available with use of a special flag. You cannot yet build LabKey from source with JDK 16. Learn more here: docs
- Microsoft SQL Server (and all other non-PostgreSQL database connections) are supported only in Premium Edition distributions. The BigIron module, which provides support for Microsoft SQL Server, Oracle, MySQL, and SAS/SHARE, has moved to Premium Edition distributions.
Version 20.11, released November 2020
Panorama
- Refinements to Multi-attribution Methods Reports - Peptide reporting shows more information of interest. (docs)
- Small Molecule Chromatogram Libraries - Curate and export chromatogram libraries for small molecules in addition to proteomics data. (docs)
- Performance improvements for QC metric reporting.
- Higher resolution plots - Chromatograms and sample comparison plots leverage higher resolution displays when available. (Introduced in 20.11.1)
Operations/Development
- Completed migration of LabKey source code and history to GitHub. A read-only copy of the trunk code will remain available in subversion to assist in migration, but all new development will be on GitHub. (docs)
- The developer links menu has been reorganized to better support developer needs. (docs)
- Upgrade to the Log4j 2 API with release 20.11. A backwards-compatibility JAR will be available if you are not able to upgrade immediately. (docs)
- Updates to module.properties file handling
- Deprecated properties removed: SvnUrl, SvnRevision, Version, LabKeyVersion, and ConsolidateScripts are no longer supported. See https://www.labkey.org/Premium/announcements-thread.view?rowId=20896 and https://github.com/LabKey/platform/pull/1568 for migration tips.
- Deprecated properties: We have deprecated the use of the ModuleDependencies property in favor of declaring the dependency within a module's build.gradle file. Support for ModuleDependencies will be completely removed for the 21.3 (March 2021) release. (docs)
- Security Update: API calls like selectRows and executeSql and UI-based requests that render data grids will now return a 400 error response if the parameters have invalid values. For example, if the maxRows parameter has a non-numeric value. In the past these bogus values were ignored, and the server used the parameter's default.
Version 20.7, released July 2020
Panorama
- Panorama QC Performance - Performance improvements when reporting on QC folders with high data volume. (docs)
- Skyline Audit Log - Improvements to import and display of Skyline document's audit log. (docs)
- Crosslinked-Peptides - Support for Skyline's new handling of cross-linked peptides.
- Multi Attribute Method (MAM) Folder Type - Panorama includes a new folder type intended for groups doing MAM analysis, making key reports easily available.
Operations
- Changes to How JDBC Jars are Distributed - The JDBC jars (jtds.jar, postgresql.jar, mysql.jar) are now versioned and distributed inside the module directories like any other third-party jar, making it unnecessary to copy them to the CATALINA_HOME/lib directory during installation and upgrade. When you upgrade to 20.7, delete these JDBC jar files from CATALINA_HOME/lib to avoid conflicts.
- Changes to Source Directory Structure - When building from source, the /optionalModules and /externalModules directories are no longer used. Move all contents from these directories into /server/modules. Note that this change only applies to developers building the server from source; for production servers /externalModules can still be used for deploying modules.
- Changes to How Proteomics Binaries are Distributed - The proteomics binaries are now downloaded automatically without further action. This download can be skipped if desired.
- Java, Tomcat, and PostgreSQL Versions - LabKey has removed support for JDK 12.x, Tomcat 7.0.x, and PostgreSQL 9.4.x. Before upgrading LabKey Server, we strongly recommend you also upgrade all major LabKey dependencies to their latest point releases. (docs)
- Upgrade Instructions - Follow the steps in this topic to upgrade to the latest release of LabKey Server: Upgrade LabKey Server
Version 20.3, released March 2020
- Month-based Version Names - A new month-based naming pattern has been adopted for LabKey Server. This March 2020 release is named 20.3; the next production release in July 2020 will be 20.7.
Panorama
- Skyline Document Version Updates - Updates to Panorama to ensure full compatibility with changes to Skyline's file format.
- Sample File Scoped Chromatograms - Display and provide API access to chromatogram-style data contained within Skyline documents. (docs)
- Multi Attribute Method (MAM) reporting - To support MAM analysis, Panorama now includes a post-translational modification (PTM) report that shows the percent of peptides that included tracked PTMs across samples, as well as a Peptide ID report that shows the identified peptides with their retention times, and expected and observed masses.
Operations
- Important Security Update - LabKey Server 20.3 includes an important security update, which has been back-ported to version 19.3.7. We strongly recommend that you upgrade your servers to at least 19.3.7 to pick up this security update.
- AdoptOpenJDK 13 - Starting with LabKey Server 20.3.0, we recommended AdoptOpenJDK 13 for new installations and upgrades. (docs)
- Upgrade all LabKey Dependencies - We strongly recommend that, as part of your LabKey Server upgrade, you also upgrade all major LabKey dependencies to their latest point releases, these include: Java, Tomcat, and your database server. (docs)
Version 19.3, released November 2019
Panorama
- Panorama Premium: Auto-enabling Metrics - Metrics are shown when relevant data is detected; these metrics are hidden when relevant data is not detected. (docs)
- Skyline List Support - Lists defined in Skyline are imported and available in Panorama folders. (docs)
- Isotopologue Metrics - Plot isotopologue metrics including LOD and LOQ when data is available from Skyline. (docs)
- Total Ion Chromatogram Metric - In QC folders, track the total ion chromatogram area as a metric, scoped to the entire run. (docs)
- Skyline Audit Log - Import the Skyline audit log into Panorama. (docs)
Version 19.2, released July 2019
Panorama
- Zip files during upload - .raw and .d directories or raw data files (from Agilent, Waters, and Bruker instruments) are automatically zipped before upload to a Panorama files repository. (docs)
- Premium Features for Panorama Partners: New features available exclusively to members of the Panorama Partners Program and on PanoramaWeb.org:
Operations
- MS1 Module Removed - The MS1 module has reached end of life and due to lack of usage, has been removed.
- Internet Explorer - End of Support - LabKey no longer supports Internet Explorer. For details, see supported browsers.
- Upgrade to Java 12 - Oracle has ended public support for Java 11, and as a result, LabKey has completely removed support for Java 11 in the 19.2.0 release. For details, see supported Java versions.
- Upgrade Tomcat Version - If you are using Tomcat 7 or 8, be sure to update to the latest point release. LabKey Server version 19.2.0 will be incompatible with Tomcat releases prior to 7.0.76 or 8.5.12. If you are using an incompatible version, you may see JSP compilation errors. Tomcat 9 releases (beginning with 9.0.0) are compatible and will not see these errors. For details, see supported Tomcat versions.
Development
- Source Code Migration to GitHub - Core LabKey Server modules have been migrated from SVN to GitHub, as well as the central automated test code and all of the modules from server/customModules. (docs | docs)
- Performance improvements by caching virtual schema metadata - Database schema metadata has always been cached, but beginning with release 19.2.x, table and column metadata for user schemas (i.e., virtual schemas) is also cached per request. This improves performance when processing complex queries.
Version 19.1, released March 2019
Panorama
- Improved Replicate Views - The replicate view of a Skyline document now highlights the annotations present in that single file, as well as showing more information about the samples being used.
- QC Folder Optimizations - Page load times for QC folders with substantial amounts of data should be improved.
- Import Optimizations - The time required to import a Skyline document has been reduced, by 50% or more in many cases.
Security
- See User and Group Details Role - Allow non-administrators to see email addresses and contact information of other users as well as information about security groups. (docs)
- Enforce CSRF Checking - All POST requests must include a CSRF token. This is no longer a configurable option. (docs)
Sample Management
- Sample Set Updates - The sample set creation and import pages have been streamlined and standardized. Performance has been improved when importing large sample sets, as well as for query and update operations. (docs).
Administration
- Configure Allowable External Redirects - Create a whitelist of allowable redirects to external sites. (docs)
Operations
- Upgrade to Java 12 - We strongly recommend upgrading your server installations to Oracle OpenJDK 12 as soon as possible. 19.1.x installations will continue to run on Java 11, but site administrators will see a warning banner. Oracle has ended public support for Java 11; as a result, LabKey will completely remove support for Java 11 in the 19.2.0 release. For details see Supported Technologies.
- Remove Support for Java 8 - Oracle ended public support for Java 8 in January 2019; as a result, LabKey Server no longer supports Java 8. For details, see Supported Technologies.
Potential Backwards Compatibility Issues
- Remote API Date Format Change - The date format in JSON responses has been changed to include milliseconds: "yyyy-MM-dd HH:mm:ss.SSS". In previous releases the following format was used: "yyyy/MM/dd HH:mm:ss".
- Removal of Legacy JFree Chart Views - Existing charts of these older types are rendered as JavaScript charts. No action is needed to migrate them. (docs)
- Legacy MS2 Views - Options in the Grouping and Comparison views previously marked as "legacy" have been removed.
- User and Group Details Access Change - Access to contact information fields in the core.Users and core.SiteUsers queries, the core.Groups query, and the getGroupPerms API now require the Administrator or "See User and Group Details" role.
- External Redirects Change - External redirects are now restricted to the host names configured using the new Configure Allowable External Redirects administration feature. The 18.3.x experimental feature that unconditionally allowed external redirects has been removed.
- POST Method Required for Many APIs - Many LabKey APIs and actions have been migrated to require the POST method, which has security benefits over GET. The LabKey client APIs have been adjusted to call these server APIs using POST, but code that invokes LabKey actions directly using HTTP may need to switch to POST.
Upcoming Changes
- End of Support for IE 11 - Support for IE 11 will end in the upcoming LabKey Server 19.2.0 release, scheduled for July 2019. Please contact us for workaround options if this change strongly impacts you. (docs)
Version 18.3, released November 2018
Panorama
- Normalized Y-axes in QC Plots - Support for normalizing Levey-Jennings and Moving Range plots using percent of mean or standard deviation as the zero point on the Y-axis. (docs)
- Improved Figures of Merit performance - Rendering performance for the Figures of Merit report has been improved. (docs)
- Read Chromatograms Directly from SKYD files - An experimental feature allows you to read chromatograms directly from SKYD files instead of storing them in the database. (docs)
Administration
- Subfolder Web Part - This web part shows the subfolders of the current location; included in new collaboration folders by default. Also available in the 18.2 release. (docs)
- Connect to Existing Amazon S3 Directories - Connect to an existing S3 directory or create a new one for each LabKey folder. (docs)
- Improved Navigation Menu - The project menu and any custom menus you define have a more consistent interface, and each contain graphical elements signaling that they are interactive elements. You can also access the project menu from the admin console. (docs)
Reporting and Visualization
- Scatter and Line Plot Enhancements - Specify multiple Y axes. Show all data on a single plot or display separate plots per measure. (docs | docs)
Development and APIs
- NaN and Infinity Values - LabKey SQL supports constants NaN, INF, and -INF. (docs)
Potential Backwards Compatibility Issues
- Changes to CSRF Setting - At 18.3 upgrade time, the CSRF checking setting on all servers will be set to "All POST requests". Site administrators will have the ability to revert back to "Admin requests" for deployments that still need to make their external modules or custom pages compatible with this setting. For release 19.1, we plan to remove the setting entirely and check CSRF tokens on every POST (except for specially annotated actions). When servers are protecting against CSRF attacks, they will require the following minimum versions: Skyline - 4.2; Skyline-daily - 4.1.1.18151; AutoQC Loader - 1.1.0.18302 (docs)
Operations
- Support for Java 11 - We recommend upgrading your server installation to Java 11. Oracle is expected to end public support for Java 8 in January 2019, and, as a result, LabKey Server will no longer support Java 8 for the 19.1 release. For details see Supported Technologies.
- Support for PostgreSQL 11 - PostgreSQL 11.1 and above is supported (not the initial PostgreSQL 11.0 release). For details, see Supported Technologies.
- Remove support for PostgreSQL 9.3 - PostgreSQL 9.3 reached end-of-life in November 2018. We recommend upgrading your PostgreSQL installation to version 10 or later. For details, see Supported Technologies.
Version 18.2, released July 2018
Panorama
- Improved Pharmacokinetic Report - Pharmacokinetic (PK) calculations are provided per subgroup, replicate annotations are included, and non-IV routes of administration are supported. (docs)
- LOD/LOQ Skyline Compatibility - Limit of Detection (LOD) is now shown in Panorama, and there is support for additional Limit of Quantitation (LOQ) configuration as defined in Skyline. (docs)
System Integration
- Spotfire Integration - Use data stored in LabKey Server to create Spotfire visualizations. (docs)
LabKey SQL
- Common Table Expressions - Use a SQL "WITH" clause to simplify complex queries and create recursive queries. (docs)
Development
Potential Backward Compatibility Issues
- Changes to CSRF Default Setting In 18.2, we have switched the default CSRF checking setting (affecting only new servers) to "All POST requests". We recommend that all clients run their servers with the "All POST requests" setting, ideally on production servers but at a minimum on their tests/staging servers. In the upcoming 18.3 release, we plan to force the setting (on all existing servers at upgrade time) to "All POST requests". We will retain the ability to revert back to "Admin requests" for deployments that still need to make their external modules or custom pages compatible with this setting. For release 19.1, we plan to remove the setting entirely and check CSRF tokens on every POST (except for specially annotated actions).
Operations
- Tomcat 8.0.x is no longer supported - If you are using Tomcat 8.0.x, you should upgrade to 8.5.x at your earliest convenience. No configuration changes in LabKey Server are necessary as part of this upgrade. For details see Supported Technologies.
- Connection Pool Size - We recommend reviewing the connection pool size settings on your production servers. For details, see Troubleshooting.
Version 18.1, released March 2018
Panorama
- Pharmacokinetic Calculations - See the stability, longevity, and uptake of compounds of interest. (docs)
- Figures of Merit for Quantitation Data - Summary statistics show the mean, standard deviation, and %CV for the replicates, along with lower limit of detection, quantitation, etc. (docs)
Collaboration
- Files Table - All files under @files, @pipeline, and @filesets in a container can be managed using a new exp.Files table. Developers can use exp.Files to programmatically control all files at once. (docs)
- Messages Default to Markdown - Markdown is a simple markup language for formatting pages from plain text, similar to LabKey's Wiki syntax. The Messages editor window includes a Markdown syntax key and message preview tab. (docs)
Security
- New Role: See Absolute File Paths - A new site-level role allows users to see absolute file paths in the File Repository. (docs)
- Impersonation Auditing - Audit records are created when a user starts or stops impersonating a role or group. docs)
- API Keys - Client code can access the server using API keys. Administrators can allow users to obtain new API keys and manage when keys expire. (docs)
- Captcha for Self Sign-up - Self-registration now includes a captcha step to prevent abuse by bots. (docs)
- Cross-Site Request Forgery (CSRF) Protection Changes - All LabKey pages have been tested and updated to protect against CSRF. We recommend that site admins change the default CSRF protection setting to "All POST requests" to enable this increased protection. This may cause issues with custom pages that are not configured to submit CSRF tokens when doing an HTTP POST. For details see the Potential Backwards Compatibility Issues section below.
Operations
- Support for Microsoft SQL Server 2017 on Windows and Linux - For details, see Supported Technologies.
- Support for Tomcat 9.0.x - For details, see Supported Technologies.
Potential Backwards Compatibility Issues
- New Cross-Site Request Forgery Protection (CSRF) Recommendation - We recommend that administrators begin the process of converting their servers from the current default CSRF protection setting of "Admin requests" to "All POST requests". The more stringent security setting may cause issues for custom pages that submit HTTP POST requests. If you have no custom pages or forms, we recommend that you immediately change the CSRF setting for all test, staging, and production servers running 18.1. If you have custom pages and forms, we recommend that you begin testing on your test and staging servers. In a future release, LabKey Server will enforce that all HTTP POSTs include the CSRF token, at which point all custom pages will be required to be do so. For details on configuring custom pages with CSRF protection, see here.
Create a Folder in Panorama
- Hover over your project name in the menu bar below the Panorama icon and click on the New Subfolder icon shown in the image below.

- Give the new folder a Name.
- Select the Panorama option under Folder Type. This is the folder type that should be selected for all workflows supported by Skyline (SRM-MS, MS1 filtering or MS2 based projects).

- On the Users / Permissions page, select one of the available options and click Next.
- You can also change permissions on a folder after it has been created.
- The next page, Configure Panorama Folder, asks you to choose the type of Targeted MS folder you would like to create. Panorama offers several choices here:
- Choose the Experimental data option for folders that serve as a repository of Skyline documents, useful for collaborating, sharing and searching across multiple experiments.
- Choose the Multi-attribute method (MAM) option for an Experimental data folder including additional reporting for multi-attribute method analyses.
- Choose Chromatogram library to store curated assays that can be used for designing and validating future experiments.
- Check Rank peptides within proteins by peak area if your data contains relative peptide expression for proteins.
- Choose the Quality control (QC) option for tracking performance of mass spec. instruments over time.

- Click Finish.
Changing the folder type
If you forget to select "Panorama" as the folder type option when creating a new folder, the folder will not be recognized by Skyline as a folder where it can upload Skyline documents. The folder will also not have the layout that you expect to see in a "Panorama" folder. For example, the Raw Data tab where you can upload raw files will not be available. You can change the folder type by following these steps:- Click the gear icon in the top right corner and select Folder and then Management
- In the Folder Management interface select the Folder Type tab as show in the image below
- Select Panorama as the folder type option and click the Update Folder button

See the LabKey documentation for more information:
Folder Navigation in Panorama
To navigate to your available projects and subfolders, hover over the folder icon or the current project name, located at the top left corner, just under the Panorama logo.
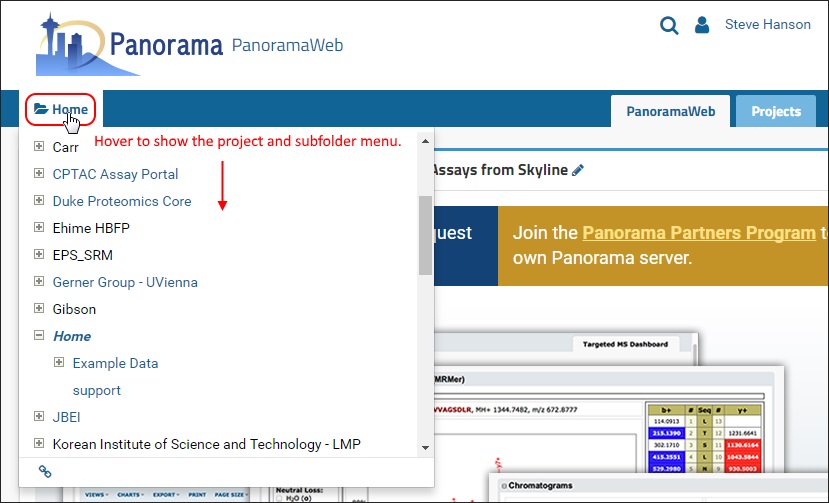
Project navigation: Hovering over the folder icon to the left displays all the projects that you have access to on PanoramaWeb. Clicking on the project name (e.g. “MacCoss”) will take you to the home page of the project.
Folder navigation: The menu provides a tree view with expandible/collapsable nodes for navigation to sub-folders. Clicking on a folder name navigates to the home page of the folder.
Also see: LabKey Documentation: Navigate Server
Adding Users to a Project
If you are the administrator of a project on panoramaweb.org, you can follow these steps to add users from your lab or organization to the project.
- Click on the Gear Icon , as shown in the image below.
- Click Folder and then click Permissions.
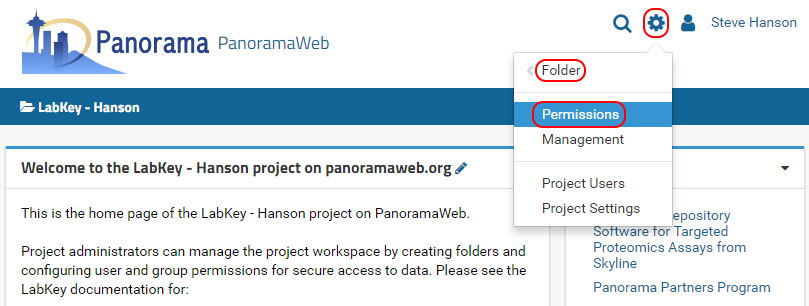
- On the permissions page click on the Project Groups tab.
- Click on the "Users" group. This is a group that is created for every project on Panorama.
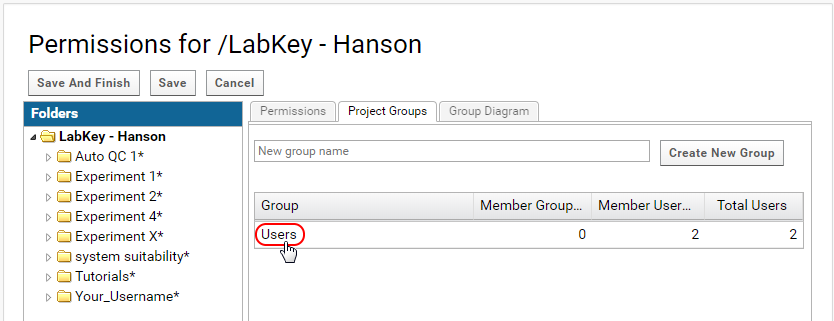
- In the Users Information popup click on Manage Group.
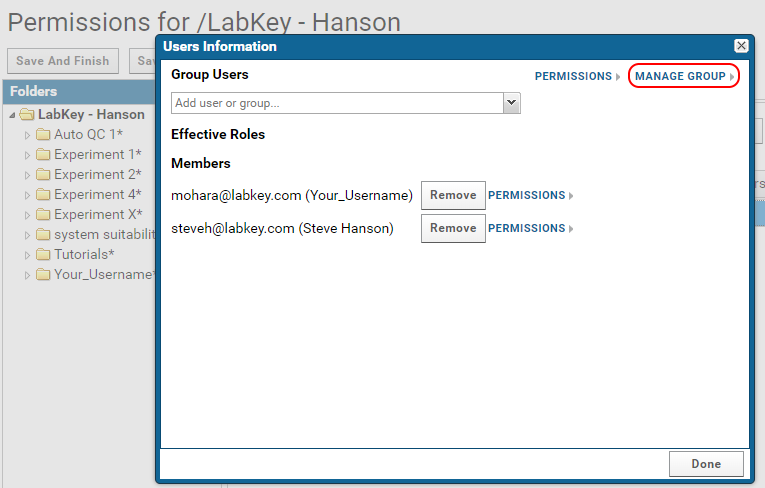
- Enter the email addresses of new users in the Add New Members text box.
- Click on Update Group Membership.
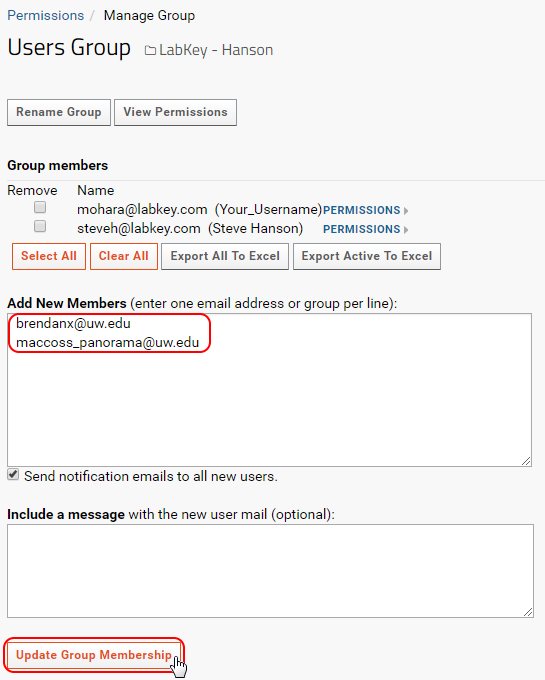
- Any users that did not already have accounts on the Panorama server will be added to the system, and a welcoming email will be sent to them.
- Click on Permissions in the navigation trail, as shown in the image below, to go back to the permissions page.
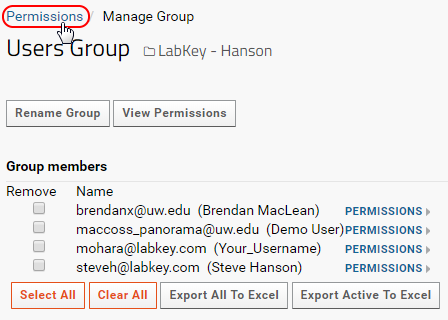
- Assign the Users group to the Reader role, as shown in the image below. All users that are members of the Users group will have read access to the project.
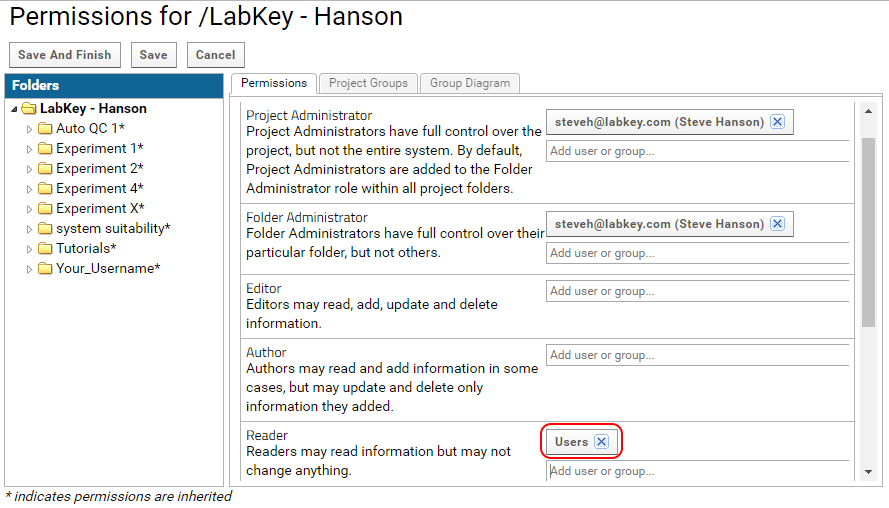
To make a folder public assign Site:Guests to the Reader role. Anyone with a link to the folder will be able to view it without having to log in.
For more information on the adding / managing users and security roles look at the LabKey documentation on LabKey security architecture.
Import Data Into Panorama
You can import data into a Panorama server either directly from Skyline or from Panorama's web-browser interface.
Importing data into a Panorama server from Skyline
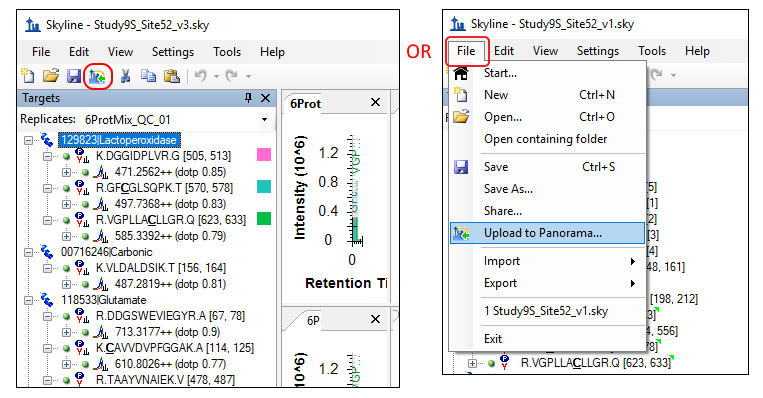
Open the document that you want to publish to Panorama.
- Click on the Upload to Panorama button in the toolbar, as shown below. Alternatively, on the File menu, click Upload to Panorama.
- If you have not already registered a Panorama server in Skyline you will see the following message.
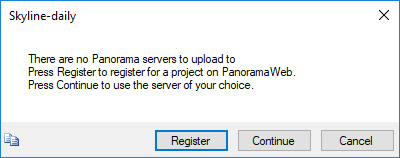
If you have an existing account on a Panorama server, and you would like to use that, click Continue and enter the server details in the Edit Server form Skyline presents. If you do not have an existing Panorama account, you can request a project on the PanoramaWeb server hosted at the University of Washington by clicking Register.

In the Edit Server form enter the server URL and the email address and password for your account on the server. Click OK. Skyline will now display a form with the folder hierarchy on the Panorama server.
- Select a folder on the server where you want to add the document.
- Click the OK button.

Skyline will create a ZIP archive of the files for your document and upload the ZIP file to the Panorama server, where it will be imported into the Panorama database.
Importing data into a Panorama server via a web-browser
Using the Skyline Upload to Panorama toolbar button or menu item is the most convenient way to get your documents into Panorama. But this can also be done by using the Panorama web interface.
- In Skyline, open the file you want to upload to Panorama.
- In the File menu click Share.
- If the document uses spectral libraries or a background proteome:
- Click the Minimize libraries radio button to share only the library spectra used in your document
- Click the Store everything radio button to share the libraries and background proteome files as they exist on your system
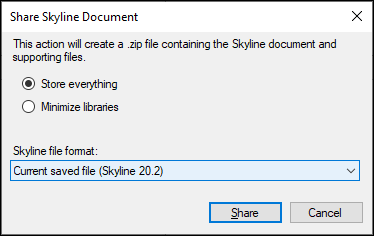
- Save the ZIP file on your computer using the Share Document form presented by Skyline.
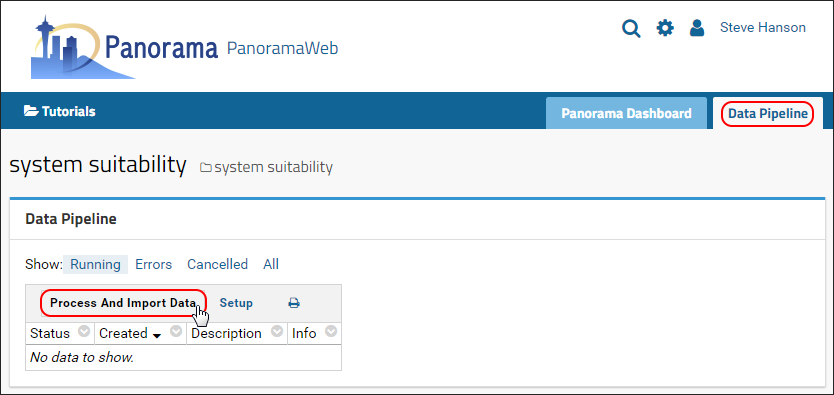
- In Panorama, navigate to your folder.
- Click the Data Pipeline tab in the upper right corner.
- Click Process and Import Data as shown below.
- In the Files browser, click Upload Files
- Click the Browse button and select the file that you want to import.
- Click the Upload button.
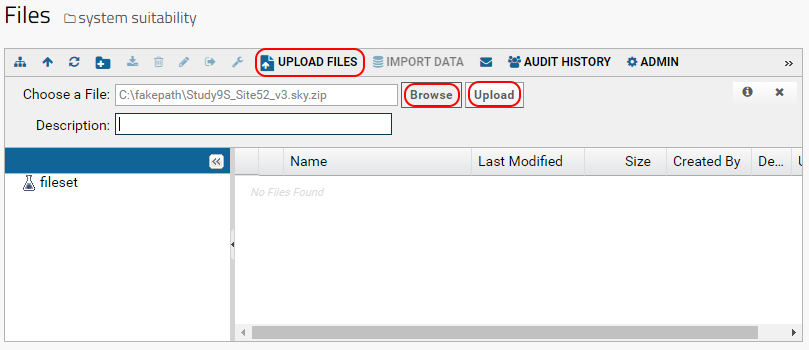
Once the file has been uploaded it will appear in the list of files in your folder
- Check the box next to your file name.
- Click Import Data in the toolbar, beside the Upload Files button
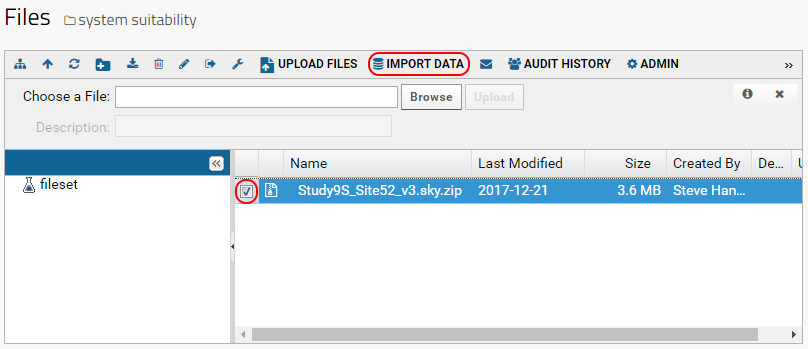 .
.
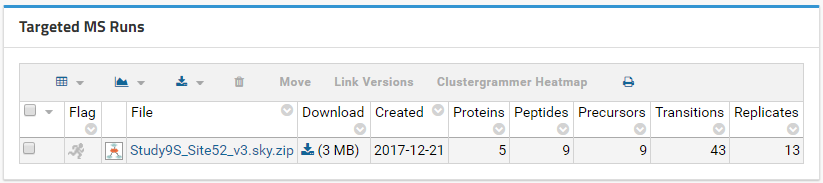
Wait for the file import to complete and then click the Panorama Dashboard tab in the upper right corner. Your file should be listed under Targeted MS Runs. You can click the file name to view the results in the Skyline document.
Adding Links in Wiki Pages
Relative links to files
If a file is less than 50MB in size, it can be attached to a Wiki page. See this page for more information on attaching files: Using File Attachments in Wikis .To add a link to a file that is attached to the Wiki page use the name of the file in the HTML source editor rather than the absolute URL of the file. Using the name of the file in the href attribute of the <a> tag, for example, will create a link that is relative to the folder, and will get copied correctly to Panorama Public. For FILENAME.csv attached to a Wiki page, for example:
- DO THIS: <a href="FILENAME.csv">
- NOT THIS: <a href="https://panoramaweb.org/home/wiki-download.view?entityId=46e23841-ce54-103a-b0fb-a091112fcade&name=FILENAME.csv">
- DO THIS: <img src="IMAGE.png">
- NOT THIS: <img src="https://panoramaweb.org/home/wiki-download.view?entityId=46e23841-ce54-103a-b0fb-a091112fcade&name=IMAGE.png">
Wiki pages can also contain links to files that have been uploaded to the Raw Data tab (See Upload Raw Data) or added as supplementary files (See Upload Supplementary Files). For example, if FILENAME.csv has been uploaded as a supplementary file, and its absolute URL is:
https://panoramaweb.org/_webdav/Example%20Data/%40files/SupplementaryFiles/FILENAME.csv
To create a link relative to the folder
- replace https://panoramaweb.org/_webdav/...%40files/ WITH filecontent-sendFile.view?fileName=
- Add &renderAs=attachment at the end of the URL if you want the file to be downloaded rather than displayed in the web browser.
filecontent-sendFile.view?fileName=SupplementaryFiles/FILENAME.csv&renderAs=attachment
Relative links to Skyline documents
To link to a Skyline document in a Wiki page, get the folder-relative URL for the document from the Targeted MS Runs grid by clicking the download icon next to the document name and selecting Copy relative URL to clipboard.
Relative links to folder tabs
To get the link to a tab in a folder (e.g. Raw Data tab), right-click the tab and select "Copy link address" (in Google Chrome) or "Copy Link" (in Firefox). Paste the link as the href attribute of an <a> tag in a Wiki page. For example:<a href="https://panoramaweb.org/home/Example%20Data/project-begin.view?pageId=Data%20Pipeline">
To convert the absolute URL to a folder-relative link remove everything until project-begin.view?.
The folder-relative link will look like this:
<a href="project-begin.view?pageId=Data%20Pipeline">
Panorama Public
- Submit Data to Panorama Public
- Upload Raw Data
- Upload Supplementary Files
- Include Subfolders in a Panorama Public Submission
- Data Validation for ProteomeXchange
- Finding Unimod Matches
- Download Data From Panorama Public
Tutorial
Submit Data to Panorama Public
Panorama Public is a member repository of the ProteomeXchange consortium. Data submitted to Panorama Public that fulfills ProteomeXchange submission requirements will be assigned a ProteomeXchange identifier and announced on ProteomeCentral.
Submitting Data to Panorama Public
- Step 1: Upload Skyline documents and other files to a folder on PanoramaWeb
- Step 2: Prepare the folder for submission to Panorama Public
- Step 3: Submit the annotated folder to Panorama Public
STEP 1: Upload Skyline documents and other files to a folder on PanoramaWebRefer to the following wiki pages to create a folder in your project on PanoramaWeb and upload Skyline documents and associated data.
- Create a folder in Panorama
- Import Skyline documents to a folder in Panorama
- Upload raw data associated with the Skyline documents. This is a requirement for ProteomeXchange.
- Upload supplementary files
STEP 2: Prepare the folder for submission to Panorama PublicFolders containing supplementary data intended for submission to Panorama Public have to be annotated with a description of the experiment. This includes information such as an abstract, experiment and sample descriptions, organism, MS instruments used etc. To add experiment annotations to a folder, do the following:
- Go to the home page of the folder by navigating the folder menu under the Panorama logo (Folder Navigation).
- Click the gear icon in the top right corner of the page, then select Page Admin Mode from the drop-down menu.
- Scroll to the bottom of the page and select Targeted MS Experiment from the <Select Web Part> menu at the bottom-left of the page.

- Click the Add button. This action will add a web part titled Targeted MS Experiment at the bottom of the page that looks like this:

- Click the Create New Experiment link in the Targeted MS Experiment web part.
- Fill out the Targeted MS Experiment form.

The Instrument and Organism fields are auto-complete fields. Type 3 or more letters to see a drop-down list of matching options. Continue typing to refine the list and select from one of the available options. Contact the Panorama team if you do not see your instrument or organism in the list. At least one organism and one instrument is required for a ProteomeXchange submission.
In addition to an organism and an instrument, Keywords describing the data also need to be filled in for a ProteomeXchange submission. Contact details of the data submitter and a lab head are also required. In the Targeted MS Experiment form, the currently logged in user is auto-selected as the submitter. Please fill in the Submitter Affiliation for the submitting user. You can select a lab head from the drop-down menu in the Lab Head field which lists all users that have administrative privileges in the folder. If your lab head does not have an account on the server, you may create one by referring to Adding Users to a Project. If you do not wish to create an account for the lab head you can leave the Lab Head and Lab Head Affiliation fields blank. You will have the option of entering a lab head name and affiliation when you submit the data to Panorama Public.

- Click the Submit button at the bottom of the form.

STEP 3: Submit the annotated folder to Panorama Public
- Navigate back to the folder home page by clicking on the link with the icon and folder name near the top of the page.
- Scroll down, if you need to, so that you can see the Targeted MS Experiment web part.
- Click the red Submit button in the Targeted MS Experiment web part.

If the Skyline documents in the folder you are submitting contain proteomic data, you will have the option of getting a ProteomeXchange ID for your data. After you click the Submit button you will see a page with a button to validate the data for a ProteomeXchange submission.

Click the Validate Data for ProteomeXchange button to start the data validation process. This process will:
- Verify that all the raw data files imported into your Skyline documents have been uploaded
- All the modifications used in your Skyline documents have a Unimod Id
- The source files (raw data + search results) used to build the spectral libraries used in your documents have been uploaded.

After the validation job is complete a detailed status report is displayed showing the validation status. A summary list of any problems found is included in the main Data Validation Status panel. Details are displayed in the tables below this panel.
If your data is valid for a "complete" ProteomeXchange submission, you can click the Continue Submission button to proceed with the submission. Otherwise, you can try submitting again after you have provided all the missing information. You also have the option of submitting without a ProteomeXchange ID, or continuing with an "incomplete" ProteomeXchange submission.

NOTE: ProteomeXchange IDs can only be assigned to proteomic data. If your Skyline documents do not contain any proteomic targets then you will not be presented with the option to get a ProteomeXchange ID.
After you click the button on the data validation page, you will see a form that looks similar to the one in the image below.
- The Get ProteomeXchange ID checkbox will be displayed only if the data is valid for a "complete" or "incomplete" ProteomeXchange submission.
- If you did not enter a lab head in the Targeted MS Experiment form, you will be able to enter the lab head details in the submission form. If you do not fill in the lab head details in this form, the submitting user's information will be used in the lab head field when announcing the data to ProteomeXchange.

In the Submission Request to Panorama Public form do the following:
- Select “Panorama Public” from the drop-down list next to the Submit To option, if it is not already selected
- Enter an Access Link
- If you are submitting data for a manuscript undergoing peer review leave the Keep Private box checked. This will ensure that when the data is copied to Panorama Public, it will be kept private with read-only access to the submitter. A read-only reviewer account will be created for the data, and account details provided to the submitter. The account details can be conveyed to the journal where the manuscript is submitted. If you want your data to be publicly available on Panorama Public right away uncheck the Keep Private checkbox.
- Click the Submit button
The Publish Experiment form allows you to “build” these the access link. The initial part of the link remains constant: https://panoramaweb.org/. You can choose a string to complete the link (highlighted in yellow below).
https://panoramaweb.org/choose_a_string.url
The initial value entered in the Access Link field is a randomly generated alphanumeric string. You can replace it with a convenient, easy to remember string. This string has to be unique across all the experiments published to Panorama Public. You may get an error if the link you entered is already in use for another experiment on Panorama Public. If this happens change the text in the access link field and try again.
Requests to copy data are handled by Panorama Public administrators within a week of submission. Once your data has been successfully copied to Panorama Public you will receive a confirmation email. If you requested that your data on Panorama Public be kept private (e.g. for a manuscript under peer review), the confirmation email will also include reviewer account details. You can pass on the account details to the journal where you are submitting your manuscript. The confirmation email will also include a ProteomeXchange ID unless you opted to skip ProteomeXchange submission.
Once the form is submitted successfully you can go back to the experiment details page.
In the Experiment Details box, just above the experiment title, you will see a “Copy Pending!” message. This message will disappear once your data has been copied to Panorama Public. Any changes that you make in the folder, such as adding/removing Skyline documents or wiki pages, or changing the layout of the page will also get copied when a copy is made to Panorama Public. At the bottom of the page, in the Submission table, you will see the Access Link that you created for this experiment. The Copied column will be blank until a copy has been made successfully. Once the data has been copied this column will display the date when the data was copied. And at that point if you click the Access Link you will be taken to the location on Panorama Public where your data was copied. You can verify that the data, folder layout and views were copied accurately.

If you need to make any changes to your data (e.g. to address reviewer feedback) after it has been copied to Panorama Public you can make the changes in your own folder. When you are ready click the red Resubmit button in the Targeted MS Experiment web part. This will send a request to the Panorama Public administrators to delete the old copy and make a new copy of your data to Panorama Public. Your access link will remain unchanged.

Related Resources:
- Panorama Public: A public repository for Skyline documents (ASMS 2015 poster)
- Submitting Supplementary Data to Panorama Public (A detailed tutorial that covers a broader set of Panorama features)
Upload Raw Data
- Upload raw data in a web browser
- Organizing data in folders
- Upload raw data by mapping a network drive in Windows
- Upload raw data on the command line
- What to do if the Raw Data tab is missing or has an error
Upload raw data in a web-browser
Raw data associated with Skyline documents in a folder can be uploaded via the Raw Data tab in the top right corner.(NOTE: If you don't see a Raw Data tab click here for instructions on how to add it)

Click the tab to see a Files browser. You can drag-and-drop files and/or folders located on your computer onto the Files browser as shown in the image below.

Another way to upload files is to click the Upload Files button in the Files browser, and click Browse to navigate to and select the file you want to upload.

Organizing data in folders
Raw data files can be organized in folders. Create a new folder by clicking the new folder button in the Files webpart.
Enter a name for the folder and click Submit.

Click the Show or Hide Folder Tree button to show the folder tree panel.

Click the newly created folder in the folder tree panel to select it. The right panel will update to show the contents of the selected folder. Drag-and-drop files in the right panel to upload them to the new folder.

More information on using the Files browser can be found here: Using the Files Repository
Upload raw data by mapping a network drive in Windows
On a Windows machine you can map your PanoramaWeb folder as a network drive and copy files to the folder using Windows Explorer. This uses WebDAV for file transfer, and Windows XP and later have a built-in WebDAV client.NOTE: The instructions below will work on Windows 10 and Windows Server 2016. If you have an older operating system and are unable to map a network drive with these steps then you can use a third party WebDAV client such as Cyberduck. Look at this page for instructions on setting up Cyberduck and for a list of other WebDAV clients: Example Setup for Cyberduck WebDAV Client
To map a PanoramaWeb raw data folder as a Windows network drive follow these steps:
Get the WebDAV URL
- In a web-browser navigate to the Panorama folder and click the Raw Data tab
- Click the Upload Files button in the Files webpart (1. in the screenshot below)
- Click the "Upload file" icon (2. in the screenshot below).
- From the File Upload Help dialog copy the WebDav URL (3. in the screenshot below)

- On your computer open Windows Explorer. Right-click This PC in the left pane and select Map network drive from the menu

- In the Map network drive dialog enter the WebDav URL that you copied from your Panorama folder. Check Connect using different credentials and click Finish
- You will be prompted for a username and password. Enter your PanoramaWeb email address and password and click OK
Using Cyberduck (https://cyberduck.io/)
- Click Open Connection.

- In the Open Connection dialog select WebDAV (HTTPS) as the connection type.
- Get the WebDAV URL as described above and enter it in the Server field. CyberDuck will automatically parse the URL and populate the Path field.
- In the Username field enter your email address on PanoramaWeb.
- Enter you password in the Password field.
- Click Connect.

Upload raw data on the command line
If you are comfortable using the command line, you can use rclone to upload your raw files. Rclone is a command line utility to sync files to and from the cloud. Among the many cloud providers it can sync with, one is webdav. Webdav can be used to access files on PanoramaWeb.You can download rclone from https://rclone.org/downloads/. If you are on Windows I recommend that you download the `AMD64 - 64bit` version.The first step is find WebDav URL
- In a web-browser navigate to the Panorama folder and click the Raw Data tab
- Click the Upload Files button in the Files webpart (1. in the screenshot below)
- Click the "Upload file" icon (2. in the screenshot below).
- From the File Upload Help dialog copy the WebDav URL (3. in the screenshot below)
Setup a remote for your folder on Panoramaweb
Start the interactive configuration sessionrclone.exe config edit
No remotes found - make a new one
n) New remote
s) Set configuration password
q) Quit config
n/s/q> n
name> PanoramaWebFiles
Type of storage to configure.
Enter a string value. Press Enter for the default ("").
Choose a number from below, or type in your own value
 1 / 1Fichier
    "fichier"
 2 / Alias for an existing remote
    "alias"
 3 / Amazon Drive
    "amazon cloud drive"
...
33 / Webdav
    "webdav"
34 / Yandex Disk
    "yandex"
35 / http Connection
    "http"
36 / premiumize.me
    "premiumizeme"
Storage>  33
URL of http host to connect to
Enter a string value. Press Enter for the default ("").
Choose a number from below, or type in your own value
 1 / Connect to example.com
    "https://example.com"
url> https://panoramaweb.org/_webdav/ExampleProject/Folder/@files/
Name of the Webdav site/service/software you are using
Enter a string value. Press Enter for the default ("").
Choose a number from below, or type in your own value
 1 / Nextcloud
    "nextcloud"
 2 / Owncloud
    "owncloud"
 3 / Sharepoint
    "sharepoint"
 4 / Other site/service or software
    "other"
vendor> other
User name
Enter a string value. Press Enter for the default ("").
user> bconn@proteinms.net
Password.
y) Yes type in my own password
g) Generate random password
n) No leave this optional password blank (default)
y/g/n> y
y/g/n> y
Enter the password:
password:
Confirm the password:
password:
Bearer token instead of user/pass (eg a Macaroon)
Enter a string value. Press Enter for the default ("").
bearer_token>
Edit advanced config? (y/n)
y) Yes
n) No (default)
y/n> n
Remote config
--------------------
"missing" href="/home/wiki-page.view?name=PanoramaWebFiles">PanoramaWebFiles
type = webdav
url = https://panoramaweb.org/_webdav/ExampleProject/Folder/@files/
vendor = other
user = bconn@proteinms.net
--------------------
y) Yes this is OK (default)
e) Edit this remote
d) Delete this remote
y/e/d> yes
y/e/d> y
Current remotes:

Name                 Type
====                 ====
PanoramaWebFiles webdav

e) Edit existing remote
n) New remote
d) Delete remote
r) Rename remote
c) Copy remote
s) Set configuration password
q) Quit config
e/n/d/r/c/s/q> q
Copying files
To copy a file to PanoramaWeb, you can use the commandrclone.exe --progress copy FILENAME PanoramaWebFiles:
rclone.exe --progress copy DIRECTORY_TO_COPY PanoramaWebFiles:
What to do if the Raw Data tab is missing or has an error
The Raw Data tab is added by default when you create a new "Panorama" type folder. Some older folders may not have this tab. If you do not see the Raw Data in a "Panorama" type folder, and you are the administrator of the folder, you can add it as follows:- Click the gear icon in the top right corner
- Select Add Raw Data Tab from the drop-down menu

The Raw Data tab provides a view into a "RawFiles" directory on the server's file system. If the "RawFiles" directory is somehow deleted you will see an error when you click the Raw Data tab.

If you see the error message above or something like "File root directory configured for this webpart could not be found", first remove the Raw Data tab and then add it back. To remove the tab:
- If you are not in page admin mode, click the gear icon in the top right corner and select Page Admin Mode from the menu
- Click the Raw Data tab and click OK in the Error dialog
- Click the little triangle in the right corner of the tab to access the control menu and select Delete

After this follow the steps above to add the Raw Data tab. This will create the "RawFiles" directory on the file system.
Upload Supplementary Files
- Click the gear icon in the top right corner and select Page Admin Mode from the menu
- Scroll to the bottom of the page and select Files from the <Select Web Part> menu at the bottom-left of the page
- Click the Add button

In the file browser you will see a "RawFiles" folder. This folder is automatically created for every "Panorama" type folder. This is the folder where raw files associated with Skyline documents should be uploaded. The Raw Data tab provides a view into this folder. Look at [Upload Raw Data] for more details. In the file browser you should also see the Skyline documents (.sky.zip files) that were uploaded to the folder. For each Skyline document where will be an exploded directory (containing the .sky, .skyd etc. files), as well as a log file that was created when the document was imported.
Files and folders can be uploaded by selecting them on your computer and then dragging and dropping them on top of the file browser. It may be a little hard for viewers to locate supplementary files in the default view of the file browser if there are multiple Skyline documents uploaded to the folder. To provide a cleaner view, you can create a sub-folder for supplementary files and customize the file browser to display only the contents of that folder. A new folder can be created by clicking the "Create a new folder" button in the tool bar of the file browser as shown below. You can name the folder whatever you like. Here it is named "SupplementaryFiles".

Double click the new folder to open it. Alternatively, click the "Show or hide the folder tree" icon in the toolbar to split the file browser into two panels. The left panel shows an expandable tree view of the folder structure, and the right panel displays the contents of the folder selected in the left panel. Select the folder just created (e.g. "SupplementaryFiles") and drag and drop files on top of the right panel to add files to this folder.

Next, customize the Files webpart to display only the contents of the "SupplementaryFiles" folder. To do this:
- Click the little triangle in the top right corner of the Files webpart and select Customize from the control menu

- In the Customize Files form enter a name in the Title field
- Select the "SupplementaryFiles" folder in the File Root tree
- Click Submit

The file browser will now show the contents of the "SupplementaryFiles" folder. More than one Files webpart can be added to a folder page and each one can have different customization settings.

Adding a new tab for supplementary files
The Files webpart can also be added to a new tab on the page, like the Raw Data tab. To add a new tab first make sure you are in the Page Admin mode. If you are, you will see an Exit Admin Mode button in the top right corner of the browser window. If you don't see the button, do this to enter Page Admin mode:- Click the gear icon in the top right corner and select Page Admin Mode from the menu
To add a new tab:
- Click the "+" icon to the right of the Raw Data tab

- Enter "Supplementary Data" in the Add Tab form, and click OK

A Files webpart can now be added to the new "Supplementary Data" tab by selecting "Files" from the <Select Web Part> menu. The files browser can be configured, as described above, to show the contents of the folder that has the supplementary data files.

Include Subfolders in a Panorama Public Submission

Click Include Subfolders And Continue to configure the experiment to include subfolders.
Click Skip Subfolders and Continue if you do not want to include any of the subfolders. When you choose this option only the contents of the main folder will be copied to Panorama Public.
To include subfolders in a submission request the user must have read permissions in all the subfolders. If you do not have read permissions in one or more of the subfolders you will this following message.


Click the Include Subfolders button to configure the experiment to include subfolders. The page will refresh and you will see a list of all the subfolders that are included in the experiment. These subfolders will be copied to Panorama Public when the data is submitted.

Data Validation for ProteomeXchange
Proteomic datasets submitted to Panorama Public can be assigned a ProteomeXchange ID if they fulfill the ProteomeXchange data guidelines. To get a ProteomeXchange ID all the raw data files imported into the Skyline documents must be uploaded. This is the minimum requirement for getting a ProteomeXchange ID. See Upload Raw Data for details on how to upload raw data. In addition to the raw data the following are also required for a "complete" ProteomeXchange submission:
- All modifications used in the Skyline documents must have Unimod Ids
- If the Skyline documents include spectral libraries then all the source files (raw + search results) used to build the libraries must be uploaded
When a dataset is submitted, it is validated for a ProteomeXchange submission. The validation process runs as a pipeline job, and the results are displayed after the job is complete. The summary panel at the top of the page displays the validation status and any problems that were found during data validation.

You will see this status message if the data is valid for a "complete" ProteomeXchange submission. This means:
- All the raw data files used with the Skyline documents were uploaded
- All the modifications used with the Skyline documents had Unimod Ids OR there were no modifications
- The source files (spectrum files + search results files) used to build the spectral libraries were uploaded OR there were no spectral libraries

You will see this status message if
- All the raw data files used with the Skyline documents were uploaded
- BUT, one or more modifications in the Skyline documents did not have a Unimod Id OR the source files used to build one or more spectral libraries were not uploaded

You will see this status message if one more raw files used with the Skyline documents were not uploaded. The data cannot be assigned a ProteomeXchange ID but it can still be submitted to Panorama Public by clicking the Submit Without a ProteomeXchange ID button.
Validation details for Skyline documents (sample files), modifications and spectral libraries are displayed in the tables below the validation summary panel.
Sample file validation table
The Skyline Document Sample Files table displays the status for each Skyline document in the dataset. If all the raw data files imported into the document were uploaded, the status displayed is Complete. Otherwise, the status displayed is Incomplete.
The nodes in the table can be expanded to view the list of replicates and sample files in each document.

Modifications validation table
The Modifications table displays a list of modifications found in the Skyline documents. For a "complete" ProteomeXchange submission all the modifications must have a Unimod Id. Skyline supports an extensive set of Unimod modifications, and it is recommended that you use modifications from the built-in list of Unimod modifications rather than define your own custom modifications. If you are unable to find your desired modification in Skyline then please post to the Skyline or Panorama support boards.The modifications table will display Missing in the Unimod Match column if the modification in the Skyline document did not have a Unimod Id. Otherwise, the Unimod Id is displayed. Clicking on a Unimod Id will take you to the modification page on the Unimod website.

Expand the nodes by clicking the '+' icon in the first column to view the Skyline documents in the dataset that use the modification along with a link to the peptides in the document with the modification.

If any of the modifications did not have a Unimod Id you can click the Find Match link. This will attempt to find a Unimod match for the modification based on the modification formula and the modified amino acids and / or terminus information found in the modification definition in the Skyline document. Read more about finding Unimod matches on this page: Finding Unimod Matches.
Spectral library validation table
The Spectral Libraries table has a row for each spectral library used with the Skyline documents in the dataset. The library status, in the Status column is Complete if the library is supported and all the source files used to build the library were uploaded. Otherwise the status is Incomplete. Each row can be expanded by clicking the '+' icon in the first column to view a list of source files for the library along with links to Skyline documents that use the library.
Finding Unimod Matches
View Data Validation for ProteomeXchange for more details.
Skyline supports an extensive set of Unimod modifications, and it is recommended that you use modifications from Skyline's built-in list of modifications rather than define your own custom modifications. If you are unable to find your desired modification in Skyline, please post to the Skyline or Panorama support boards.
The sections below cover the following:
If a modification is not associated with a Unimod Id, you will see a Find Match link for the modification in two locations:
- If you have already run ProteomeXchange data validation on the data, and are looking at the validation results, you will see the Find Match link in the Unimod Match column of the Modifications table.

- Another location where you will see the Find Match link is on the experiment details page in the Structural Modifications and Isotope Modifications tables. These tables list the structural and isotope modifications used in the dataset. You can go to the experiment details page by clicking the [More Details...] link in the Targeted MS Experiment webpart.

Assign a Unimod match
It is highly recommended that you use a modification from Skyline's built-in list of structural and isotope modifications, since those modifications have a Unimod Id. However, if there are custom modifications in your documents that do not have a Unimod Id, you can find a Unimod match for those modifications on Panorama if the modification definition has a modification formula (or labeled atoms for isotope modifications), the modified sites (amino acids) and / or the modified terminus. To find a Unimod match do the following:- Click the Find Match link in one of tables (Modifications table on the data validation results page, or one of the modifications table on the experiment details page). If you click this link for a structural modification you will see a page with buttons to find a Unimod Match or define a Combination Modification. Click the button to find a Unimod Match. This will display a page that shows the Unimod matches found for the modification based on the modification formula and modification sites (amino acids) and / or modified terminus. The option to define a combination modification is not available for Isotope modifications, so clicking the Find Match link will open the page with Unimod matches found for the modification.

If more than one match was found, click the Save Match button below the correct match to associate the Unimod Id with the modification.
Define a combination modification
Sometimes users have to create a custom modification in Skyline that is the combination of two modifications. Such modifications do not have a Unimod Id in the Skyline document. To associate a combination modification with the Unimod Ids of the two modifications that it combines, you can do the following:- Click the Find Match link in one of tables (Modifications table on the data validation results page, or the Structural Modifications table on the experiment details page). You will see the following page:

- Click the button to define a Combination Modification. You will see a form where you can select two Unimod modifications that make up the modification.

- Start typing the name of first modification in the textbox for Unimod Modification 1. The drop-down list will show you the modifications that match the text entered. Select a modification from the list.

- The sum of the formulas of the two modifications you select must match the formula of combination modification. After you select the first modification, the form will update to show the difference in the formula of the combination modification and the selected modification.

- Select the second modification in Unimod Modification 2. You can search for the modification by name or by the difference in the formula that is displayed in the form (e.g. H4C3O in the image above)

If the sum of the formulas of the two selected modifications matches the formula of the combination modification then a green checkmark will be displayed as shown in the image above.
- Click the Save button.
The screenshot below shows a saved combination modification in the Modifications table on the data validation results page:

Clicking the Unimod Ids will link to the modification page on the Unimod website
Wildcard modifications in Skyline
Skyline includes the following built-in wildcard modifications.- Label:15N
- Label:13C
- Label:13C15N

Download Data From Panorama Public
- Download Skyline documents
- Download raw data
Download Skyline documents
Skyline documents available in a public dataset can be downloaded by clicking the download icon ( ) next to the document name. In the pop-up menu click Full Skyline Document. This will download a .sky.zip file which can be opened in Skyline.
Download raw data in a web-browser
Raw data uploaded with a dataset is available under the Raw Data tab in the top right corner. Click the tab to view a list of files available for downloading. Select one or more files and click the download icon ( ).
To select all the files listed in the files browser, select the first file in the list by clicking the name of the file in the File column. Press the Shift key and then select the last file by clicking the file name. This will select all the files between the first and the last selected files. Please note that this will not work if you use the checkboxes next to the file names to select files. Click files names instead to select files.
Download raw data using WebDAV
Files can also be downloaded using the WebDAV protocol. On Windows the raw data folder can be mapped as a network drive in Windows Explorer. Other WebDAV clients such as CyberDuck or WinSCP can also be used to connect to the folder.In the Download Data panel below the files browser in the Raw Data tab you will find the WebDAV URL (example screenshot below) along with the email address and password that is needed to connect to the folder.

Map folder as a network drive in Windows
- Copy the WebDAV URL displayed in the Download Data panel under the files browser in the Raw Data tab.
- On your computer open Windows Explorer. Right-click This PC in the left pane and select Map network drive from the menu.

- In the Map network drive dialog enter the WebDav URL copied in step 1. Check Connect using different credentials and click Finish.
- When prompted for a username and password enter the email address and password from the DataPanel in the Raw Data tab and click OK.
This should map the folder as a network drive on your computer, and you should be able to copy down the desired files to another folder in Windows Explorer. Once you are done copying files you can disconnect the network drive by right-clicking the mapped drive and selecting Disconnect network drive from the menu. Please note that this works in Windows 10 and Windows Server 2016. If you have an older operating system and are unable to map a network drive with these steps then you can use a third party WebDAV clients such as CyberDuck and WinSCP.
CyberDuck (https://cyberduck.io/)
- Click Open Connection.

- In the Open Connection dialog select WebDAV (HTTPS) as the connection type.
- In the Server field enter the WebDAV URL copied from the Download Data panel in the Raw Data tab. CyberDuck will automatically parse the URL and populate the Path field.
- In the Username field enter public@proteinms.net.
- In the Password field enter panorama.
- Click Connect.

WinSCP (https://winscp.net/eng/index.php)
- In the Login dialog select WwbDAV under File Protocol.
- Copy the WebDAV URL in the Host name field. WinSCP will automatically parse the remote directory path from the URL, and you will only see "panoramaweb.org" in the field.
- Enter public@proteinms.net under User name.
- Enter panorama under Password.
- Click Login.

For options on OSX and Linux see this link: Native OSX and Linux WebDAV Clients
Quality control with AutoQC
Panorama AutoQC
The Panorama AutoQC pipeline enables mass spec laboratories to evaluate LC MS/MS performance over time, and quickly identify potential issues. This pipeline comprises three components: Skyline, a Panorama server and AutoQC Loader, a utility program that automates the processing and uploading of QC results from the instrument computer to the Panorama server. The pipeline is initialized by specifying the following:- A template document with target QC peptides into which raw data files should be imported as they are acquired.
- A local folder where QC results files are written.
- A folder on the Panorama server where data should be uploaded.
Panorama QC folder documentation:
- Panorama QC Dashboard
- Panorama QC Plots
- Panorama QC Plot Types
- Panorama QC Pareto Plots
- Panorama QC Annotations
- Panorama QC Guide Sets
- Configure QC Metrics (enable/disable metrics, define new metrics)
- Setup Email Notifications
AutoQC Loader
AutoQC Loader automates the process of importing results files into a Skyline document and uploading the document to a folder on a Panorama server. It uses SkylineRunner to launch Skyline without showing the Skyline window. Command-line arguments are passed to this invisible instance of Skyline to import results files to a Skyline document and upload the document to the Panorama server specified in the settings.Install AutoQC Loader
AutoQC Loader Documentation
AutoQC Setup Tutorial
A tutorial describing how to setup a Skyline document for use with AutoQC, and setting up the instrument method: AutoQC SetupLindsay Pino's AutoQC Setup Tutorial
Upgrading to AutoQC Loader 24.1.0.x
1. Export Configurations
- Launch AutoQC Loader 22.1.0.122 if it is not already running.
- Stop all running configurations.
- Export the configurations by clicking the Share button.

- Check Select All in the Share Configurations dialog, and click Save. Save the .qcfg file on your computer.

2. Uninstall AutoQC Loader 22.1.0.122
BEFORE uninstalling AutoQC Loader it is important to:
- Stop all running configurations
- In the Settings tab uncheck Keep AutoQC Loader running

- Close the AutoQC Loader app by clicking the Close ('X') icon in the top right corner of the app window.
To uninstall:
- In the search box on the taskbar, type Control Panel and select it from the results.
- Select Programs > Programs and Features
- Find AutoQC in the list of installed programs. Right-click on "AutoQC". Select Uninstall or Uninstall/Change.
- In the AutoQC Maintenance dialog, select Remove the application from this computer, and click OK.

2. Install AutoQC Loader 24.1.0.x
- Download the installer here https://skyline.gs.washington.edu/software/AutoQC24/index.html
- After installing, import the saved configurations by clicking the Import button, browsing and selecting the previously saved configuration (.qcfg) file.

AutoQC Loader Documentation
AutoQC Loader
AutoQC Loader automates the process of importing results files into a Skyline document and uploading the document to a folder on a Panorama server. It uses SkylineRunner or SkylineCmd to launch Skyline without showing the Skyline window. Command-line arguments are passed to this invisible instance of Skyline to import results files to a Skyline document and upload the document to the Panorama server specified in the settings. Install AutoQC Loader.- Create a New Configuration
- Starting / Stopping / Editing a Configuration
- Exporting / Importing Configurations
- Invalid Configurations
- Other Settings
- Logging
- Data Archival
When you start AutoQC Loader for the first time you will see this window.

To start monitoring a local folder for QC results, create a new configuration by clicking the Add button. Each configuration is a combination of settings that include the location of the template Skyline document, the local folder where QC results will be written, and the folder on a Panorama server where the results will be uploaded. Multiple configurations can be enabled allowing users to monitor more than one QC data folder at the same time. Configurations are saved so that instrument operators can enable a previously created configuration if they are acquiring data for an ongoing project with intermittent breaks in data acquisition.
Configuration Settings
In the AutoQC Configuration form enter the appropriate settings in the Settings tab.
Configuration name: This can be the name of an instrument or the project or study for which data is being acquired. Each configuration has to have a unique name.
Skyline file path: This is the path to the template Skyline document into which QC results files will be imported. Click the browse button next to the textbox to open a Windows Explorer window and navigate to the template Skyline document (.sky file).

Note for Skyline versions prior to 4.2 the Integrate all setting (Settings > Integrate all) must be checked in the template Skyline document. This setting forced Skyline to calculate areas for all fragment ions between the integration boundaries and gives better quantitative results. Since Skyline 4.2 areas are now always the sum of all quantitative transitions, but you may still want this setting for visualization inside Skyline.
Folder to watch: This is the folder that AutoQC Loader will monitor for new QC results files. Any new results files added to the folder will automatically be imported into the given template Skyline document. When a configuration is started all existing results files in this folder that are newer than the last imported result in the Skyline document will get imported. If the document does not have any imported results, AutoQC Loader will import all the results files in the folder. The folder can be on a physical disk drive of the computer running AutoQC Loader, or it may also be on a mapped network drive, allowing central processing of system suitability files collected by multiple instruments.
File filter: This can be used to apply a filter on the results files that will be imported into the Skyline document. The default option (All) will import all results files added to the QC folder without applying any filters. Choose one of the other options from the drop-down list to import only those results files that match the filter. For example, the filter selected in the screenshot below can be used to import only those files that have the substring "_QC_" in the file name.

Results time window: The results time window determines how long imported results will be retained in the Skyline document. This is a rolling window and only results acquired within the last ‘n’ days, where ‘n’ is the width of this window in days, will be retained in the document. When a new run is imported into the document any results that no longer fall within this time window, ending on that day, will be removed from the document. The default (and minimum) width of the window is 31 days. Please note that AutoQC Loader does NOT delete any results files on the computer. Only results imported into the document that are older than the current time window are removed from the document. This is done to keep the active Skyline document from getting too large. The larger the document gets the more time it will take for each upload to Panorama. Uncheck the Remove Results checkbox to keep all the imported results in the Skyline document. This is not recommended for long-running projects.

Instrument type: The instrument type setting tells AutoQC Loader the type of files (e.g. *.raw for Thermo instruments, *.wiff for SCIEX instruments etc.) to look for in the folder that it is monitoring.
Expected acquisition duration: The expected acquisition duration determines how long AutoQC Loader will wait before attempting to import a new results file. Most instruments write directly to the output results file when data acquisition begins, and an error occurs if an attempt is made to read the file before acquisition is complete. When AutoQC Loader detects a new results file in the QC folder, it will wait for the duration specified in this setting before attempting to import the file. The default value for this setting is 75 minutes (10 min. trapping time + 60 min. gradient + 5 min. extra).
Panorama Settings
To upload the Skyline document containing QC results to a Panorama server, check the Publish to Panorama checkbox in the Panorama tab. Enter the URL of the Panorama server, your email and password on the server along with the path to the folder on the server where the document should be uploaded. AutoQC Loader will upload the document to the Panorama server each time a new results file is imported into the document.
The Panorama server manages redundant results files included in successive Skyline documents uploaded to a QC folder by keeping the results contained in the most recently uploaded Skyline document.
Note: The password is stored encrypted using a Windows system encryption key and is not accessible as plain text.
Skyline Settings
You can choose to use either Skyline or Skyline-daily with a configuration if both are installed on the computer that is running AutoQC Loader. This selection can be made in the Skyline tab of the AutoQC Configuration form. Only the installations of Skyline that are available will be enabled and selectable in the form. You may also specify the path to a Skyline (or Skyline-daily) installation somewhere else on your computer.
Running a Configuration
In the main AutoQC Loader window, in the Configurations tab check the box next to the configuration name to start the configuration. AutoQC Loader will start the monitoring the local folder specified in the configuration for new results files. Uncheck the box to stop the configuration.
The selected configuration can be edited by clicking the Edit button to the right of the Saved configurations panel.
To make a copy of the configuration, click the Copy button.
In addition, the following buttons are enabled when a configuration is selected in the Saved configurations list.

Exporting Configurations
You can export some or all of your saved configurations to a AutoQC Configuration file (.qcfg) by clicking the Share button in the main program window.
In the Share Configurations form select the configurations you want to export and click the Save button.

In the Windows File Explorer navigate to the folder where you want to save the file.
Configurations contained in the exported AutoQC Configuration file (.qcfg) can be imported into AutoQC Loader by clicking the Import button and selecting the .qcfg file in the File Explorer.
Invalid Configurations
Configurations that cannot be validated appear in red text in the list of configurations in the main window (e.g. "Fusion 1" in the screenshot below). Configurations can become invalid, for example, if the path to the Skyline document or the folder to monitor no longer exist on the computer. A configuration may also become invalid if the user email and password saved in the Panorama settings can no longer be authenticated, or if the permissions were changed on the Panorama server and the user does not have permissions to upload to the selected Panorama folder.
Attempting to run an invalid configuration will display an error message as can be seen in the example below where the path to the Skyline document does not exist on the computer.

To fix an invalid configuration either double-click the configuration name or select the configuration and click the Edit button. This will open the Configuration Set Up Manager which will step through the configuration issues which must be addressed to fix the configuration.

AutoQC Loader Settings

If you want AutoQC Loader to keep running continuously on your computer, and start-up automatically after the computer restarts check the Keep AutoQC Loader running checkbox in the Settings tab. This will place a shortcut to AutoQCStarter.exe in the Windows Startup folder. AutoQCStarter.exe checks every few minutes to see if AutoQC Loader is running, and starts it if it is not running. Any configurations that were running when AutoQC Loader was last running are also started.
Check the Minimize program to Windows System Tray to minimize the AutoQC Loader window to the Windows System Tray
 instead of the Task Bar. If the AutoQC icon is no longer visible in Windows System Tray, click the "Show hidden icons" button, and double-click the AutoQC icon to view the AutoQC Loader window.

Logging
AutoQC Loader writes to a log file (AutoQC.log) that is located in a directory with the same name as the name of the configuration. This directory can be found in the directory that contains the template Skyline document. You can open this directory by selecting a configuration and clicking the "Open Folder" icon shown below and selecting Log Folder.
The contents of the log can be viewed in the Log tab by selecting the configuration in the Configurations tab and clicking the View Log button. Once the Log tab is active you can also choose the log for any configuration from the dropdown list above the pane displaying the log text. The folder containing the log file for the selected configuration can also be opened by clicking the Open Folder button in the Log tab.

Please provide this log file to the developers if you run into any issues with AutoQC Loader.
Data Archival
AutoQC Loader creates a monthly archive (*.sky.zip) of the Skyline document. Archive creation is triggered when the first run is imported into the document in a given month. For example, when the first run is imported into the Skyline document, QC_doc.sky, in the month of August 2015, an archive file, QC_doc_2015_07.sky.zip, is created in the same directory as QC_doc.sky.AutoQC Loader 1.1.0.20237 Documentation
AutoQC Loader
AutoQC Loader automates the process of importing results files into a Skyline document and uploading the document to a folder on a Panorama server. It uses SkylineRunner to launch Skyline without showing the Skyline window. Command-line arguments are passed to this invisible instance of Skyline to import results files to a Skyline document and upload the document to the Panorama server specified in the settings.Install AutoQC Loader for Skyline 3.5 or later, or Skyline-daily (3.1.1.8694 or later)
When AutoQC Loader starts up for the very first time, it will check for existing Skyline or Skyline-daily installations in the following order:
- C:\Program Files\Skyline
- C:\Program Files\Skyline-daily
- Web installation (ClickOnce) of Skyline
- Web installation (ClickOnce) of Skyline-daily

To start monitoring a local folder for QC results, create a new configuration in AutoQC Loader by clicking on the Create a new configuration button in the Configurations tab. Each configuration is a combination of settings that include the location of the template Skyline document, the local folder where QC results will be written, and the folder on a Panorama server where the results will be uploaded. Multiple configurations can be enabled allowing users to monitor more than one QC data folder at the same time. Configurations are saved so that instrument operators can enable a previously created configuration if they are acquiring data for an ongoing project with intermittent breaks in data acquisition.

Configuration Settings
In the AutoQC Configuration form enter the appropriate settings in the Settings tab.
Configuration name: This can be the name of the project or study for which data is being acquired.
Skyline file path: This is the path to the template Skyline document into which QC results files will be imported. Please note that the Integrate all setting (Settings > Integrate all) must be checked for Skyline documents that contain QC results. This setting forces Skyline to calculate areas for all fragment ions between the integration boundaries and gives better quantitative results.
Folder to watch: This is the folder that AutoQC Loader will monitor for new QC results files. Any new results files added to the folder will automatically be imported into the given template Skyline document. When a configuration is enabled or started, all existing results files in this folder that are newer than the last imported result in the Skyline document will get imported. If the document does not have any imported results, AutoQC Loader will import all the results files in the folder.
File filter: One of the options in this combo-box can be used to apply a filter on the QC files that will be imported to the Skyline document. Only files with names that match the selected option will be imported. The default option (All) will import all results files added to the QC folder without applying any filters.

Results time window: The results time window determines how long imported results will be retained in the Skyline document. This is a rolling window and only results acquired within the last ‘n’ days, where ‘n’ is the width of this window in days, will be retained in the document. When a new run is imported into the document any results that no longer fall within this time window, ending on that day, will be removed from the document. The default (and minimum) width of the window is 31 days. Please note that AutoQC Loader does NOT delete any results files on the computer. Only results imported into the document that are older than the current time window are removed from the document. This is done to keep the active Skyline document from getting too large.
Instrument type: The instrument type setting tells AutoQC Loader the type of files (e.g. *.raw for Thermo instruments, *.wiff for SCIEX instruments etc.) to look for in the folder that it is monitoring.
Expected acquisition duration: The expected acquisition duration determines how long AutoQC Loader will wait before attempting to import a new results file. Most instruments write directly to the output results file during acquisition, and an error occurs if an attempt is made to read the file before acquisition is complete. When AutoQC Loader detects a new results file in the QC folder, it will wait for the duration specified in this setting before attempting to import the file. The default value for this setting is 75 minutes (10 min. trapping time + 60 min. gradient + 5 min. extra).
Panorama Settings For a Configuration
To upload the Skyline document containing QC results to a Panorama server, check the Publish to Panorama checkbox in the Panorama Settings tab. Enter the URL of the Panorama server, your email and password on the server along with the path to the folder on the server where the document should be uploaded. AutoQC Loader will upload the document to the Panorama server each time a new results file is imported into the document.
The Panorama server manages redundant results files included in multiple, successive Skyline documents uploaded to a QC folder by keeping only the most recent copy of the results.
Starting or Stopping a Configuration
In the main AutoQC Loader window, under the Configurations check the box next to the configuration name to start the configuration. AutoQC Loader will start the monitoring the local folder specified in the configuration for new results files. Uncheck the box to stop the configuration.
AutoQC Loader Settings

If you want AutoQC Loader to keep running continuously on your computer, and start-up automatically after the computer restarts check the Keep AutoQC Loader running checkbox in the Settings tab. This will place a shortcut to AutoQCStarter.exe in the Windows Startup folder. AutoQCStarter.exe checks every few minutes to see if AutoQC Loader is running, and starts it if it is not running. Any configurations that were running when AutoQC Loader was last running are also started.
Check the Minimize program to Windows System Tray to minimize the AutoQC Loader window to the Windows System Tray
 instead of the Task Bar.
Logging
AutoQC Loader writes to a log file (AutoQC.log) in the directory that contains the template Skyline document. Please provide this log file to the developers if you run into any issues with AutoQC Loader.Data Archival
AutoQC Loader creates a monthly archive (*.sky.zip) of the Skyline document. Archive creation is triggered when the first run is imported into the document in a given month. For example, when the first run is imported into the Skyline document, QC_doc.sky, in the month of August 2015, an archive file, QC_doc_2015_07.sky.zip, is created in the same directory as QC_doc.sky.Recovering configurations for a broken installation
Finding and saving your settings:
On Windows 10, Windows 7 or Windows Vista, find the folder: C:\Users\<your_user_name>\AppData\Local\Apps\2.0
On Windows XP, it will be something like: C:\Documents and Settings\<your_user_name>\Local Settings\Apps\2.0
If you are unable to find either the AppData (Windows 10/7) or the Local Settings (Windows XP) folder, you may need to do the following in Windows Explorer:
- Open the Folder Options form
- On Windows 10, select the View tab and click Options > Change folder and search options.
- On Windows 7, Windows Vista of Windows XP press Alt+T, O to open the Folder Options form.
- Click the View tab.
- Under the Hidden files and folders item, click the Show hidden files and folders option.
- Click the OK button.
With the Apps\2.0 folder open in Windows Explorer search for the file 'user.config'. You will likely find more than one. Look for the most recent file under a folder beginning with 'auto..'.
- Open the file in a text editor to verify that it contains your configurations. AutoQC Loader configurations are saved as XML that will look like this:
<setting name="ConfigList" serializeAs="Xml">
  <value>
    <ConfigList>
      <autoqc_config name=...>
        <main_settings skyline_file_path=… />
        <panorama_settings publish_to_panorama=… />
      </autoqc_config>
    </ConfigList>
  </value>
</setting>
- Save this file to another location on your computer (e.g. Desktop) and change the file extension from .config to .qcfg (e.g. user-config.qcfg). For versions of AutoQC Loader older than 21.1.0.158 change the extension from .config to .xml.
- Click the Import button in the Configurations tab of the main window.
- Select the .qcfg file saved in the previous step and click Open.
Install Panorama
Panorama has been implemented as a module within LabKey Server, and is included in all official releases.
You can download the latest release of LabKey Server here for a new installation or to upgrade an existing one. See LabKey installation documentation for available install options.
Once you have a running LabKey Server you can set up a workspace for your lab or group by creating projects and folders, and configuring user and group permissions for authenticated access to the workspace. Please see the LabKey documentation for:
For additional documentation and help regarding LabKey Server please visit the LabKey support site.
For information on creating folders in Panorama, see Create a folder in Panorama.
For more information on getting your data into a Panorama server see Import data into Panorama.