In this step we will create a wide-window PRM method to verify the RT locations of the PQ500 heavy peptides in plasma. Sometimes it can be the case that the RT’s of peptides will be much different when spiked into matrix compared to when analyzed neat. This is expected and likely due to the binding properties of the chromatography stationary phase, which depend on the concentration of analytes in the liquid phase in an equilibrium sometimes referred to as an isotherm. At the end of this section we will have a candidate final method that includes both heavy and light peptides, and that also includes Adaptive RT real-time chromatogram alignment.
Use File / Save As on our files from the last step, pq500_60spd_neat_multireplicate_results_refined.sky and pq500_100spd_neat_multireplicate_results_refined.sky and save in the folder Step 3. Plasma Heavy-Only Wide Window as pq500_60spd_plasma_multireplicate_results.sky and pq500_100spd_neat_multireplicate_results_refined.sky.
Use Tools / Thermo / PRM Conductor.
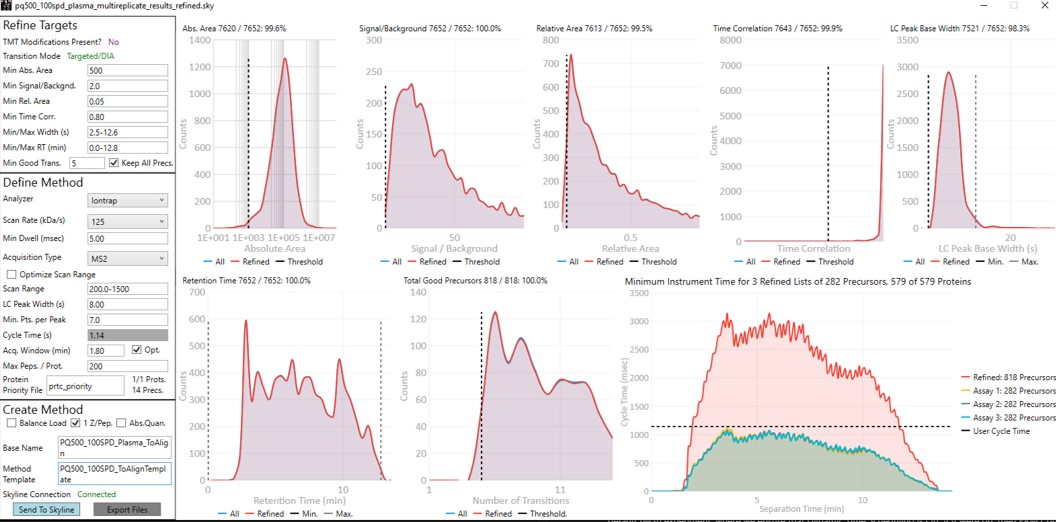
Update the settings as in the figure below. After changing any number value, be sure to press the Enter key on the keyboard. The prtc_priority.prot file is selected by double clicking the Protein Priority File text box. This is just a text file with the line “Pierce standards”, the protein name that Skyline gave to the iRT standards. The peptides from any proteins listed in this file (with Skyline's protein names, not accession numbers) are included in the assay, whether or not their transitions meet the requirements. If the Balance Load checkbox is not selected and there are multiple assays to export, each assay will contain the prioritized proteins, and Skyline will be able to use the iRT calculator for more robust peak picking.
Note that with the 1.8 minute acquisition window, the right-most plot in PRM Conductor tells us that the 818 precursors in the assay require up to almost 2500 milliseconds to be acquired, and as we have the Balance load box unchecked, they will be split into 2 assays. If Balance Load was checked, then we would create a single assay, for only the precursors that can be acquired in less than the Cycle Time.

Enter a suitable Base Name like PQ500_60SPD_Plasma_ToAlign. This reflects the fact that we are including acquisitions to perform Adaptive RT, but we are not actually adjusting our scheduling windows in real time. Our neat standards were not suitable for performing aligning in the complex plasma matrix background.
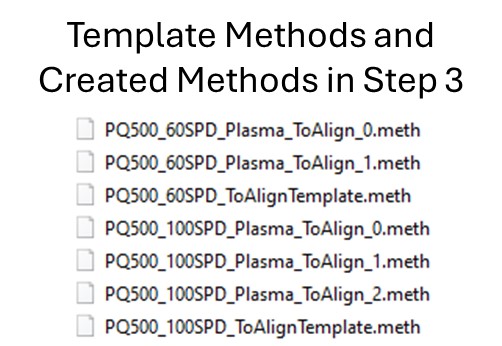
Double click the Method Template field and select the Step 3. Plasma Heavy-Only Wide Window/PQ500_60SPD_ToAlignTemplate.meth file. This file is standard targeted method for Stellar, with 3 experiments. The first is the Adaptive RT DIA experiment, which is being used to gather data for real-time alignment in future targeted methods. The second is a MS1 experiment, which isn't strictly needed, but enables the TIC Normalization feature in Skyline to be used, and can be helpful for diagnostic purposes. Removing it would save on computer disk space. The tMSn experiment can be simply the default tMSn experiment, where we ensure that Dynamic Time Scheduling is Off. If it were on, then PRM Conductor would try to embed alignment spectra from the current data set into the method. Here we leave it off.

Press the Export Button. PRM Conductor will open a progress bar and do some work to export a .sky file, and two .meth files with the names PQ500_60SPD_Plasma_ToAlign_0.sky and PQ500_60SPD_Plasma_ToAlign_1.sky. The new .sky file has our new transition list imported and sets the Acquisition mode to PRM. This can be useful especially when discovery data is acquired in a DIA mode, however in this case we want to still compare our neat PQ500 data with the spiked plasma data we’ll be collecting, so we’ll continue using our file pq500_60spd_plasma_multireplicate_results.sky.
Do the same thing for the 100 SPD method. Here we can create 3 methods if the LC Peak Width is set to 8. Change the Base Name and Method Template to the 100 SPD versions and press Export Files.
Open Settings / Transition Settings and set the Retention time filtering option to Use only scans within 1 minutes of MS/MS IDs. You want to be careful with this filtering because if the RT shifts were greater than +/- 1 minute, some data could be missing. You can always use one number and then change it, and use Edit/Manage Results, and select the replicate and Reimport, to use a wider or narrower filter. In this case the IDs are coming from the spectral library that we created in the previous step. Alternatively one could use Use only scans with X minutes of predicted RT option. We need some kind of RT filtering of this sort to help Skyline differentiate between the iRT peptide SSAAPPPPPR and the PQ500 peptide FQASVATPR, which have the same exact m/z.
We acquired data for PQ500 spiked into 300 ng of plasma and put the resulting .raw files in the folder Step 3. Plasma Heavy-Only Wide Window\Raw. Load the results with File / Import Results / Add one replicate, use a name like PlasmaMultireplicate, and select the .raw files for the appropriate 60 or 100 SPD throughput. Skyline will load these data files as a single replicate.
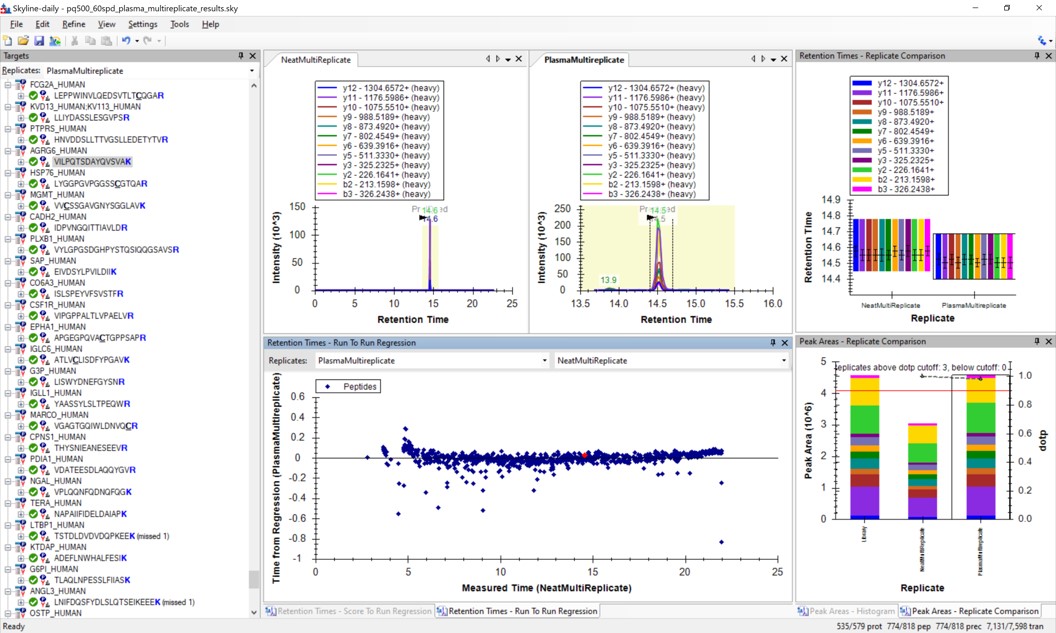
Use View / Arrange Graphs / Row so that we can view the Neat and the Plasma replicates at the same time. Right click a chromatogram plot and use Auto Zoom X Axis / None, so that we are zoomed out as far as we can go.
Use View / Retention Times / Regression / Run-to-Run. Your Skyline document should look something like the figure below.
Use Save As to save a new version of this file in case we make any changes to the picked peaks. You can use pq500_60spd_plasma_multireplicate_results_refined.sky.
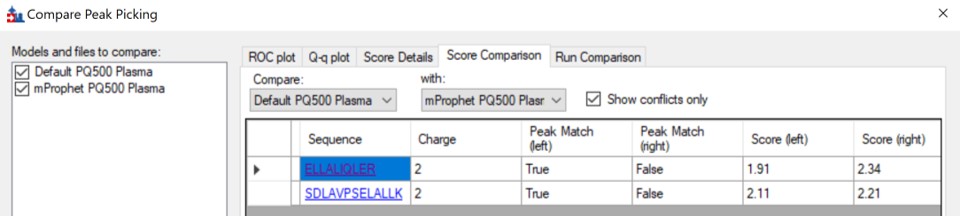
We can do the same steps as above. Make an mProphet and Default Peak picking models with Refine / Reintegrate. Then use Refine / Compare Peak Scoring, select the two new models with the Add button, then select the Score Comparison tab. Select the two models, and click Show conflicts only. We see two descrepancies, and changed the ELLALIQLER peptide from 20.0 to 20.2 minutes, which had a higher dot product and better predicted RT. We kept the default peak for the other peptide.
Click on the various outliers and make sure that the peak area plots are showing a good correspondance of the transitions with a high dot product.
Use a report with the Library Dot Product sorted from Low-to-High and investigate the worst cases. Even the lowest dot product cases look okay to us.
For the 100 SPD data, investigating the Plasma-to-Neat retention times has a similar patterns as for the 60 SPD. There is one case, the FQASVATPR peptide, that has the same exact m/z as the SSAAPPPPPR iRT peptide, which elutes at a similar RT. Reducing the Settings / Transition Settings / RT filtering time to +/- 0.5 minutes can separate these two peptides. We kept all the Skyline picked LC peaks for the 100 SPD document, and saved a new file pq500_100spd_plasma_multireplicate_results_refined.sky.

Remove the NeatMultiReplicate using Edit / Manage Results. It's easy to forget to do this. We don’t want PRM Conductor to consider the neat peaks, which are already very clean. Save the Skyline file again.
Launch PRM Conductor to clean up interferences and create a final method. Set Min. Good Trans. 5 and check Keep All Precs. Set Min Dwell 5 msec. Set LC Peak Width 11, Min. Pts. Per Peak 7, Acquisition Window 0.6 minutes, and check the Opt. box. This option increases the acquisition windows slightly, especially at the start of the experiment, without going over the user's Cycle Time. Select the prtc_priority.prot file, which in in this case just makes sure that those peptides can't get filtered. Check the Balance Load, 1 Z/prec., and Abs. Quan boxes. This last option instructs the Export command to include light targets for each of the heavy targets. Set a Base Name PQ500_60SPD_Align, and select the PQ500_60SPD_AlignTemplate.meth.
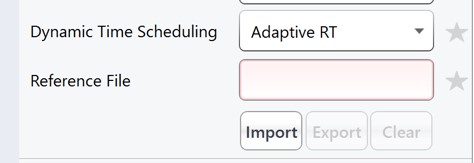
This template method is the same as the ToAlign version, only the Dynamic Time Scheduling is set to Adaptive RT. Now when PRM Conductor exports a method, it will compress the qualifying alignment acquisitions in the data and embed them into the created method.
We have a small issue here in that there more refined targets (red trace) than we can target. We have to trick PRM Conductor here and set the LC Peak Width to 20 so that all targets are exported, then in the created file change the LC Peak width back to 11 and points per peak to 7. In the future we'll allow the user to just export an "invalid" method.
Press Export Files to create the new instrument method.


Use the Send to Skyline to filter the remaining few poor transitions from these targets, and save the Skyline document state. Export a spectral library like we did before, giving it a name like PQ500_60SPD_Plasma. Configure this library in Settings / Peptide Settings / Library. This is the end of step 3.
For the 100 SPD case, from the pq500_100spd_plasma_multireplicate_results_refined.sky file, Launch PRM Conductor. Check the Optimize Scan Range box. This will produce targets with customized scan ranges for each target, significantly increasing the acquisition speed, at the cost of some injection time and sensitivity. Set an appropriate Base Name and select the PQ500_100SPD_AlignTemplate.meth for the Method Template. Use the same trick as for the 60 SPD, setting the LC peak width to 20 seconds and Export the method. Then open the method that is created and change the LC peak width back to 7 with 6 points per peak.
Press the Send to Skyline button. Export the spectral library and configure it in the Peptide Settings / Library tab. Save the pq500_100spd_plasma_multireplicate_results_refined.sky.

| Attached Files | ||
step3_100spd_rt_checking.jpg step3_art_embedded.jpg step3_art_ui.jpg step3_compare_peak_models.jpg step3_created_methods.jpg step3_prm_conductor_60spd_align.jpg step3_prm_conductor_60spd_toalign_results.jpg step3_prm_conductor_100spd_align.jpg step3_prm_conductor_toalign_60spd.jpg step3_prm_conductor_toalign_100spd.jpg step3_toalign_method.jpg