Table of Contents |
guest 2024-04-16 |
Tutorial: Sharing Skyline Documents
Tutorial: Panorama Chromatogram Libraries
Tutorial: Submitting Supplementary Data to Panorama Public
Tutorials
Try one of these tutorials, and get hands-on experience using Panorama with real data.
Panorama Chromatogram Libraries
Submit Data to Panorama Public
On Oct 20, 2015, the Skyline and Panorama Teams produced Webinar #11: Panorama Public and Panorama AutoQC, another great resource to learn more about some of the new aspects of Panorama.
[webinar]
Tutorial: Sharing Skyline Documents
- Overview
- Getting Started
- Requesting a Project on panoramaweb.org
- Creating a Subfolder in Panorama
- Uploading Data from Skyline to Panorama
- Viewing Data in Panorama
- Customizing Grid Views in Panorama
- Downloading Skyline Files from Panorama
- Uploading Documents Using the Panorama Web Interface
- Search Features in Panorama
- Sharing Data in Panorama
- Viewing of PTM-containing Peptides in Panorama
- Conclusion
Overview
Panorama is a freely available, open-source web server database application for targeted proteomics assays that integrates into a Skyline proteomics workflow. It has been implemented as a module within LabKey Server, an open-source bioinformatics data management platform with extensive support for proteomics data and a security model rich enough to support clinical studies.Panorama can be installed by laboratories and organizations on their own servers. You can visit the LabKey Server installation documentation: https://www.labkey.org/wiki/home/Documentation/page.view?name=installServerDemo for the available installation options. For this tutorial you will use the Panorama server hosted at the University of Washington panoramaweb.org where users can request free projects and have full administrative rights to configure data organization and security. This tutorial is an introduction to Panorama and covers the following areas:- Requesting a project on panoramaweb.org
- Data organization and folder management in Panorama
- Publishing Skyline documents to Panorama
- Data display options and searching results uploaded to Panorama
- Providing access to collaborators and other groups
Getting Started
- To start this tutorial, download the following ZIP file:
- Extract the files in it to a folder on your computer, such as
C:\Users\userName\Documents
- This will create a new folder:
C:\Users\userName\Documents\PanoramaSharing
Requesting a Project on panoramaweb.org
Open the Study9S_Site52_v3.sky file in Skyline either by double-clicking on the file in Windows Explorer or by going through the File > Open menu in Skyline. This file contains results that are part of a recent CPTAC multi-site SRM-MS system suitability study (Abbatiello et al., Mol. Cell. Proteomics 2013). The data in this document was collected at Site 52. To publish this document to Panorama, click on the Upload to Panorama button in the toolbar, as circled below. Alternatively, on the File menu, click Upload to Panorama.
 Since you have not yet registered a Panorama server in Skyline, you will see the following message:
- If you have an existing account on a Panorama server (or LabKey Server), and you would like to use that, click Continue and enter the server details in the Edit Server form Skyline presents. Skip to the next section of this tutorial.
- If you do not have an existing Panorama account, click Register to request a project on the PanoramaWeb server hosted at the University of Washington. This will open the project sign-up page on panoramaweb.org in a web-browser as shown below.

- Fill out the form and be sure to enter a Group name.
- Click Submit for Review.
 Click on the Tutorials project to go to the project homepage. On the project homepage, hover over the project name in the menu bar below the Panorama icon, click the to open the Tutorials node, then click on the folder that was created for you (e.g. ‘Your_Username’ in the following screenshot). You will have full administrative rights in your folder, so you will be able to create a folder structure for organizing your Skyline documents, and configure user access to the sub-folders.
Creating a Subfolder in Panorama
Skyline documents cannot be uploaded to the root project folder on panoramaweb.org or your folder in the ‘Tutorials’ project. You will create a sub-folder for uploading the Skyline document that you opened earlier. As a project administrator, you would typically organize your project workspace to have subfolders for each project and/or each researcher in your laboratory or organization. Follow these steps to create a "system suitability" sub-folder in your folder in the “Tutorials” project:- Navigate to "Your_Username" folder home page, if you are not already there.
- Hover over the project name in the menu bar below the Panorama icon and click on the new folder icon shown in the image below.

- In the Create Folder form, enter "system suitability" in the folder Name field.
- Select the Panorama option under Folder Type. This is the folder type that should be selected for all workflows supported by Skyline (SRM-MS, MS1 filtering or MS2 based projects).
- Click Next.

- On the "Users / Permissions" page accept the default selection and click Next. You will configure user permissions on this folder later.

- The next page Configure Panorama Folder asks you to choose the type of Targeted MS folder you would like to create. Panorama offers three choices here. For this tutorial accept the default Experimental data option. This option is meant for folders that serve as a repository of Skyline documents, useful for collaborating, sharing and searching across multiple experiments.
- Click Finish.
 You will be taken to the home page of the "system suitability" sub-folder that should look as follows:
 You are now ready to upload Skyline documents to this folder.
Publishing Data from Skyline to Panorama
To publish your first Skyline document to PanoramaWeb, perform the following steps:- Open "Study9S_Site52_v3.sky" in Skyline if it is not already open.
- If the Edit Server form is not already open, open it by clicking the Upload to Panorama button, or selecting File > Upload to Panorama and clicking Continue in the popup.
- In the Edit Server form, enter the email address and password for your account.
- If you are using PanoramaWeb, the server URL should already be entered as https://panoramaweb.org.
- If not, enter the URL to your Panorama/LabKey Server.

- Click OK.
- Navigate to and select the "system suitability" folder.
- Click OK.
 Skyline will create a ZIP archive of the files for your document and upload the ZIP file to panoramaweb.org, where it will be imported into the Panorama database.A popup message reading "Publish succeeded, would you like to view the file in Panorama?" will appear. Click Yes to view the document details.
Viewing Data in Panorama
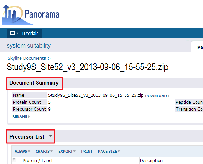
If you are not already viewing the document details, return to your "system suitability" folder, refresh the browser window if necessary, and click the name of the file you just uploaded in the Targeted MS Runs box. The Document Summary box shown in image below gives you a summary of the number of proteins, peptides, and transitions in your document.
 Below the Document Summary box you can view a list of all the proteins, peptides and precursors in your document, along with some of the information imported from the Skyline document, such as a modified peptide sequence, m/z and charge. You can click on a protein or peptide to view more details, including chromatograms and some of the other graphs that are also available in Skyline. Scroll down on the page and click on the peptide CAVVDVPFGGAK. This will take you to a page that has the following details for this peptide:
1. Chromatograms to show quantitative data quality
This peptide was measured in 10 QC system suitability replicates and there were 3 blank acquisitions. On this page you can view the chromatograms for this peptide in all the replicates. The image below shows the precursor and transition chromatograms in the replicates QC_01 and QC_02. There is one row of chromatograms for each replicate in your Skyline document, where the first column has the total precursor chromatogram and the subsequent columns have transition chromatograms. If this precursor was measured in a light as well as a heavy-labeled from, transition chromatograms for both the forms would be displayed side-by-side.
2. Peak Area Replicate Graph
Scroll further down on the page or collapse the Chromatograms box by clicking on the icon in the header of the box as circled in the image above.In the Summary Charts panel, you will now see a graph displaying the peak area for this peptide in the 13 replicates. This graph is similar to what you would see in Skyline for this peptide. As in Skyline, Panorama also allows grouping peak areas by custom replicate annotations. In this Skyline document researchers used a custom "system suitability" annotation that was set to "true" for the system suitability replicates and "false" for the blank acquisitions. You can group the peak areas by selecting "system suitability" from the pull-down combo-box next to Group By.
 Click Update to see peak areas grouped by the "system suitability" annotation.
 In the graph above, the red bar labeled ‘true’ represents the 10 system suitability runs, and the small error bar indicates that there was very little variability in the measurements for this peptide in the 10 replicates. You can also switch to a Coefficient of Variation (CV) view by checking the CV Values box and clicking Update again.
3. Library MS/MS spectrum viewer
Scroll down further on the peptide details page to see an interactive spectrum viewer displaying the MS/MS spectrum for CAVVDVPFGGAK from the spectrum library associated with this Skyline document. The name of the library is displayed in the title bar of the viewer. The viewer allows you to zoom in by clicking and dragging your mouse over the spectrum. You can also customize the view by selecting the ion types and charge states you want to display from the options menu to the left of the spectrum. A color-coded table to the right of the spectrum lists all the fragment ion m/z values for the peptide, with colored boxed representing the matching fragment ions found in the library spectrum. These spectral library views can be used to support publications in peer-reviewed journals or share data with collaborators.
Customizing Grid Views in Panorama
On your web-browser click the back button, or scroll to the top of the page and click on the ZIP file name in the navigation trail just under your folder name as shown in the image below. This will take you back to the documents details page. LabKey Server, on top of which Panorama is built, allows customizations of all tabular views. You can select which columns you would like to see, order them according to your preference, and define a sorting order. The Precursor List table on this page has blank annotation columns since the researchers did not define any custom peptide or precursor annotations in this Skyline document.
 To hide these columns from the default view preform the following steps:
- Select (Grid Views) just under the Precursor List heading.
- Choose Customize Grid from the drop-down menu.
 In the customization form that appears, you will see the Selected Fields panel on the right that shows the fields that are currently displayed.
- Hover over "Peptide Note/Annotations" below Peptide in the Selected Fields and click the (remove) icon.
- Do the same for "Precursor Note/Annotations" below Precursor.
- Click Save.

- In the popup, leave "Default grid view for this page" checked.
- Check "Make this grid view available to all users". This will cause all users with access to this folder to see the same table columns.
- Click Save.
 The annotation columns should no longer be displayed, as shown below:
 You can view the LabKey Server documentation on customizing grid views (https://www.labkey.org/wiki/home/Documentation/page.view?name=customViews) for more information.
Downloading Skyline Files from Panorama
Scroll up, if you need to, to view the Document Summary box. You can download the original Skyline ZIP archive that was published to Panorama by clicking on the Download link next to the file name. To open this zip file in Skyline do the following:
- On the File menu, click Open (Ctrl-O).
- Navigate to and select the zip file that you downloaded.
- Click the Open button.
 Publishing to Panorama provides a convenient way to share Skyline documents with other researchers. You will see later in this tutorial how to give other users access to the folders you create in Panorama.
Uploading Documents Using the Panorama Web Interface
Using the Skyline Publish to Panorama toolbar button or menu item is the most convenient way to get your documents into Panorama. But this can also be done by using the Panorama web interface. Next, you will use the web-interface to upload another document to the "system suitability" folder.
- In Skyline, open the file "Study9S_Site54_v2.sky".
- In the File menu, click Share.
- Click the Minimal button in the form that appears.

- Save the ZIP file on your computer using the Share Document form presented by Skyline.
- In Panorama, go to the "system suitability" folder.
- Click the Data Pipeline tab in the upper right corner.
- Click Process and Import Data as shown below.

- In the Files browser, click Upload Files.
- Click Browse or Choose File.
- Select "Study9S_Site54_v2.zip" that you just saved through Skyline.
- In the Description field enter "Site 54".
- Click Upload.
 Once the file has been uploaded it will appear in the list of files in your folder.
- Check the box next to Study9S_Site54_v2.zip.
- Click Import Data in the toolbar.

- Confirm that Import Skyline Results is selected.
- Click Import in the Import Data popup.

Search Features in Panorama
Panorama allows you to search for proteins, peptides and even peptides with specific modifications across all the documents contained in a folder and its sub-folders. These search features are particularly useful for large projects and data sets, and help to compare results between data acquired over a long period of time.On the "system suitability" folder page look at the Mass Spec Search box. You will see three available search options under the tabs Protein Search, Peptide Search and Modification Search. You will use the modification search option later in the tutorial. To perform a peptide search do the following:- Click the Peptide Search tab.
- Enter "GFCGLSQPK" in the Peptide sequence field.
- Check Exact matches only.
- Click the Search button.
 On the results page, in the Targeted MS Peptides box, you will see a list of documents in your folder where this peptide was observed. This peptide was found in both documents uploaded (sites 52 and 54) to this folder. You can view the details for the peptide in a document by clicking on the peptide sequence.
Sharing Data in Panorama
Panorama allows you to set fine-grained access control on your folders. You can grant access to your folders to individual collaborators or groups of researchers, and you can also configure the type of access (read-only, read and edit etc.).To change the permissions on the "system suitability" folder, first, make sure that you are on the "system suitability" folder page. If not, return by hovering over your project name (e.g. Tutorials) in the menu bar below the Panorama icon, opening the project and folders, then clicking your "system suitability" folder as shown in the image below. To change the permissions on this folder, navigate to the Permissions page by doing the following:
- On the menu bar, choose (Admin) > Folder > Permissions.
 If you did not configure the permissions for this folder during the folder creation process, the permissions page should look like this.
 The email address selected for the Folder Administrator role should be the email address with which you requested a project on panoramaweb.org. The Folder Administrator has full control over a folder. To add Brendan MacLean (Skyline team) to the Editor role, which will give him the ability to add and delete documents to this folder, follow these steps:
- Uncheck "Inherit permissions from parent", if it is checked.
- Select ‘brendanx@uw.edu (Brendan MacLean)’ from the combo-box next to Editor.
- Click Save.
- Select ‘vsharma@uw.edu’ from the combo-box next to Reader.
- Click Save.
 Instead of adding individual users to a role you can create a group of users and assign a role to the group. Only Project Administrators have permissions to create user groups. If you are working in your folder in the “Tutorials” project on panoramaweb.org, you do not have project administrator privileges. However, if you are working through this tutorial in your own project on panoramaweb.org or any other Panorama server, follow these steps to create a "Seattle collaborators" group and assign it to the Reader role:
- On the Permissions page click on the Project Groups tab.
- In the New group name field enter "Seattle collaborators" and click Create New Group.

- In the popup select Brendan and Vagisha from the pull down list to add them to the group.
- Click Done.

- Select the Permissions tab.
- Add the new "Seattle collaborator" group to the Reader role.
- Click Save.
- Select your "system suitability" folder in the folder navigation column.
- Add the "Seattle collaborator" group to the Reader role for this folder.
- Click Save and Finish.
- Select (Admin) > Folder > Permissions.
- Click the Project Groups tab.
- Click the "Seattle collaborators" group.
- In the popup, click Manage Group.

- On the Manage Group page, enter the email address of the new user in the Add New Members field.
- Scroll down and click Update Group Membership.
Viewing of PTM-containing Peptides in Panorama
Many journals require visual display of MS/MS spectra of peptides containing post-translational modifications such as phosphorylation or acetylation. You can make use of Skyline to build spectral libraries from your peptide search results and view the annotated spectra in the Skyline Spectral Library Explorer. However, using the resulting Skyline document to satisfy journal requirements requires that you send the Skyline document to reviewers, and that they have a local installation of Skyline to view the document. Alternatively, you can publish the documents to Panorama, where reviewers can view the spectra in the Panorama spectrum viewer.Next, you will import a Skyline document to Panorama that contains phosphorylated peptides, search for modified peptides and view their spectra.Create a new sub-folder in "Your_Username" folder called "Phospho peptides", using another method for creating sub-folders in Panorama than you used before:- In the header bar, select (Admin) > Folder > Management.

- On the Folder Management page, make sure that the Folder Tree tab is selected, and "Your_Username" folder is highlighted.
- Click Create Subfolder.

- In the Create Folder wizard enter Name: “Phospho peptides”.
- Select Folder Type, "Panorama" as before.
- Click Next.
- For Users/Permissions keep the default selection: Inherit from Parent Folder.
- Click Next.
- Select Experimental Data on the Configure Panorama Folder page.
- Click Finish.
- In Skyline, open the file "Phospho_0921_2010_Thr99_v1_P only.sky" from the tutorial folder.
- Click the Publish to Panorama toolbar button.
- Select the “Phospho peptides” folder from the folder tree in the Publish Document dialog.
- Click OK.
 Wait for data import to complete and then go back to Panorama in your web-browser, and navigate to the “Phospho peptides” folder. Refresh the page (F5 in most browsers) if you are already on the “Phospho peptides” folder page. You should see the file that you just imported to Panorama in the Targeted MS Runs table. Click on the name of the file to see the document details. Clicking on any of the peptide sequences will take you to the peptide details page where you can view the library spectrum for the peptide. Click the back button to go back to the folder page, or use the Phospho peptides link.To find all peptides in this document containing a phosphorylation, perform the following steps:
- In the Mass Spec Search box, select the Modification Search tab.
- Choose the Delta Mass option for Search By, if it is not already selected.
- Enter "S" in the Amino Acid field.
- Enter "80" in the Delta Mass field.
- Click Search.
 You will now see a list of all the serine phosphorylated peptides in the document. Click on the first peptide in the list, LSVPTSDEEDEVPAPKPR, to view its library spectrum. Click back in your browser. In the Peptide Summary box click on the name of the protein (sp|Q8NE71|ABCF1_HUMAN) to which this peptide belongs.
 You will be taken to the protein details page where you can see the location of this peptide in the protein sequence.
Conclusion
In this tutorial, you have been introduced to new ways you can share Skyline documents with collaborators, reviewers and the general public using Panorama, and the PanoramaWeb.org web site hosted by the MacCoss Lab at the University of Washington. You have requested a project on PanoramaWeb, registered an administrator account for that project with your email address, and created 2 new folders in that project. You have explored data from Skyline documents in these folders, searched for specific peptides and post-translational modifications, and customized access to the data in them. If you worked on this tutorial in your own project instead of the "Tutorials" project, you can now just as easily go back to the folder management form and delete these tutorial folders to return your new project to its original state, ready for your own experimental data.We wish you luck in your research and hope that you find these tools useful in sharing and disseminating your findings.Tutorial: Panorama Chromatogram Libraries
- Overview
- Getting Started
- Signing Up for an Account on panoramaweb.org
- Creating a Chromatogram Library Folder in Panorama
- Publishing Skyline Documents to a Library Folder in Panorama
- Viewing Chromatogram Library Data in Panorama
- Updating Chromatogram Libraries
- Using Chromatogram Libraries in Skyline
- Conclusion
- Reference List
Overview
Targeted assay development for proteins or peptides is typically a time-consuming and lengthy process. Deciding the ideal set of peptides and transitions to measure for your proteins of interest requires careful experimental design and iterative optimization. Once an assay has been established, the assay parameters can be reused for designing future experiments. Chromatogram libraries in Panorama provide a way you can store targeted assays that have been curated in Skyline and reuse them in the future for measuring proteins and peptides in other samples, as well as share them with other researchers. Chromatogram libraries can also capture physiochemical and experimental properties such as the relative ion abundance, measured retention time, measured chromatograms, and in the future we expect to store iRT, ion mobility, and optimal instrument parameters such as collision energy. Empirical measurements for these parameters can be particularly relevant in guiding targeted experiment design.You can preview the results of this tutorial in an example folder on PanoramaWeb.org.In this tutorial we will:- Create a folder in Panorama for chromatogram library data.
- Add Skyline documents, with curated targeted results, to the chromatogram library folder.
- Download the chromatogram library from Panorama and use it in Skyline.
Getting Started
To start this tutorial, download the following ZIP file: Extract the files to a folder on your computer, like:C:\Users\username\Documents
C:\Users\username\Documents\PanoramaChromatogramLibraries
Signing Up for an Account on panoramaweb.org
This tutorial assumes that you will be working in a sub-folder of the "Tutorials" project on panoramaweb.org, the Panorama server hosted by the MacCoss lab at the University of Washington. However, if you already have an existing account and project on panoramaweb.org, or have an account on another Panorama server you are welcome to use that, and skip to the next step.To request a folder on panoramaweb.org for working through this tutorial, fill out the sign-up form on this page: https://panoramaweb.org/labkey/wiki/home/support/page.view?name=hosted-project-signup-form- Fill in the required fields, marked with a red asterisk, in the form shown below.
- Enter "Tutorials" in the Group name.
- Click Submit.
 Once your request is approved, a folder with full administrative rights will be created for you in the "Tutorials" project on panoramaweb.org. You will receive a welcoming email with a link to complete your account registration by choosing a password.
Creating a Chromatogram Library Folder in Panorama
First sign in to the Panorama server and navigate to your folder. If you are working in the "Tutorials" project on panoramaweb.org follow these steps:- Click the Projects tab to see a list of all the projects to which you have access on the server.
- Click the "Tutorials" project.
- On the project homepage, hover over the project name in the menu bar below the Panorama icon and click on the folder that was created for you (e.g. "Your_Username").
 When organizing your data for chromatogram libraries, we recommend that you create a folder for each species that you study, and under each species folder you can create subfolders for the instrument type where the data was collected, or any other experimental conditions for which it is appropriate to have separate chromatogram libraries. In this tutorial you will create a subfolder for building a chromatogram library for human transcription factors.
To create a sub-folder for this tutorial, do the following:
When organizing your data for chromatogram libraries, we recommend that you create a folder for each species that you study, and under each species folder you can create subfolders for the instrument type where the data was collected, or any other experimental conditions for which it is appropriate to have separate chromatogram libraries. In this tutorial you will create a subfolder for building a chromatogram library for human transcription factors.
To create a sub-folder for this tutorial, do the following:
- Hover over the project menu and click the new folder icon shown in the image below.

- In the Create Folder form, enter "Human" in the folder Name field.
- Select the Panorama option under Folder Type, as shown below.

- Click Next.
- On the Users / Permissions page accept the default selection.

- Click Next.
- On the Configure Panorama Folder page choose the Chromatogram library option.
- Check the box to "Rank peptides within proteins by peak area".

- Click Finish.
 You are now ready to upload Skyline documents to this folder.
Publishing Skyline Documents to a Library Folder in Panorama
Open the "Stergachis-SupplementaryData_2_a.sky" file in Skyline either by double-clicking on the file in Windows Explorer or in Skyline, on the File menu, click Open (Ctrl-O). This file contains peptides and fragment ions for 10 human transcription factors published in Stergachis et al. 2011. To publish this document to your library folder on Panorama, follow these steps:- Click on the Publish to Panorama
 button in the Skyline toolbar, shown in the image below. Alternatively, on the File menu, click Publish to Panorama.
 If you have not yet set up a Panorama server in Skyline, you will see the following message.
- Click Continue.
- If you are working on a server other than panoramaweb.org, enter the URL of your server.
- Enter your email address and password on the Panorama server.
- Click the OK button.
 chromatogram icon next to them.
- Navigate to and select the "Human" folder that you just created in Panorama.
- Click the OK button.
Viewing Chromatogram Library Data in Panorama
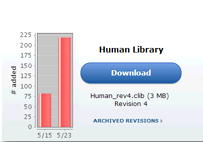
Once your document has been imported into Panorama, go back to the web-browser where the home page of the "Human" library folder should still be open. Skyline will offer you the option to directly view the results. From this page click Human to return to the home page. Refresh the page (F5 in most browsers) and, in the Chromatogram Library Download box, you will see that the first version (Revision 1) of your "Human Library" is now available for download. A brief summary of the contents of the library is also displayed under the Library Statistics heading. Further down on the page, in the Mass Spec Search box, you can search for proteins, peptide sequences or peptides with specific modifications in your library.
 The tables below the Mass Spec Search box display a list of the proteins and peptides in the library folder. Clicking on an entry in one of these tables will display more details for the selected protein or peptide. Click on CTCF in the Proteins table to bring up a page with more details for this protein. The Sequence Coverage box displays the sequence, with colored rectangles highlighting the peptides for which there are measurements in the library.
 The Peptides table displays a list of these peptides along with some information that was contained in the uploaded Skyline document, such as the retention time.
 Below the Peptides table is a bar graph that displays the peak areas of the peptides, ordered from the highest to the lowest measured peak area. Retention times are also shown.
 Go back to the home page of your library folder either by clicking your browser's back button or by clicking the Human (folder name) link near the top of the page.
Updating Chromatogram Libraries
As you develop assays for more proteins or peptides, you can publish Skyline documents containing those assays to the same library folder. Panorama will build a new version of the library each time a Skyline document is published to the folder. Any proteins that were not already included in the library will be added.Open the file "Stergachis-SupplementaryData_2_b.sky" in Skyline. This file contains another subset of transcription factor assays from "Stergachis et al. 2011|#reference]. This file also contains measurements for the transcription factor MAX that was already included in the first document that you published to the library folder. Two additional peptide measurements are included for this protein in this document.Publish this document to the "Human" chromatogram library folder on Panorama by doing the following:- Click the Publish to Panorama button in the Skyline toolbar.
- Select the "Human" folder in the Panorama Folders tree of the Publish Document form.
- Click OK.
- Wait for the file import to complete.
- Go to your browser and refresh the library folder page on PanoramaWeb. If you click Yes in Skyline to "view the file in Panorama", you will open a new browser showing the results. Click Human near the top of the page to return to the library folder page.
 In case of a conflict, Panorama marks the incoming version of the protein as conflicted, and continues to include the older version of the protein in the library, until the conflict is resolved. The library built after uploading "Stergachis-SupplementaryData_2_b.sky" still contains peptides, transitions and chromatograms for protein MAX from the first document that was uploaded to the library folder. To tell Panorama to use the newer version of the protein:
- Click the Resolve conflicts link.
 Click on the (plus) icon next to the protein name to view the list of peptides measured for this protein in the two versions. (When expanded, the icon will become a (minus). The new document contains measurements for two additional peptides that are marked in the image below.
 To resolve this conflict by choosing the new version of the protein, do the following:
- Under Conflicting Proteins in Document, click the check box next to the protein name if it is not already checked.
- Click Apply Changes.
- Click on the Download button and save the chromatogram library file (Human_rev3.clib) to your computer.
 A table with all the library revisions will be displayed. You can download older revisions by clicking on a file name in the Archived Revisions table.
Using Chromatogram Libraries in Skyline
You will now prepare a new Skyline document to measure the proteins CTCF and MAX in another sample. The library you just downloaded from Panorama contains chromatograms for peptides from these proteins. You will use the library to filter the set of peptides and transitions in your Skyline document to the best responding ones contained in the library. You will also see how you can compare fragment ion or transition chromatograms obtained in a new experiment with chromatograms contained in the library to confirm peptide identifications.Before you begin, make sure that the peptide and transition settings in Skyline are configured correctly, by creating a new file and adjusting its settings as necessary:- On the File menu in Skyline, click New (Ctrl-N).
- On the Settings menu, click Peptide Settings....
- Click the Digestion tab, if it is not already selected.
- In the Enzyme dropdown list, select "Trypsin KR " (if it is not selected by default).
- In the Max Missed Cleavages dropdown list, select "0" (if it is not selected by default).
- In the Background proteome dropdown list, select "None" (if it is not already selected).
- Click the Filter tab.
- In the Min length field, enter "7".
- In the Max length field, enter "23".
- In the Exclude N-terminal AAs field, enter "0".
- Uncheck Exclude potential ragged ends (if it is checked).
- Uncheck any selected options in the Exclude peptides containing: list.
- Check Auto-select all matching peptides (if it is not already checked).
- Click the Library tab.
- Uncheck any selected libraries.
- Click on the Modifications tab.
- Check the "Carbamidomethyl (C)" modification in the Structural modifications list (if it is not already checked).
- Uncheck any other selected modifications in the Structural modifications list.
- Uncheck any selected modifications in the Isotope modifications list.
- Click the OK button in the Peptide Settings form.
- On the Settings menu, click Transition Settings....
- Click the Filter tab.
- In the Precursor charges field, enter "2".
- In the Ion charges field, enter "1".
- In the Ion types field, enter "y".
- In the Product ions section From dropdown list, select "ion 3".
- In the Product ions section To dropdown list, select "last ion – 1".
- In the Special ions list, uncheck any selected options.
- Make sure that the Precursor m/z exclusion window field is blank.
- Check Auto-select all matching transitions (if it is not already checked).
- Click on the Library tab.
- Uncheck If a library spectrum is available, pick its most intense ions.
- Click on the Instrument tab.
- Enter "50" in the Min m/z textbox.
- Enter "1500" in the Max m/z textbox.
- Uncheck Dynamic min product m/z if it is checked.
- Click the OK button in the Transition Settings form.
- On the File menu, choose Import and click FASTA....
- Browse to and select "CTCF_MAX.txt" in the file browser.
- Click the Open button.
 The settings you configured in Skyline have resulted in 31 peptides for the two proteins. If you export a transition list for this document without applying any filtering you would be measuring 220 transitions. However, you can take advantage of the information contained in the chromatogram library to limit your measurements to the best responding precursors and product ions for the two proteins. Follow these steps to filter the list of peptides and transitions:
- On the Settings menu, click Peptide Settings....
- Click the Library tab.
- Click the Edit List button.
- Click the Add... button in the Edit Libraries form.
- In the Name field of the Edit Library form, enter "Panorama Human Library".
- Click on the Browse... button.
- Select the "Human_rev3.clib" chromatogram library file that you downloaded earlier.
- Click the OK button in the Edit Library form.
- Click the OK button in the Edit Libraries form.
- Check the box next to "Panorama Human Library", in the Libraries list.
- In the Pick peptides matching dropdown list that appears, select Library (if it is not selected by default).
- In the Rank peptides by dropdown list, select Peak Area.
- Check the Limit peptides per protein box.
- In the Peptides field, enter "5".

- Click the OK button.
 This number can be further reduced by limiting the transitions to the top ranking transitions in the library.
- On the Settings menu, click Transition Settings....
- Click the Library tab.
- Check the box for If a library spectrum is available, pick its most intense ions.
- In the Pick: product ions field that appears, Enter "3".
- Select the From filtered product ions option.

- Click the OK button.
- On the File menu, choose Export and click either Transition List... or Method....
- To view the list of supported instrument types, use the Instrument type dropdown menu.
- Open the file "In_vivo_versus_in_vitro_comparison.sky" in Skyline.
- In the Targets view, select the peptide "TFQCELCSYTCPR", under the CTCF protein.
 You should see the chromatograms for this peptide from the newly acquired data side-by-side with the chromatograms from the Human_rev3.clib library. The tab titled K562 (nuclear) has the chromatograms from the new data, and the tab titled Library Match displays the library chromatograms.If you do not see the Library Match tab you can display it as follows:
- On the View menu, click Library Match.
Conclusion
In this tutorial, you have gone through the steps of creating a library folder in Panorama for curated, targeted results. You have built a chromatogram library in Panorama, and used it in Skyline to select the peptides and product ions to measure in a new experimental setting. You have also compared chromatograms acquired in a new experiment with data contained in the library to validate peptide identifications. By using these techniques with your own experimental data, you can build an extensive knowledge base of the targeted assays you have investigated and refined in your laboratory, and avoid duplicating this effort in new experiments. You can share these libraries with collaborators or the general public, as others are already doing, helping others to reproduce your results, or use them for new applications in targeted proteomics.Reference List
1. Stergachis, A., MacLean, B., Lee, K., Stamatoyannopoulos, J. A., & MacCoss, M. J., Rapid empirical discovery of optimal peptides for targeted proteomics Nature Methods 8,1041–1043 (2011)Related Topics
Tutorial: Submitting Supplementary Data to Panorama Public
- Overview
- Getting Started
- Creating a Folder in Panorama
- Uploading Skyline Documents to Panorama
- Customizing Grid Views in Panorama
- Creating Wiki Pages on Panorama
- Submitting to Panorama Public
- Reference List
Overview
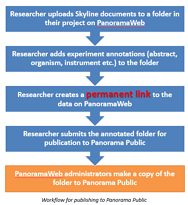
PanoramaWeb (https://panoramaweb.org), the public Panorama server hosted at the University of Washington is being increasingly used by researchers to host data processed in Skyline for sharing with collaborators and for referencing in published papers. Users on PanoramaWeb are given their own projects over which they have full administrative control. The ease of uploading Skyline documents to Panorama combined with the ability to configure permissions and folder structure makes PanoramaWeb an attractive choice for hosting and sharing data from Skyline centric workflows. It also makes it possible for users to provide public access to data for fulfilling journal submission requirements. Several papers have already been published that reference supplementary Skyline documents hosted on PanoramaWeb. However, data in user projects remains under the control of the user, and may be edited or deleted post publication.To address this concern, PanoramaWeb hosts a public repository called "Panorama Public" where users may submit supplementary data contained in their projects on PanoramaWeb. The repository provides a permanent location for data to be referenced in publications. Upon submission, a copy of the data contained in the user project is made to Panorama Public. This copy includes user interface elements such as wiki pages, charts and other supplementary figures which were added by the user to their project. Data copied to Panorama Public is read-only, ensuring its availability in the original form accepted for publication. Permissions to the data in Panorama Public are managed as required -- private with access to reviewers while the manuscript is in review and public after the paper has been accepted.In this tutorial you will you will prepare a folder on PanoramaWeb for submitting to Panorama Public. This will involve uploading documents related to a manuscript and building a custom user interface around the data. Finally, you will go through the steps of submitting the folder to Panorama Public. A large part of this tutorial covers adding custom user interface elements to enhance the presentation and provide context to the supplementary data contained in a folder on PanoramaWeb. If you already have a folder that is ready for publication, you can skip to the section "Submitting to Panorama Public" that covers the steps required for submitting data to Panorama Public.In this tutorial you will use several features that are part of LabKey Server (https://www.labkey.org), the data management platform behind Panorama, to create a user interface for your supplementary data on PanoramaWeb. Links to detailed documentation provided by labkey.org on individual features are included in the tutorial in yellow boxes like the one below. Please note that these links are not part of the tutorial and are only meant to provide more detailed information on a particular feature in LabKey Server. The link below takes you to the main documentation page on labkey.org. Documentation Home:
 Getting Started
To start the tutorial, download the following ZIP file: Extract the files to a folder on your computer, like:C:\UsersYour_Username\Documents
C:\Users\Your_Username\Documents\SubmitToPanoramaPublic
- Create a folder on PanoramaWeb and upload Skyline documents to the folder.
- Add wiki pages with text, supplementary figures and tables.
- Prepare the folder for submission by providing an abstract, organism, instrument information etc.
- Submit to Panorama Public.
Signing Up for an Account on PanoramaWeb
This tutorial assumes that you will be working in a sub-folder of the "Tutorials" project on PanoramaWeb, the Panorama server hosted by the MacCoss lab at the University of Washington. However, if you already have a project on this server, you are welcome to work in a sub-folder of your project, and skip to the next step.To request a folder on PanoramaWeb for working through this tutorial, fill out the sign-up form on this page:- https://panoramaweb.org/signup.url
- Fill in the required fields, marked with a red asterisk, in the form shown below.
- Enter "Tutorials" in the Group name.
- Click Submit.
 Once your request is approved, a folder with full administrative rights will be created for you in the "Tutorials" project on PanoramaWeb. You will also receive a welcoming email with a link to complete your account registration by choosing a password.
Creating a Folder in Panorama
Sign in to PanoramaWeb at https://panoramaweb.org with your username and password. If you are working in the "Tutorials" project follow these steps to navigate to your folder under this project:- Click the Projects tab in the upper right corner (shown below) to see a list of all the projects to which you have access on the server.
- Click the "Tutorials" project.
- On the project homepage, hover over the project name in the menu bar below the Panorama icon and click on the folder that was created for you. We will use "Your_Username" as the folder name only as an example. Your folder name will be different.

NOTE: Most of the Panorama features that you will explore in the rest of the tutorial require that you have administrative permissions in the folder that you are working in. If you are working in your sub-folder in the "Tutorials" project you are the administrator of the folder. If, however, you are working in another project on PanoramaWeb you must contact your project administrator to ensure that you have administrative permissions.
You will now create a subfolder where you will upload Skyline documents and add other supplementary information for a manuscript. To create a sub-folder for this tutorial, do the following:
- Click the new folder icon shown in the image below.

- In the Create Folder form, enter "System Suitability Study" in the folder Name field.
- Select the Panorama option under Folder Type, as shown below.

- Click the Next button.
- On the Users/Permissions page accept the default selection (Inherit From Parent Folder).
- Click the Next button.
- On the Configure Panorama Folder page accept the default selection (Experimental data).
- Click the Finish button.
Uploading Skyline Documents to Panorama
From the tutorial files downloaded earlier, open the "Study9S_Site52_v1.sky" file in Skyline either by double-clicking on the file in Windows Explorer or in Skyline, on the File menu, click Open (Ctrl-O). This file contains measured results for 22 peptides from one of the participating labs in the system suitability study (Abbatiello et al. 2013). To upload this document to the folder you just created on Panorama, follow these steps:- Click on the Upload to Panorama button in the Skyline toolbar, shown in the image below. Alternatively, on the File menu, click Upload to Panorama.
 If you have not yet set up a Panorama server in Skyline, you will see the following message.
- Click the Continue button.
- Enter "https://panoramaweb.org" in the URL field.
- Enter your email address and password on PanoramaWeb.
- Click the OK button.

- In the Panorama Folders field, navigate to and select the "System Suitability Study" folder that you just created on Panorama.
- Click the OK button.

Customizing Grid Views in Panorama
Click on "Study9S_Site56_v1.sky.zip" in the Targeted MS Runs table to open the details page for the document. The Precursor List table on this page displays a list of precursors in this Skyline document. The Precursor Note/Annotations column in the table, highlighted in the image below, is blank since the researchers did not define any custom precursor annotations in this document. Do the following to hide this column from the default grid view:
- Click the (Grid Views) button at the top of the table, just under the Precursor List title.
- Select Customize Grid from the drop-down menu.
 In the customization form that appears, you will see a Selected Fields panel, to the right, that lists the columns that are currently displayed.
- Scroll down, then hover over Precursor Note/Annotations below Precursor in the Selected Fields panel and click the (remove) icon.

- Click the Save button.
- In the Save Custom View form, check Make this grid view available to all users.
- Click the Save button.
 The Precursor Note/Annotations columns should no longer be displayed, as shown below:
 Go back to the home page of the "System Suitability Study" folder by clicking on the folder-name link near the top of the page as shown here:
TIP: This folder name link is provided on all pages within the folder except the main home page and provides a quick way to navigate to the home page of that folder.
Click on "Study9S_Site52_v1.sky.zip" in the Targeted MS Runs table. The default view for the Precursor List table for this document should not have the Precursor Note/Annotations column. Custom grid views defined once in a folder apply to all Skyline documents uploaded to the folder. The "default" grid we saved our changes to is shown by default.
Creating Wiki Pages on Panorama
Wiki pages allow you to add content, including file attachments, to your folders on Panorama. You will now create a wiki page to display a supplementary figure (Supplementary Figure 3A) from the original paper along with a figure caption. This figure displays normalized peak areas for the 9 best peptides identified in the study (Abbatiello et al. 2013), across 10 replicates in each site. The original figure has a plot for each of the 15 sites in the study. "SupplFig_3A.png" in the tutorial files has plots for the 3 sites for which Skyline files are included in the tutorial.Navigate back to the "System Suitability Study" folder home page. To add a wiki page in the folder, we first need to enter "Page Admin Mode" to add a new wiki web part to the folder page. Do the following:- In the header, click the (gear) icon to open the Admin menu. Select Page Admin Mode.

- From the <Select Web Part> drop-down menu that will appear at the bottom left of the folder home page, scroll down and select Wiki.
- Click the Add button.
 A box titled Wiki will be added under the Targeted MS Runs box that should look like this:
- Click the Create a new wiki page link to open the wiki editor.
- Enter "supplementary_figure_3A" in the Name field. The name must be unique in the folder and typically does not contain spaces.
- Enter "Supplementary Figure 3A" in the Title field. The title is the display title and has no restrictions on uniqueness or spaces for display.
- In the Body (HTML) field select the Visual tab if it is not already selected.

- In Notepad or another text editor open the file "SupplFig_3A_caption.txt" contained in the tutorial data you downloaded. Copy and paste the contents of this file into the Body (HTML) field.
- You can format the text using the options available in the formatting toolbar. - Remove any preformatting by selecting the text and choosing the format "Paragraph".
- Select the title of the figure caption ("Supplementary Figure 3A") and make it bold by clicking the B button in the toolbar. You can see more formatting options in the toolbar by clicking the Show/hide toolbars button at the left corner of the toolbar.

- Upload an image file to display on the wiki page:
- Scroll down, if you need to, to the Files field at the bottom of the wiki editor.
- Uncheck the Show Attached Files checkbox.
- Click the Attach a file link and click the Choose File button that appears.
- Navigate to the folder where you downloaded the tutorial data and select "SupplFig_3A.png".
- Click on the Open button.
- Add the image to the wiki page:
- Place the mouse cursor just before the figure title in the Body(HTML) field.
- Click the Insert/edit image icon
 in the toolbar.
 - Enter "SupplFig_3A.png" in the Image URL field of the Insert/edit image dialog.
- Click Insert in the dialog.
- Press the "Enter" key on your keyboard once so that the image title is below the image icon in the Body(HTML) field. At this time the actual image will not appear in the editor.

- Click the Save & Close button at the top left of the wiki editor.

A note about "Web Parts" in LabKey Server:The wiki page that you just created appears on the folder home page in a box with a border and a title that is referred to as a "web part". Web parts are user interface panels that can be added or removed from folder pages by folder administrators when they are in page admin mode. Each web part provides a way for users to view and/or interact with some part of the data contained in the folder. For example, the Wiki web part displays the contents of a specific wiki page. The list of available web parts can be accessed from the two <Select Web Part> menus at the bottom of the folder home page – one on the left side and the other on the right side. The two menus have different sets of available web parts. Web parts selected from the menu on the bottom left of the page are wider and get added to the left side of the page, and those selected from the menu on the bottom right get added to a narrower column on the right side of the page.The title bar of a web part has controls (available to folder administrators in page admin mode) for moving it up and down the page, relative to other web parts. These controls appear in the right side of the title bar for the wider web parts, shown in the image below. The term "web part" will be used in the remainder of the tutorial to refer to these user interface elements.
You will now add a table of contents for easy navigation to the wiki pages.
The term "web part" will be used in the remainder of the tutorial to refer to these user interface elements.- Scroll down to the bottom of the page.
- Choose Wiki Table of Contents from the <Select Web Part> drop-down menu at the bottom right of the page.
- Click the Add button.

- Change the title of the web part by clicking the (triangle) drop-down icon in the title bar and selecting Customize. If you are still in page admin mode, you will see additional options on this menu.

- Enter "Figures & Tables" as the title (leave the folder path as is) and click the Submit button. The table of contents web part on the home page should now display the updated title. This webpart will allow you to easily navigate to all the wiki pages in this folder as you add additional figures and tables in new wikis.
- Add a new wiki page by clicking the drop-down icon in the title bar (which should now read Figures & Tables) of the Wiki Table of Contents web part.
- Select New from the menu.
- Enter "supplementary_table_6" in the Name field.
- Enter "Supplementary Table 6" in the Title field.
- In the Body (HTML) field select the Visual tab if it is not already selected.
- In Notepad or another text editor open the file "SupplTable_6_caption.txt" contained in the tutorial data. Copy and paste the contents of this file in the Body (HTML) field.
- Remove any preformatting by selecting the text and choosing the format "Paragraph".
- Format the text using options available in the formatting toolbar. For example, you can make the title ("Supplementary Table 6") bold.
- In the Files field at the bottom of the wiki editor click the Attach a file link and click the Choose File button.
- Navigate to the folder where you downloaded the tutorial data and select "SupplTable_6.xlsx".
- Click the Open button if double clicking does not attach the file and close the popup.
- Notice that we are leaving the Show Attached Files checkbox checked this time.
- Click Save & Close at the top of the wiki editor.
 Viewers can click the attached file to download it.Notice that we did not create a new wiki web part for this wiki, so you are viewing the wiki page itself. By default, a search box and a Wiki Table of Contents web part with the title Pages is shown. This web part should display the titles of the two wiki pages you have in the folder. You can click on a title to view either wiki page.Go back to the home page of the folder by clicking the System Suitability Study link near the top of the page. Notice on the home page that the Figures & Tables is displayed in the table of contents web part here.
 Since the wiki pages can now be accessed via the table of contents web part, you can remove the wiki web part that is displaying "Supplementary Figure 3A" from the folder home page.
- Scroll down, if you need to, so that the title bar of the wiki web part is visible.
- From the (triangle) menu, select Remove From Page.

- If you do not see this option, first reenter page admin mode by selecting: Page Admin Mode in the header.
- Notice that the wiki itself is still available from the table of contents. Removing the web part did not remove the underlying content.
Submitting to Panorama Public
Folders containing supplementary data intended for publication to Panorama Public have to be annotated with a description of the experiment. This includes information such as an abstract, experiment and sample descriptions, organism, MS instruments used etc. To add experiment annotations to the folder, do the following:- Go back to the home page of the System Suitability Study folder, if you are not already there.
- Re-enter > Page Admin Mode if you are not already in this mode.
- Select Targeted MS Experiment from the <Select Web Part> menu at bottom-left of the page.
- Click the Add button.
 This action will add a web part titled Targeted MS Experiment at the bottom of the page that looks like this:
- While in page admin mode, you can change the layout of the folder home page to move the Targeted MS Experiment webpart to the top of the page.
- Move the Targeted MS Experiment web part above the Targeted MS Runs web part by selecting Move Up from the (triangle) menu in the web part title bar.

- Scroll to the top of the page and remove the Mass Spec Search web part by selecting > Remove From Page in its title bar.
- Click Exit Admin Mode at the top of the page to hide the page layout editing features.
- Click the Create New Experiment link in the Targeted MS Experiment web part.
- In the Targeted MS Experiment form enter "Multi-lab system suitability study" in the Title field.
- Start typing "Bos" in the organism field and select "Bos taurus" from the drop-down list.
- Select "TSQ Vantage" and "4000 QTRAP" in the Instrument field. Start typing the instrument name and select from the drop-down list.
- In Notepad or another text editor open the file "Abstract.txt" included in the tutorial data. Copy the contents of the file and paste in the Abstract field of the form.
- In the Keywords field enter "skyline, system-suitability".
- Enter a Submitter Affiliation.

- Click the Submit button at the bottom of the form.
 You will be taken to the experiment details page. All the Skyline documents you upload to this folder will get added to the experiment and will appear in the Targeted MS Runs table. In this tutorial you have uploaded all the Skyline files to a single folder. If, however, your data is organized in subfolders, you will see a panel titled Subfolders. You can click the Include Subfolders button in this panel to include data from subfolders in your experiment prior to submitting to Panorama Public. You can find more details on this documentation page.
Navigate back to the folder home page by clicking the System Suitability Study link near the top of the page.
You will be taken to the experiment details page. All the Skyline documents you upload to this folder will get added to the experiment and will appear in the Targeted MS Runs table. In this tutorial you have uploaded all the Skyline files to a single folder. If, however, your data is organized in subfolders, you will see a panel titled Subfolders. You can click the Include Subfolders button in this panel to include data from subfolders in your experiment prior to submitting to Panorama Public. You can find more details on this documentation page.
Navigate back to the folder home page by clicking the System Suitability Study link near the top of the page. To submit to Panorama Public, click the red Submit button in the Targeted MS Experiment web part.
Panorama Public is a member repository of the ProteomeXchange consortium. Data submitted to Panorama Public that fulfills ProteomeXchange submission requirements will be assigned a ProteomeXchange Id and announced on ProteomeCentral.
For more details refer to this documentation page: Data Validation for ProteomeXchange
Click the Validate Data for ProteomeXchange button on the next page. The data validation process will check for:
- All the raw files imported into the Skyline documents being submitted have been uploaded. This is the minimum requirement for getting a ProteomeXchange Id.
- All the modifications used in the Skyline documents have a Unimod Id.
- The source files (spectrum files + search results files) used to build any spectral libraries used with the Skyline documents are uploaded.
 This will start a data validation process in the background. This page will refresh automatically with the validation progress.
 Validation results will be displayed when the validation job is complete. Since the raw files used with the Skyline documents have not been uploaded, the validation status displayed should be - "Data is not valid for a ProteomeXchange submission".
Learn more about data validation for ProteomeXchange here: Data Validation for ProteomeXchange
 Expand the nodes next to the Skyline document names in the "Skyline Document Sample Files" grid to view the names of the missing raw data files. Click the Upload Files button.
 On the "Upload Missing Sample Files" page drag and drop the raw files from the "Raw Files" subfolder of the tutorial data. You can select multiple files and drop them into the files browser. After the files are uploaded click the Rerun Validation button.
 When the validation job is complete the status displayed should be - "Incomplete data and / or metadata". The "Skyline Document Sample Files" grid should show a "Complete" status for all the Skyline documents. This means that the data can be assigned a ProteomeXchange Id, but there is some more information required for a "complete" ProteomeXchange submission. In the "Modifications" grid there is no Unimod Id for "Carboxymethylcysteine". Click the "Find Match" link in the "Unimod Match" column.
 On the "Unimod Match Options" page click the Unimod Match button to find a Unimod Id for Carboxymethylcysteine.
 The match found for Carboxymethylcysteine should be "Carboxymethyl, Unimod:6". Click the Save Match button.
 After saving the Unimod match, the status on the validation results page should be "Complete". Click the Continue Submission button.
 You will be presented with a form that looks similar to the image below:
 In the Submission Request to Panorama Public form do the following:
- If you were working in a folder with real data for a manuscript, you would select "Panorama Public" from the drop-down list next to the Submit To option (it is the default, shown above). For this tutorial, select "Panorama Public Tutorial".
- Enter "publication _tutorial_<your_ folder_name>" in the Access Link field. Replace <your_ folder_name> with the name of your folder in the "Tutorials" project. For example, if you folder name is "Your_Username" enter "publication_tutorial_Your_Username" in the textbox. The URL displayed below the textbox will be updated as you type in the textbox. Once you have finished typing the URL should read (for folder "Your_Username")
https://panoramaweb.org/publication_tutorial_Your_Username.url
- Uncheck the Keep Private checkbox. If you were submitting data for a manuscript undergoing peer review you could keep the Keep Private box checked. This will ensure that when the data is copied to Panorama Public, it will be kept private with read-only access to the submitter. Another read-only reviewer account will be created for the data, and account details provided to the submitter. These account details can be conveyed to the journal where the manuscript is submitted.

- Click the Submit button.
 Once the data has been copied this column will display the date when the data was copied. You will also receive an email informing you that the data was successfully copied to Panorama Public. At that point if you click on the value in the Access Link column you will be taken to the folder where your data was copied on Panorama Public and you can verify that the data, folder layout, and views were copied accurately.Requests to copy data are handled by Panorama Public administrators within a week of submission. Once your data has been successfully copied to Panorama Public you will receive a confirmation email. If you requested that your data on Panorama Public be kept private (e.g. for a manuscript under peer review), the confirmation email will also include reviewer account details. You can pass on the account details to the journal where you are submitting your manuscript.
Reference List
1. Abbatiello, S. E., Mani, D. R., Schilling, B., MacLean, B., Zimmerman, L. J., Feng, X., … Carr, S. A. (2013). Design, Implementation and Multisite Evaluation of a System Suitability Protocol for the Quantitative Assessment of Instrument Performance in Liquid Chromatography-Multiple Reaction Monitoring-MS (LC-MRM-MS). Molecular & Cellular Proteomics : MCP, 12(9), 2623–2639. doi:10.1074/mcp.M112.027078
On Oct 20, 2015, the Skyline and Panorama Teams produced Webinar #11: Panorama Public and Panorama AutoQC, another great resource to learn more about some of the new aspects of Panorama.