Table of Contents |
guest 2025-09-14 |
Lindsay Pino's AutoQC Setup Tutorial
Upgrading to AutoQC Loader 24.1.0.x
AutoQC Loader Documentation
AutoQC Loader 1.1.0.20237 Documentation
Recovering configurations for a broken installation
Quality control with AutoQC
Panorama AutoQC
The Panorama AutoQC pipeline enables mass spec laboratories to evaluate LC MS/MS performance over time, and quickly identify potential issues. This pipeline comprises three components: Skyline, a Panorama server and AutoQC Loader, a utility program that automates the processing and uploading of QC results from the instrument computer to the Panorama server. The pipeline is initialized by specifying the following:- A template document with target QC peptides into which raw data files should be imported as they are acquired.
- A local folder where QC results files are written.
- A folder on the Panorama server where data should be uploaded.
Panorama QC folder documentation:
- Panorama QC Dashboard
- Panorama QC Plots
- Panorama QC Plot Types
- Panorama QC Pareto Plots
- Panorama QC Annotations
- Panorama QC Guide Sets
- Configure QC Metrics (enable/disable metrics, define new metrics)
- Setup Email Notifications
AutoQC Loader
AutoQC Loader automates the process of importing results files into a Skyline document and uploading the document to a folder on a Panorama server. It uses SkylineRunner to launch Skyline without showing the Skyline window. Command-line arguments are passed to this invisible instance of Skyline to import results files to a Skyline document and upload the document to the Panorama server specified in the settings.Install AutoQC Loader
AutoQC Loader Documentation
AutoQC Setup Tutorial
A tutorial describing how to setup a Skyline document for use with AutoQC, and setting up the instrument method: AutoQC SetupLindsay Pino's AutoQC Setup Tutorial
Upgrading to AutoQC Loader 24.1.0.x
AutoQC Loader version 22.1.0.122 will not automatically upgrade to version 24.1.0.x. To install AutoQC Loader 24.1.0.x on a machine currently running version 22.1.0.122 or an older version, you must first uninstall the older version. Please follow the steps below to save your configurations, uninstall the older version, and install AutoQC Loader 24.1.0.x.
1. Export Configurations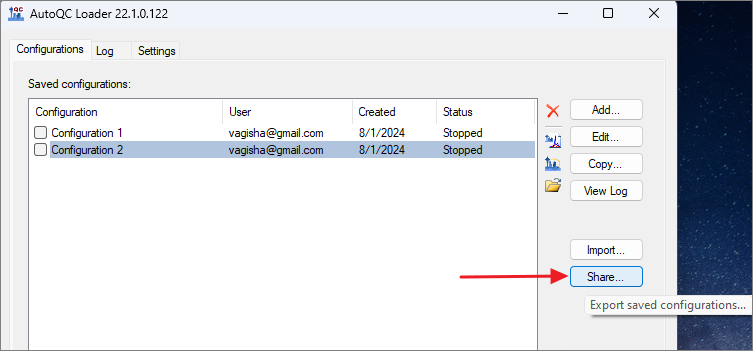
2. Uninstall AutoQC Loader 22.1.0.122
BEFORE uninstalling AutoQC Loader it is important to: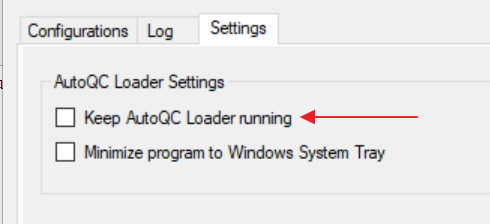
To uninstall: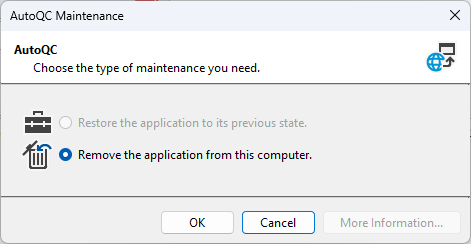
2. Install AutoQC Loader 24.1.0.x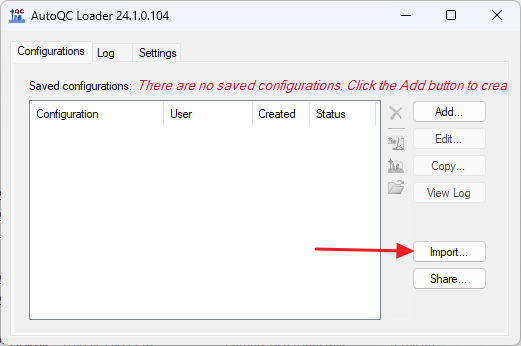
1. Export Configurations
- Launch AutoQC Loader 22.1.0.122 if it is not already running.
- Stop all running configurations.
- Export the configurations by clicking the Share button.

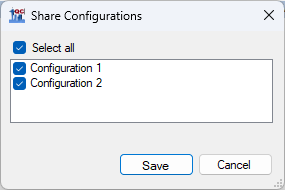
- Check Select All in the Share Configurations dialog, and click Save. Save the .qcfg file on your computer.

2. Uninstall AutoQC Loader 22.1.0.122
BEFORE uninstalling AutoQC Loader it is important to:
- Stop all running configurations
- In the Settings tab uncheck Keep AutoQC Loader running

- Close the AutoQC Loader app by clicking the Close ('X') icon in the top right corner of the app window.
To uninstall:
- In the search box on the taskbar, type Control Panel and select it from the results.
- Select Programs > Programs and Features
- Find AutoQC in the list of installed programs. Right-click on "AutoQC". Select Uninstall or Uninstall/Change.
- In the AutoQC Maintenance dialog, select Remove the application from this computer, and click OK.

2. Install AutoQC Loader 24.1.0.x
- Download the installer here https://skyline.gs.washington.edu/software/AutoQC24/index.html
- After installing, import the saved configurations by clicking the Import button, browsing and selecting the previously saved configuration (.qcfg) file.

AutoQC Loader Documentation
AutoQC Loader
AutoQC Loader automates the process of importing results files into a Skyline document and uploading the document to a folder on a Panorama server. It uses SkylineRunner or SkylineCmd to launch Skyline without showing the Skyline window. Command-line arguments are passed to this invisible instance of Skyline to import results files to a Skyline document and upload the document to the Panorama server specified in the settings. Install AutoQC Loader.- Create a New Configuration
- Starting / Stopping / Editing a Configuration
- Exporting / Importing Configurations
- Invalid Configurations
- Other Settings
- Logging
- Data Archival
When you start AutoQC Loader for the first time you will see this window.
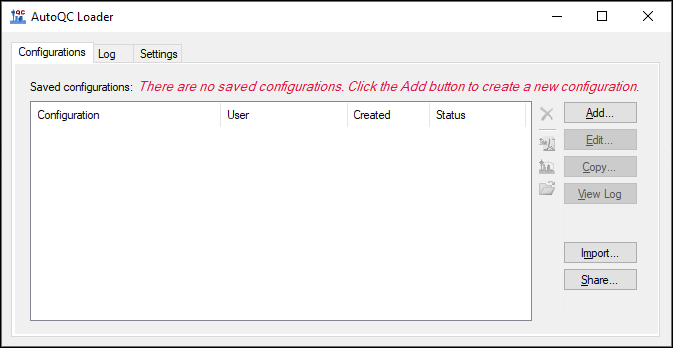
To start monitoring a local folder for QC results, create a new configuration by clicking the Add button. Each configuration is a combination of settings that include the location of the template Skyline document, the local folder where QC results will be written, and the folder on a Panorama server where the results will be uploaded. Multiple configurations can be enabled allowing users to monitor more than one QC data folder at the same time. Configurations are saved so that instrument operators can enable a previously created configuration if they are acquiring data for an ongoing project with intermittent breaks in data acquisition.
Configuration Settings
In the AutoQC Configuration form enter the appropriate settings in the Settings tab.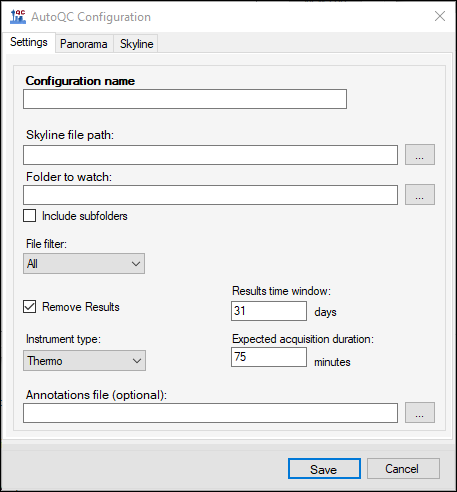
Configuration name: This can be the name of an instrument or the project or study for which data is being acquired. Each configuration has to have a unique name.
Skyline file path: This is the path to the template Skyline document into which QC results files will be imported. Click the browse button next to the textbox to open a Windows Explorer window and navigate to the template Skyline document (.sky file).

Note for Skyline versions prior to 4.2 the Integrate all setting (Settings > Integrate all) must be checked in the template Skyline document. This setting forced Skyline to calculate areas for all fragment ions between the integration boundaries and gives better quantitative results. Since Skyline 4.2 areas are now always the sum of all quantitative transitions, but you may still want this setting for visualization inside Skyline.
Folder to watch: This is the folder that AutoQC Loader will monitor for new QC results files. Any new results files added to the folder will automatically be imported into the given template Skyline document. When a configuration is started all existing results files in this folder that are newer than the last imported result in the Skyline document will get imported. If the document does not have any imported results, AutoQC Loader will import all the results files in the folder. The folder can be on a physical disk drive of the computer running AutoQC Loader, or it may also be on a mapped network drive, allowing central processing of system suitability files collected by multiple instruments.
File filter: This can be used to apply a filter on the results files that will be imported into the Skyline document. The default option (All) will import all results files added to the QC folder without applying any filters. Choose one of the other options from the drop-down list to import only those results files that match the filter. For example, the filter selected in the screenshot below can be used to import only those files that have the substring "_QC_" in the file name.

Results time window: The results time window determines how long imported results will be retained in the Skyline document. This is a rolling window and only results acquired within the last ‘n’ days, where ‘n’ is the width of this window in days, will be retained in the document. When a new run is imported into the document any results that no longer fall within this time window, ending on that day, will be removed from the document. The default (and minimum) width of the window is 31 days. Please note that AutoQC Loader does NOT delete any results files on the computer. Only results imported into the document that are older than the current time window are removed from the document. This is done to keep the active Skyline document from getting too large. The larger the document gets the more time it will take for each upload to Panorama. Uncheck the Remove Results checkbox to keep all the imported results in the Skyline document. This is not recommended for long-running projects.

Instrument type: The instrument type setting tells AutoQC Loader the type of files (e.g. *.raw for Thermo instruments, *.wiff for SCIEX instruments etc.) to look for in the folder that it is monitoring.
Expected acquisition duration: The expected acquisition duration determines how long AutoQC Loader will wait before attempting to import a new results file. Most instruments write directly to the output results file when data acquisition begins, and an error occurs if an attempt is made to read the file before acquisition is complete. When AutoQC Loader detects a new results file in the QC folder, it will wait for the duration specified in this setting before attempting to import the file. The default value for this setting is 75 minutes (10 min. trapping time + 60 min. gradient + 5 min. extra).
Annotations file: This is the path to an optional annotations CSV file that AutoQC Loader will import into the Skyline document whenever it detects a change in the file. The file can contain annotation values for targets (e.g. replicates, precursors etc.) in the Skyline document and must be in a Skyline compatible format. The annotations in the file must already exist in the Skyline document. Click the browse button next to the textbox to open a Windows Explorer window to select the file.

Panorama Settings
To upload the Skyline document containing QC results to a Panorama server, check the Publish to Panorama checkbox in the Panorama tab. Enter the URL of the Panorama server, your email and password on the server along with the path to the folder on the server where the document should be uploaded. AutoQC Loader will upload the document to the Panorama server each time a new results file is imported into the document.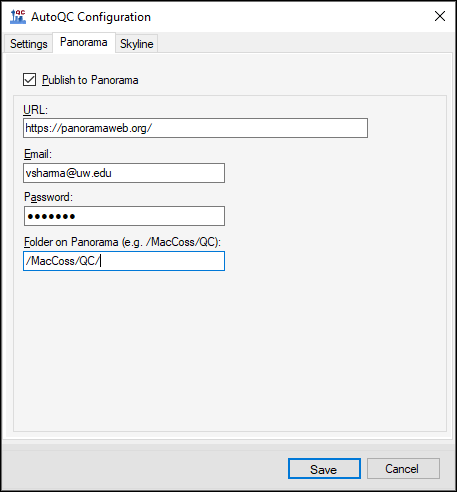
The Panorama server manages redundant results files included in successive Skyline documents uploaded to a QC folder by keeping the results contained in the most recently uploaded Skyline document.
Note: The password is stored encrypted using a Windows system encryption key and is not accessible as plain text.
Skyline Settings
You can choose to use either Skyline or Skyline-daily with a configuration if both are installed on the computer that is running AutoQC Loader. This selection can be made in the Skyline tab of the AutoQC Configuration form. Only the installations of Skyline that are available will be enabled and selectable in the form. You may also specify the path to a Skyline (or Skyline-daily) installation somewhere else on your computer.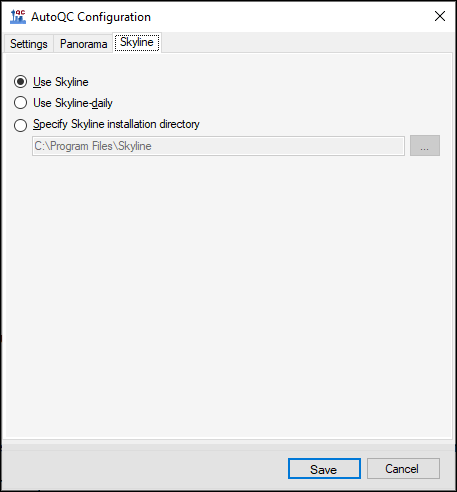
Running a Configuration
In the main AutoQC Loader window, in the Configurations tab check the box next to the configuration name to start the configuration. AutoQC Loader will start the monitoring the local folder specified in the configuration for new results files. Uncheck the box to stop the configuration.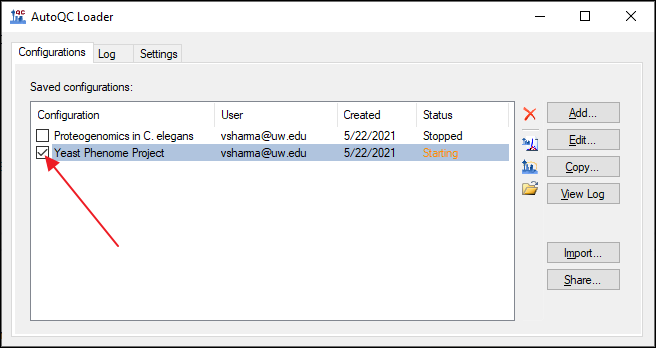
The selected configuration can be edited by clicking the Edit button to the right of the Saved configurations panel.
To make a copy of the configuration, click the Copy button.
In addition, the following buttons are enabled when a configuration is selected in the Saved configurations list.
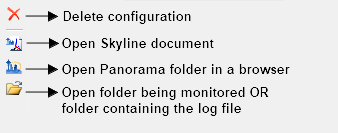
Exporting Configurations
You can export some or all of your saved configurations to a AutoQC Configuration file (.qcfg) by clicking the Share button in the main program window.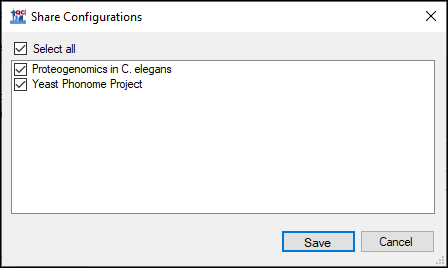
In the Share Configurations form select the configurations you want to export and click the Save button.
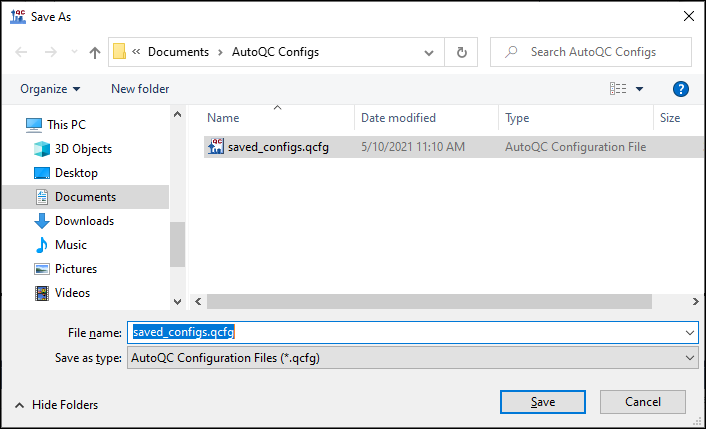
In the Windows File Explorer navigate to the folder where you want to save the file.
Configurations contained in the exported AutoQC Configuration file (.qcfg) can be imported into AutoQC Loader by clicking the Import button and selecting the .qcfg file in the File Explorer.
Invalid Configurations
Configurations that cannot be validated appear in red text in the list of configurations in the main window (e.g. "Fusion 1" in the screenshot below). Configurations can become invalid, for example, if the path to the Skyline document or the folder to monitor no longer exist on the computer. A configuration may also become invalid if the user email and password saved in the Panorama settings can no longer be authenticated, or if the permissions were changed on the Panorama server and the user does not have permissions to upload to the selected Panorama folder.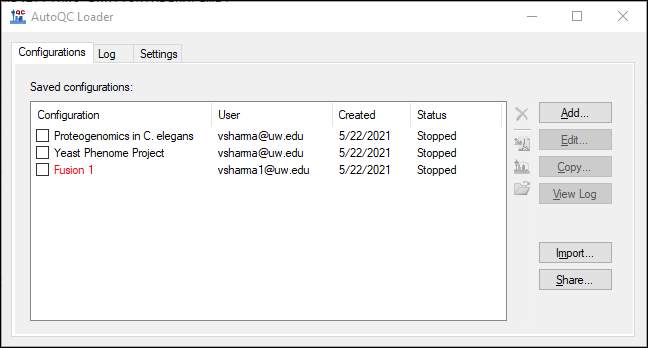
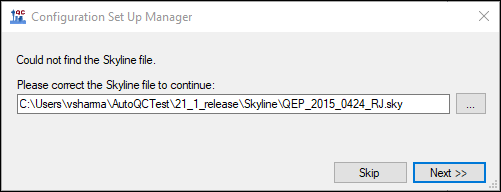
Attempting to run an invalid configuration will display an error message as can be seen in the example below where the path to the Skyline document does not exist on the computer.

To fix an invalid configuration either double-click the configuration name or select the configuration and click the Edit button. This will open the Configuration Set Up Manager which will step through the configuration issues which must be addressed to fix the configuration.
AutoQC Loader Settings

If you want AutoQC Loader to keep running continuously on your computer, and start-up automatically after the computer restarts check the Keep AutoQC Loader running checkbox in the Settings tab. This will place a shortcut to AutoQCStarter.exe in the Windows Startup folder. AutoQCStarter.exe checks every few minutes to see if AutoQC Loader is running, and starts it if it is not running. Any configurations that were running when AutoQC Loader was last running are also started.
Check the Minimize program to Windows System Tray to minimize the AutoQC Loader window to the Windows System Tray
 instead of the Task Bar. If the AutoQC icon is no longer visible in Windows System Tray, click the "Show hidden icons" button, and double-click the AutoQC icon to view the AutoQC Loader window.

Logging
AutoQC Loader writes to a log file (AutoQC.log) that is located in a directory with the same name as the name of the configuration. This directory can be found in the directory that contains the template Skyline document. You can open this directory by selecting a configuration and clicking the "Open Folder" icon shown below and selecting Log Folder.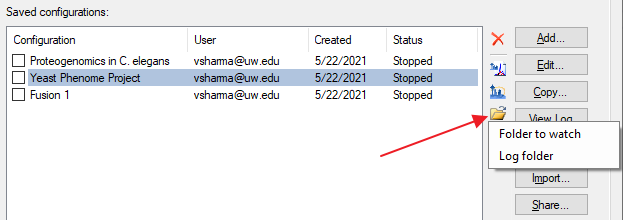
The contents of the log can be viewed in the Log tab by selecting the configuration in the Configurations tab and clicking the View Log button. Once the Log tab is active you can also choose the log for any configuration from the dropdown list above the pane displaying the log text. The folder containing the log file for the selected configuration can also be opened by clicking the Open Folder button in the Log tab.
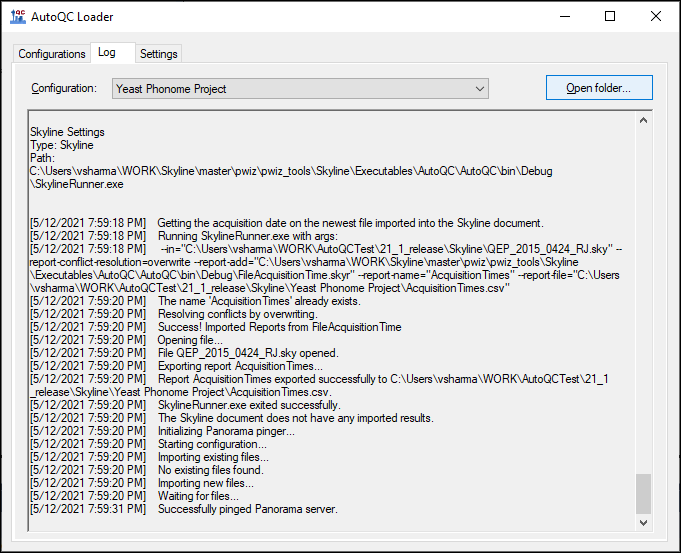
Please provide this log file to the developers if you run into any issues with AutoQC Loader.
Data Archival
AutoQC Loader creates a monthly archive (*.sky.zip) of the Skyline document. Archive creation is triggered when the first run is imported into the document in a given month. For example, when the first run is imported into the Skyline document, QC_doc.sky, in the month of August 2015, an archive file, QC_doc_2015_07.sky.zip, is created in the same directory as QC_doc.sky.AutoQC Loader 1.1.0.20237 Documentation
This documentation is for an older version of AutoQC Loader. Please refer to the latest documentation here.
AutoQC Loader
AutoQC Loader automates the process of importing results files into a Skyline document and uploading the document to a folder on a Panorama server. It uses SkylineRunner to launch Skyline without showing the Skyline window. Command-line arguments are passed to this invisible instance of Skyline to import results files to a Skyline document and upload the document to the Panorama server specified in the settings.Install AutoQC Loader for Skyline 3.5 or later, or Skyline-daily (3.1.1.8694 or later)
When AutoQC Loader starts up for the very first time, it will check for existing Skyline or Skyline-daily installations in the following order:
- C:\Program Files\Skyline
- C:\Program Files\Skyline-daily
- Web installation (ClickOnce) of Skyline
- Web installation (ClickOnce) of Skyline-daily

To start monitoring a local folder for QC results, create a new configuration in AutoQC Loader by clicking on the Create a new configuration button in the Configurations tab. Each configuration is a combination of settings that include the location of the template Skyline document, the local folder where QC results will be written, and the folder on a Panorama server where the results will be uploaded. Multiple configurations can be enabled allowing users to monitor more than one QC data folder at the same time. Configurations are saved so that instrument operators can enable a previously created configuration if they are acquiring data for an ongoing project with intermittent breaks in data acquisition.
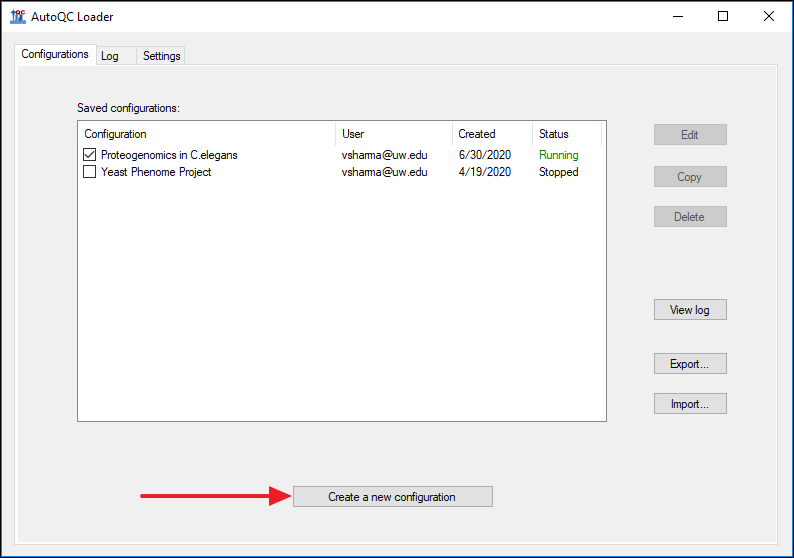
Configuration Settings
In the AutoQC Configuration form enter the appropriate settings in the Settings tab.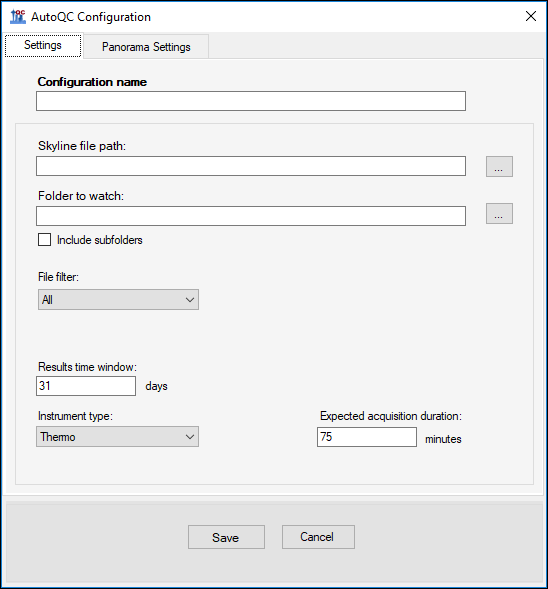
Configuration name: This can be the name of the project or study for which data is being acquired.
Skyline file path: This is the path to the template Skyline document into which QC results files will be imported. Please note that the Integrate all setting (Settings > Integrate all) must be checked for Skyline documents that contain QC results. This setting forces Skyline to calculate areas for all fragment ions between the integration boundaries and gives better quantitative results.
Folder to watch: This is the folder that AutoQC Loader will monitor for new QC results files. Any new results files added to the folder will automatically be imported into the given template Skyline document. When a configuration is enabled or started, all existing results files in this folder that are newer than the last imported result in the Skyline document will get imported. If the document does not have any imported results, AutoQC Loader will import all the results files in the folder.
File filter: One of the options in this combo-box can be used to apply a filter on the QC files that will be imported to the Skyline document. Only files with names that match the selected option will be imported. The default option (All) will import all results files added to the QC folder without applying any filters.

Results time window: The results time window determines how long imported results will be retained in the Skyline document. This is a rolling window and only results acquired within the last ‘n’ days, where ‘n’ is the width of this window in days, will be retained in the document. When a new run is imported into the document any results that no longer fall within this time window, ending on that day, will be removed from the document. The default (and minimum) width of the window is 31 days. Please note that AutoQC Loader does NOT delete any results files on the computer. Only results imported into the document that are older than the current time window are removed from the document. This is done to keep the active Skyline document from getting too large.
Instrument type: The instrument type setting tells AutoQC Loader the type of files (e.g. *.raw for Thermo instruments, *.wiff for SCIEX instruments etc.) to look for in the folder that it is monitoring.
Expected acquisition duration: The expected acquisition duration determines how long AutoQC Loader will wait before attempting to import a new results file. Most instruments write directly to the output results file during acquisition, and an error occurs if an attempt is made to read the file before acquisition is complete. When AutoQC Loader detects a new results file in the QC folder, it will wait for the duration specified in this setting before attempting to import the file. The default value for this setting is 75 minutes (10 min. trapping time + 60 min. gradient + 5 min. extra).
Panorama Settings For a Configuration
To upload the Skyline document containing QC results to a Panorama server, check the Publish to Panorama checkbox in the Panorama Settings tab. Enter the URL of the Panorama server, your email and password on the server along with the path to the folder on the server where the document should be uploaded. AutoQC Loader will upload the document to the Panorama server each time a new results file is imported into the document.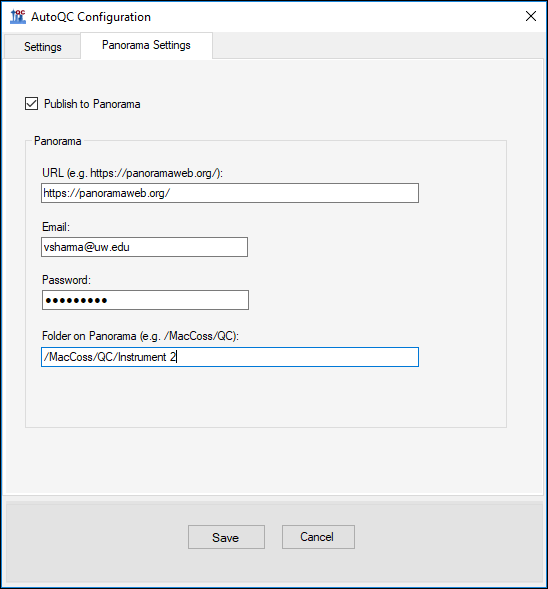
The Panorama server manages redundant results files included in multiple, successive Skyline documents uploaded to a QC folder by keeping only the most recent copy of the results.
Starting or Stopping a Configuration
In the main AutoQC Loader window, under the Configurations check the box next to the configuration name to start the configuration. AutoQC Loader will start the monitoring the local folder specified in the configuration for new results files. Uncheck the box to stop the configuration.
AutoQC Loader Settings

If you want AutoQC Loader to keep running continuously on your computer, and start-up automatically after the computer restarts check the Keep AutoQC Loader running checkbox in the Settings tab. This will place a shortcut to AutoQCStarter.exe in the Windows Startup folder. AutoQCStarter.exe checks every few minutes to see if AutoQC Loader is running, and starts it if it is not running. Any configurations that were running when AutoQC Loader was last running are also started.
Check the Minimize program to Windows System Tray to minimize the AutoQC Loader window to the Windows System Tray
 instead of the Task Bar.
Logging
AutoQC Loader writes to a log file (AutoQC.log) in the directory that contains the template Skyline document. Please provide this log file to the developers if you run into any issues with AutoQC Loader.Data Archival
AutoQC Loader creates a monthly archive (*.sky.zip) of the Skyline document. Archive creation is triggered when the first run is imported into the document in a given month. For example, when the first run is imported into the Skyline document, QC_doc.sky, in the month of August 2015, an archive file, QC_doc_2015_07.sky.zip, is created in the same directory as QC_doc.sky.Recovering configurations for a broken installation
If your AutoQC Loader installation is broken and you are unable to install a new release over the top of your existing installation you may have to first uninstall AutoQC Loader on your computer and install it again. Before you uninstall AutoQC Loader, locate the file that contains the saved AutoQC Loader configurations. This file can be imported into your new installation to recover the configurations.
Finding and saving your settings:
On Windows 10, Windows 7 or Windows Vista, find the folder: C:\Users\<your_user_name>\AppData\Local\Apps\2.0
On Windows XP, it will be something like: C:\Documents and Settings\<your_user_name>\Local Settings\Apps\2.0
If you are unable to find either the AppData (Windows 10/7) or the Local Settings (Windows XP) folder, you may need to do the following in Windows Explorer:
With the Apps\2.0 folder open in Windows Explorer search for the file 'user.config'. You will likely find more than one. Look for the most recent file under a folder beginning with 'auto..'.
Finding and saving your settings:
On Windows 10, Windows 7 or Windows Vista, find the folder: C:\Users\<your_user_name>\AppData\Local\Apps\2.0
On Windows XP, it will be something like: C:\Documents and Settings\<your_user_name>\Local Settings\Apps\2.0
If you are unable to find either the AppData (Windows 10/7) or the Local Settings (Windows XP) folder, you may need to do the following in Windows Explorer:
- Open the Folder Options form
- On Windows 10, select the View tab and click Options > Change folder and search options.
- On Windows 7, Windows Vista of Windows XP press Alt+T, O to open the Folder Options form.
- Click the View tab.
- Under the Hidden files and folders item, click the Show hidden files and folders option.
- Click the OK button.
With the Apps\2.0 folder open in Windows Explorer search for the file 'user.config'. You will likely find more than one. Look for the most recent file under a folder beginning with 'auto..'.
- Open the file in a text editor to verify that it contains your configurations. AutoQC Loader configurations are saved as XML that will look like this:
<setting name="ConfigList" serializeAs="Xml">
  <value>
    <ConfigList>
      <autoqc_config name=...>
        <main_settings skyline_file_path=… />
        <panorama_settings publish_to_panorama=… />
      </autoqc_config>
    </ConfigList>
  </value>
</setting>
- Save this file to another location on your computer (e.g. Desktop) and change the file extension from .config to .qcfg (e.g. user-config.qcfg). For versions of AutoQC Loader older than 21.1.0.158 change the extension from .config to .xml.
- Click the Import button in the Configurations tab of the main window.
- Select the .qcfg file saved in the previous step and click Open.