Upload Raw Data |
2025-07-12 |
- Upload raw data in a web browser
- Organizing data in folders
- Upload raw data by mapping a network drive in Windows
- Upload raw data on the command line
- What to do if the Raw Data tab is missing or has an error
Upload raw data in a web-browser
Raw data associated with Skyline documents in a folder can be uploaded via the Raw Data tab in the top right corner.(NOTE: If you don't see a Raw Data tab click here for instructions on how to add it)
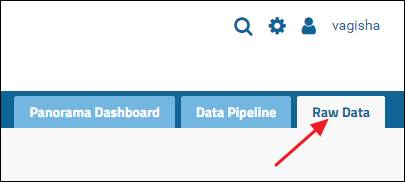
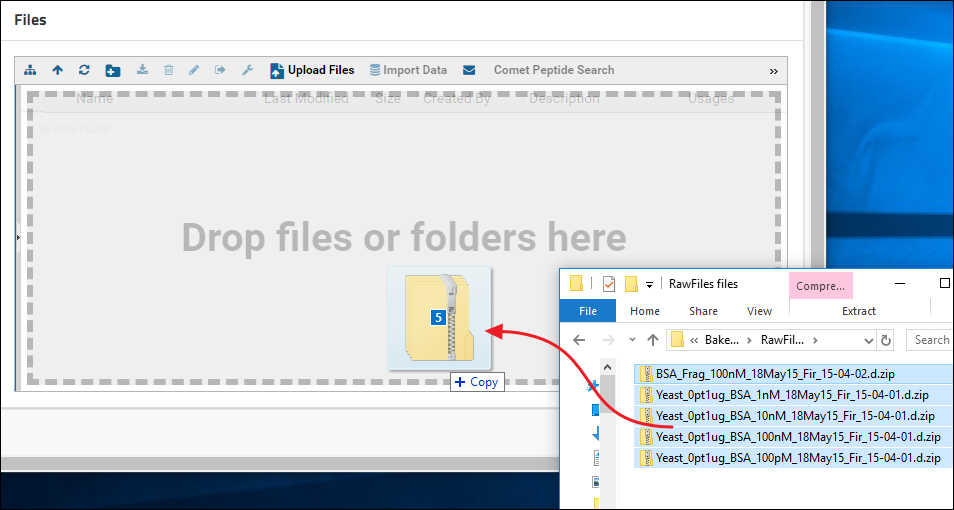
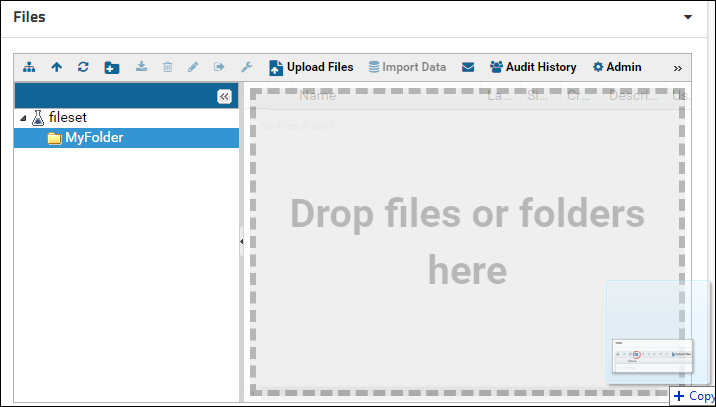
Click the tab to see a Files browser. You can drag-and-drop files and/or folders located on your computer onto the Files browser as shown in the image below.
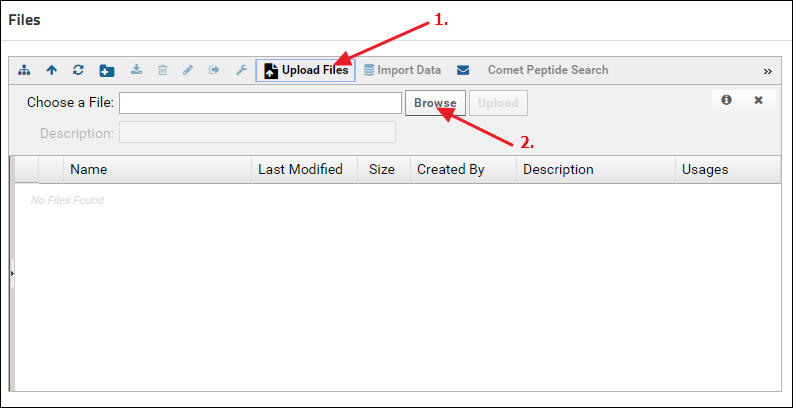
Another way to upload files is to click the Upload Files button in the Files browser, and click Browse to navigate to and select the file you want to upload.
Organizing data in folders
Raw data files can be organized in folders. Create a new folder by clicking the new folder button in the Files webpart.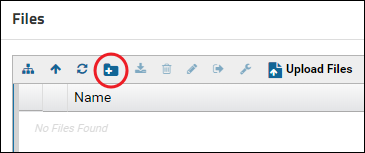
Enter a name for the folder and click Submit.

Click the Show or Hide Folder Tree button to show the folder tree panel.
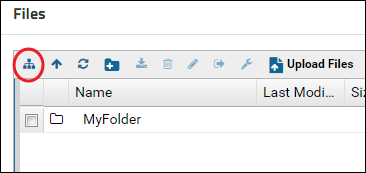
Click the newly created folder in the folder tree panel to select it. The right panel will update to show the contents of the selected folder. Drag-and-drop files in the right panel to upload them to the new folder.
More information on using the Files browser can be found here: Using the Files Repository
Upload raw data by mapping a network drive in Windows
On a Windows machine you can map your PanoramaWeb folder as a network drive and copy files to the folder using Windows Explorer. This uses WebDAV for file transfer, and Windows XP and later have a built-in WebDAV client.NOTE: The instructions below will work on Windows 10 and Windows Server 2016. If you have an older operating system and are unable to map a network drive with these steps then you can use a third party WebDAV client such as Cyberduck. Look at this page for instructions on setting up Cyberduck and for a list of other WebDAV clients: Example Setup for Cyberduck WebDAV Client
To map a PanoramaWeb raw data folder as a Windows network drive follow these steps:
Get the WebDAV URL
- In a web-browser navigate to the Panorama folder and click the Raw Data tab
- Click the Upload Files button in the Files webpart (1. in the screenshot below)
- Click the "Upload file" icon (2. in the screenshot below).
- From the File Upload Help dialog copy the WebDav URL (3. in the screenshot below)
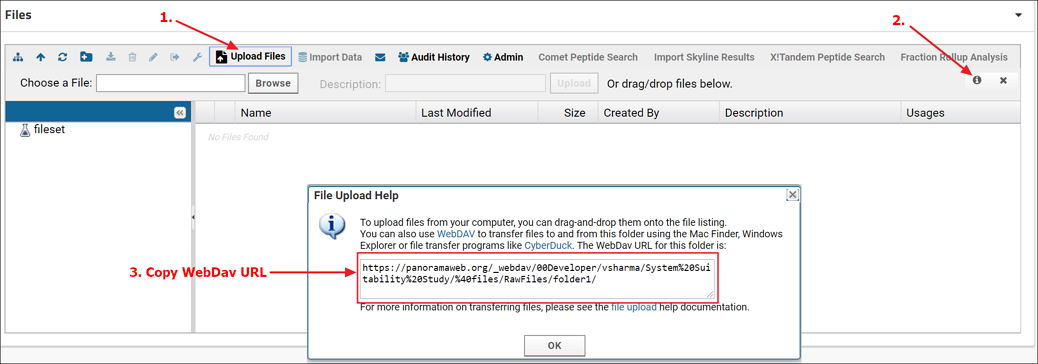
- On your computer open Windows Explorer. Right-click This PC in the left pane and select Map network drive from the menu

- In the Map network drive dialog enter the WebDav URL that you copied from your Panorama folder. Check Connect using different credentials and click Finish
- You will be prompted for a username and password. Enter your PanoramaWeb email address and password and click OK
Using Cyberduck (https://cyberduck.io/)
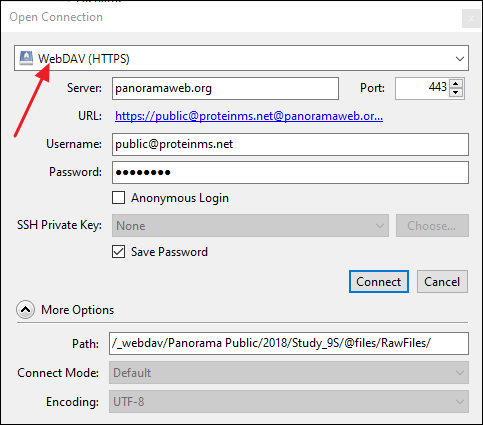
- Click Open Connection.

- In the Open Connection dialog select WebDAV (HTTPS) as the connection type.
- Get the WebDAV URL as described above and enter it in the Server field. CyberDuck will automatically parse the URL and populate the Path field.
- In the Username field enter your email address on PanoramaWeb.
- Enter you password in the Password field.
- Click Connect.
Upload raw data on the command line
If you are comfortable using the command line, you can use rclone to upload your raw files. Rclone is a command line utility to sync files to and from the cloud. Among the many cloud providers it can sync with, one is webdav. Webdav can be used to access files on PanoramaWeb.You can download rclone from https://rclone.org/downloads/. If you are on Windows I recommend that you download the `AMD64 - 64bit` version.The first step is find WebDav URL
- In a web-browser navigate to the Panorama folder and click the Raw Data tab
- Click the Upload Files button in the Files webpart (1. in the screenshot below)
- Click the "Upload file" icon (2. in the screenshot below).
- From the File Upload Help dialog copy the WebDav URL (3. in the screenshot below)

Setup a remote for your folder on Panoramaweb
Start the interactive configuration sessionrclone.exe config edit
No remotes found - make a new one
n) New remote
s) Set configuration password
q) Quit config
n/s/q> n
name> PanoramaWebFiles
Type of storage to configure.
Enter a string value. Press Enter for the default ("").
Choose a number from below, or type in your own value
 1 / 1Fichier
    "fichier"
 2 / Alias for an existing remote
    "alias"
 3 / Amazon Drive
    "amazon cloud drive"
...
33 / Webdav
    "webdav"
34 / Yandex Disk
    "yandex"
35 / http Connection
    "http"
36 / premiumize.me
    "premiumizeme"
Storage>  33
URL of http host to connect to
Enter a string value. Press Enter for the default ("").
Choose a number from below, or type in your own value
 1 / Connect to example.com
    "https://example.com"
url> https://panoramaweb.org/_webdav/ExampleProject/Folder/@files/
Name of the Webdav site/service/software you are using
Enter a string value. Press Enter for the default ("").
Choose a number from below, or type in your own value
 1 / Nextcloud
    "nextcloud"
 2 / Owncloud
    "owncloud"
 3 / Sharepoint
    "sharepoint"
 4 / Other site/service or software
    "other"
vendor> other
User name
Enter a string value. Press Enter for the default ("").
user> bconn@proteinms.net
Password.
y) Yes type in my own password
g) Generate random password
n) No leave this optional password blank (default)
y/g/n> y
y/g/n> y
Enter the password:
password:
Confirm the password:
password:
Bearer token instead of user/pass (eg a Macaroon)
Enter a string value. Press Enter for the default ("").
bearer_token>
Edit advanced config? (y/n)
y) Yes
n) No (default)
y/n> n
Remote config
--------------------
"missing" href="/home/wiki-page.view?name=PanoramaWebFiles">PanoramaWebFiles
type = webdav
url = https://panoramaweb.org/_webdav/ExampleProject/Folder/@files/
vendor = other
user = bconn@proteinms.net
--------------------
y) Yes this is OK (default)
e) Edit this remote
d) Delete this remote
y/e/d> yes
y/e/d> y
Current remotes:

Name                 Type
====                 ====
PanoramaWebFiles webdav

e) Edit existing remote
n) New remote
d) Delete remote
r) Rename remote
c) Copy remote
s) Set configuration password
q) Quit config
e/n/d/r/c/s/q> q
Copying files
To copy a file to PanoramaWeb, you can use the commandrclone.exe --progress copy FILENAME PanoramaWebFiles:
rclone.exe --progress copy DIRECTORY_TO_COPY PanoramaWebFiles:
What to do if the Raw Data tab is missing or has an error
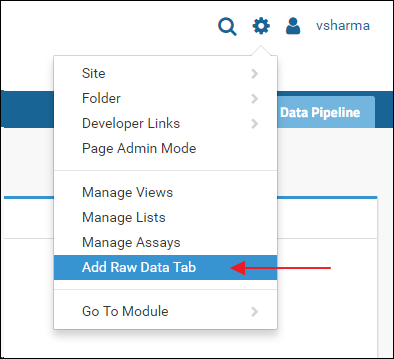
The Raw Data tab is added by default when you create a new "Panorama" type folder. Some older folders may not have this tab. If you do not see the Raw Data in a "Panorama" type folder, and you are the administrator of the folder, you can add it as follows:- Click the gear icon in the top right corner
- Select Add Raw Data Tab from the drop-down menu
The Raw Data tab provides a view into a "RawFiles" directory on the server's file system. If the "RawFiles" directory is somehow deleted you will see an error when you click the Raw Data tab.

If you see the error message above or something like "File root directory configured for this webpart could not be found", first remove the Raw Data tab and then add it back. To remove the tab:
- If you are not in page admin mode, click the gear icon in the top right corner and select Page Admin Mode from the menu
- Click the Raw Data tab and click OK in the Error dialog
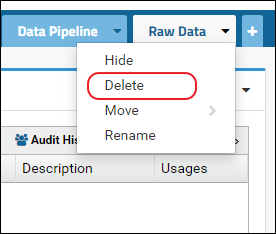
- Click the little triangle in the right corner of the tab to access the control menu and select Delete
After this follow the steps above to add the Raw Data tab. This will create the "RawFiles" directory on the file system.