Upload Supplementary Files |
2025-07-15 |
The Files webpart or the file browser in Panorama can be used to upload any additional supplementary files that you may want to make available with your data on Panorama Public. To add a Files webpart

In the file browser you will see a "RawFiles" folder. This folder is automatically created for every "Panorama" type folder. This is the folder where raw files associated with Skyline documents should be uploaded. The Raw Data tab provides a view into this folder. Look at [Upload Raw Data] for more details. In the file browser you should also see the Skyline documents (.sky.zip files) that were uploaded to the folder. For each Skyline document where will be an exploded directory (containing the .sky, .skyd etc. files), as well as a log file that was created when the document was imported.
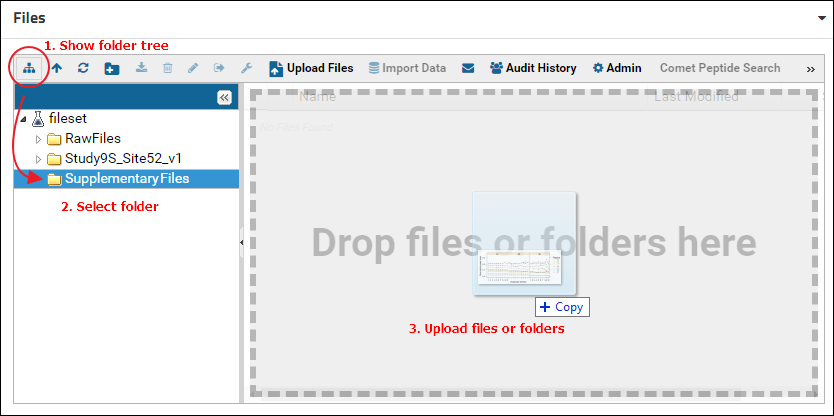
Files and folders can be uploaded by selecting them on your computer and then dragging and dropping them on top of the file browser. It may be a little hard for viewers to locate supplementary files in the default view of the file browser if there are multiple Skyline documents uploaded to the folder. To provide a cleaner view, you can create a sub-folder for supplementary files and customize the file browser to display only the contents of that folder. A new folder can be created by clicking the "Create a new folder" button in the tool bar of the file browser as shown below. You can name the folder whatever you like. Here it is named "SupplementaryFiles".

Double click the new folder to open it. Alternatively, click the "Show or hide the folder tree" icon in the toolbar to split the file browser into two panels. The left panel shows an expandable tree view of the folder structure, and the right panel displays the contents of the folder selected in the left panel. Select the folder just created (e.g. "SupplementaryFiles") and drag and drop files on top of the right panel to add files to this folder.

Next, customize the Files webpart to display only the contents of the "SupplementaryFiles" folder. To do this:

The file browser will now show the contents of the "SupplementaryFiles" folder. More than one Files webpart can be added to a folder page and each one can have different customization settings.

To add a new tab:

A Files webpart can now be added to the new "Supplementary Data" tab by selecting "Files" from the <Select Web Part> menu. The files browser can be configured, as described above, to show the contents of the folder that has the supplementary data files.

- Click the gear icon in the top right corner and select Page Admin Mode from the menu
- Scroll to the bottom of the page and select Files from the <Select Web Part> menu at the bottom-left of the page
- Click the Add button

In the file browser you will see a "RawFiles" folder. This folder is automatically created for every "Panorama" type folder. This is the folder where raw files associated with Skyline documents should be uploaded. The Raw Data tab provides a view into this folder. Look at [Upload Raw Data] for more details. In the file browser you should also see the Skyline documents (.sky.zip files) that were uploaded to the folder. For each Skyline document where will be an exploded directory (containing the .sky, .skyd etc. files), as well as a log file that was created when the document was imported.
Files and folders can be uploaded by selecting them on your computer and then dragging and dropping them on top of the file browser. It may be a little hard for viewers to locate supplementary files in the default view of the file browser if there are multiple Skyline documents uploaded to the folder. To provide a cleaner view, you can create a sub-folder for supplementary files and customize the file browser to display only the contents of that folder. A new folder can be created by clicking the "Create a new folder" button in the tool bar of the file browser as shown below. You can name the folder whatever you like. Here it is named "SupplementaryFiles".

Double click the new folder to open it. Alternatively, click the "Show or hide the folder tree" icon in the toolbar to split the file browser into two panels. The left panel shows an expandable tree view of the folder structure, and the right panel displays the contents of the folder selected in the left panel. Select the folder just created (e.g. "SupplementaryFiles") and drag and drop files on top of the right panel to add files to this folder.

Next, customize the Files webpart to display only the contents of the "SupplementaryFiles" folder. To do this:
- Click the little triangle in the top right corner of the Files webpart and select Customize from the control menu

- In the Customize Files form enter a name in the Title field
- Select the "SupplementaryFiles" folder in the File Root tree
- Click Submit

The file browser will now show the contents of the "SupplementaryFiles" folder. More than one Files webpart can be added to a folder page and each one can have different customization settings.

Adding a new tab for supplementary files
The Files webpart can also be added to a new tab on the page, like the Raw Data tab. To add a new tab first make sure you are in the Page Admin mode. If you are, you will see an Exit Admin Mode button in the top right corner of the browser window. If you don't see the button, do this to enter Page Admin mode:- Click the gear icon in the top right corner and select Page Admin Mode from the menu
To add a new tab:
- Click the "+" icon to the right of the Raw Data tab

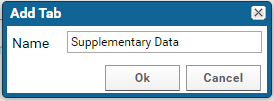
- Enter "Supplementary Data" in the Add Tab form, and click OK

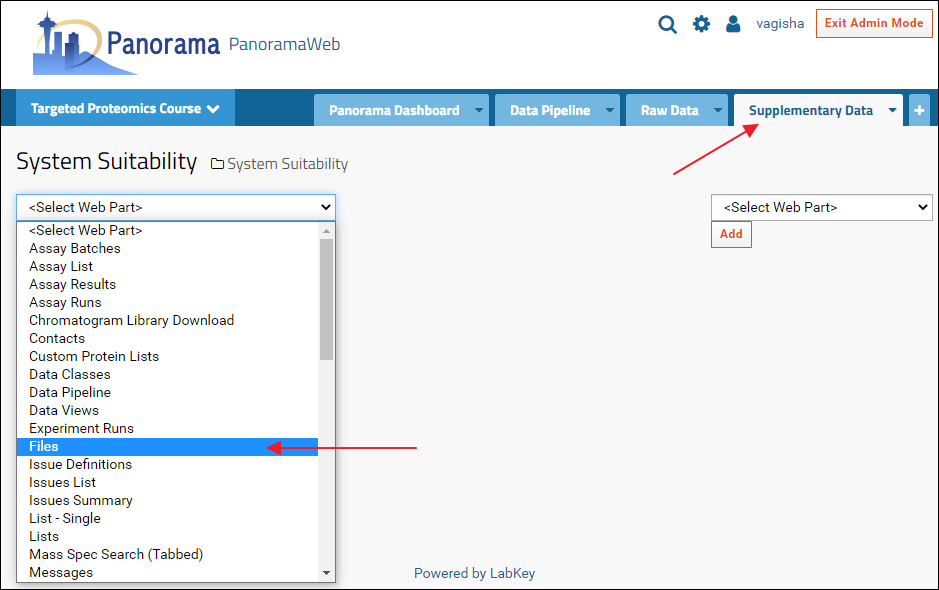
A Files webpart can now be added to the new "Supplementary Data" tab by selecting "Files" from the <Select Web Part> menu. The files browser can be configured, as described above, to show the contents of the folder that has the supplementary data files.
