Overview
Targeted assay development for proteins or peptides is typically a time-consuming and lengthy process. Deciding the ideal set of peptides and transitions to measure for your proteins of interest requires careful experimental design and iterative optimization. Once an assay has been established, the assay parameters can be reused for designing future experiments. Chromatogram libraries in Panorama provide a way you can store targeted assays that have been curated in Skyline and reuse them in the future for measuring proteins and peptides in other samples, as well as share them with other researchers. Chromatogram libraries can also capture physiochemical and experimental properties such as the relative ion abundance, measured retention time, measured chromatograms, and in the future we expect to store iRT, ion mobility, and optimal instrument parameters such as collision energy. Empirical measurements for these parameters can be particularly relevant in guiding targeted experiment design.
You can preview the results of this tutorial in
an example folder on PanoramaWeb.org.
In this tutorial we will:
- Create a folder in Panorama for chromatogram library data.
- Add Skyline documents, with curated targeted results, to the chromatogram library folder.
- Download the chromatogram library from Panorama and use it in Skyline.
Getting Started
To start this tutorial, download the following ZIP file:
Extract the files to a folder on your computer, like:
C:\Users\username\Documents
This will create a new folder:
C:\Users\username\Documents\PanoramaChromatogramLibraries
It will contain all the files necessary for this tutorial.
The data used in this tutorial was published in
Stergachis et al. 2011, where the authors described a high-throughput method for selecting optimal peptides and fragment ions for targeted proteomics applications. The Skyline files used in this tutorial contain assays for a subset of the 96 human transcription factors on which they demonstrated their approach.
Signing Up for an Account on panoramaweb.org
This tutorial assumes that you will be working in a sub-folder of the "Tutorials" project on panoramaweb.org, the Panorama server hosted by the MacCoss lab at the University of Washington. However, if you already have an existing account and project on panoramaweb.org, or have an account on another Panorama server you are welcome to use that, and skip to
the next step.
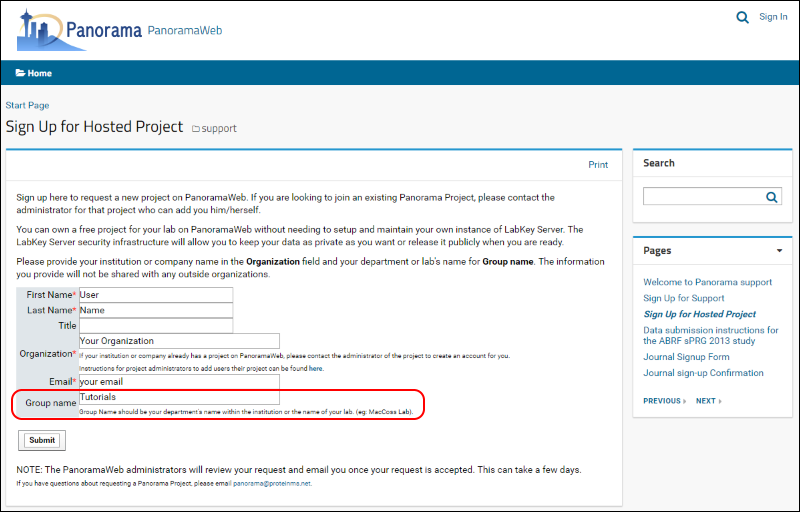
To request a folder on panoramaweb.org for working through this tutorial, fill out the sign-up form on this page:
https://panoramaweb.org/labkey/wiki/home/support/page.view?name=hosted-project-signup-form
- Fill in the required fields, marked with a red asterisk, in the form shown below.
- Enter "Tutorials" in the Group name.
- Click Submit.
Once your request is approved, a folder with full administrative rights will be created for you in the "Tutorials" project on panoramaweb.org. You will receive a welcoming email with a link to complete your account registration by choosing a password.
Creating a Chromatogram Library Folder in Panorama
First
sign in to the Panorama server and navigate to your folder. If you are working in the "Tutorials" project on panoramaweb.org follow these steps:
- Click the Projects tab to see a list of all the projects to which you have access on the server.
- Click the "Tutorials" project.
- On the project homepage, hover over the project name in the menu bar below the Panorama icon and click on the folder that was created for you (e.g. "Your_Username").

When organizing your data for chromatogram libraries, we recommend that you create a folder for each species that you study, and under each species folder you can create subfolders for the instrument type where the data was collected, or any other experimental conditions for which it is appropriate to have separate chromatogram libraries. In this tutorial you will create a subfolder for building a chromatogram library for human transcription factors.
To create a sub-folder for this tutorial, do the following:
- Hover over the project menu and click the new folder icon shown in the image below.

- In the Create Folder form, enter "Human" in the folder Name field.
- Select the Panorama option under Folder Type, as shown below.

- Click Next.
- On the Users / Permissions page accept the default selection.

- Click Next.
- On the Configure Panorama Folder page choose the Chromatogram library option.
- Check the box to "Rank peptides within proteins by peak area".

The
Rank peptides within proteins by peak area box should be checked when you have targeted results containing relative peptide peak areas for a given protein. Leave this box unchecked if you do not yet have quantitative data from proteolytically digested proteins, such as when you are working with synthetic peptides.
After successful folder creation, you will be taken to the home page of the "Human" chromatogram library folder that should look as follows:
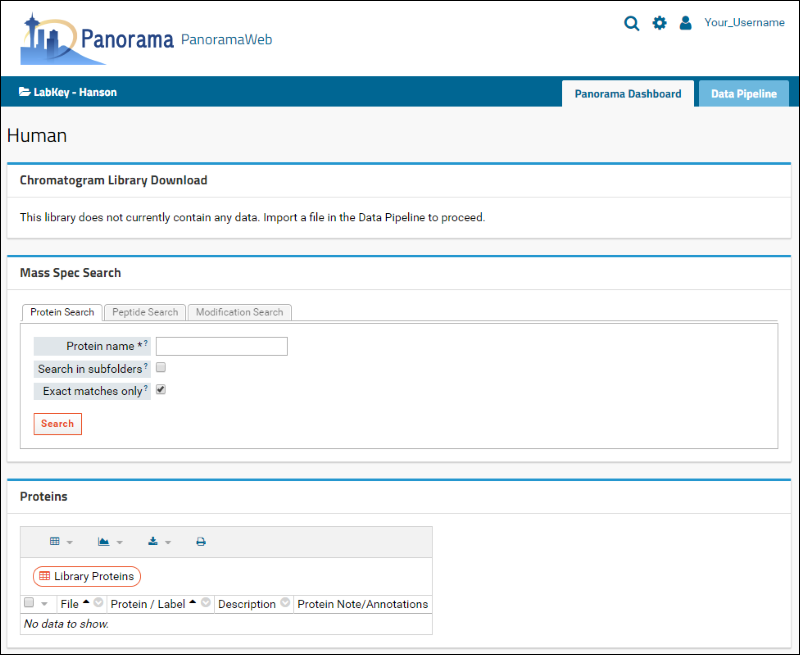
You are now ready to upload Skyline documents to this folder.
Publishing Skyline Documents to a Library Folder in Panorama
Open the "Stergachis-SupplementaryData_2_a.sky" file in Skyline either by double-clicking on the file in Windows Explorer or in Skyline, on the
File menu, click
Open (
Ctrl-O). This file contains peptides and fragment ions for 10 human transcription factors published in
Stergachis et al. 2011. To publish this document to your library folder on Panorama, follow these steps:
- Click on the Publish to Panorama
 button in the Skyline toolbar, shown in the image below. Alternatively, on the File menu, click Publish to Panorama.

If you have not yet set up a Panorama server in Skyline, you will see the following message.
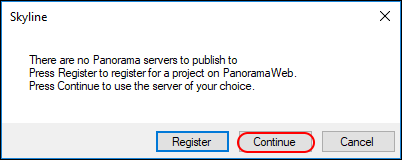
In the
Edit Server form that appears, the default value in the URL field is
https://panoramaweb.org. This is the URL of the server hosted at the University of Washington, and the server where you have an account if you followed the registration steps at the beginning of this tutorial.
- If you are working on a server other than panoramaweb.org, enter the URL of your server.
- Enter your email address and password on the Panorama server.
- Click the OK button.
Skyline will now display a form with the folders available to you on your Panorama server. Chromatogram library folders will have the

chromatogram icon next to them.

- Navigate to and select the "Human" folder that you just created in Panorama.
- Click the OK button.
Skyline will upload a ZIP archive of your document to the selected library folder on the Panorama server.
Viewing Chromatogram Library Data in Panorama
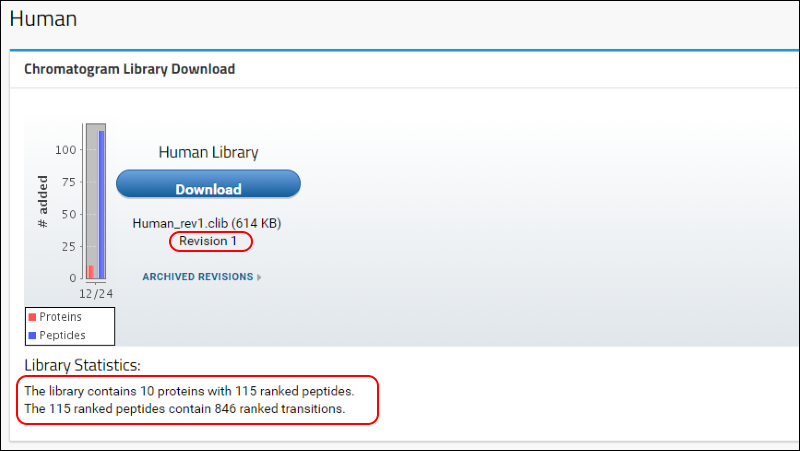
Once your document has been imported into Panorama, go back to the web-browser where the home page of the "Human" library folder should still be open. Skyline will offer you the option to directly view the results. From this page click
Human to return to the home page. Refresh the page (F5 in most browsers) and, in the
Chromatogram Library Download box, you will see that the first version (Revision 1) of your "Human Library" is now available for download. A brief summary of the contents of the library is also displayed under the
Library Statistics heading.
Further down on the page, in the
Mass Spec Search box, you can search for proteins, peptide sequences or peptides with specific modifications in your library.
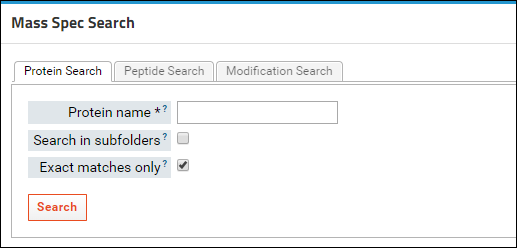
The tables below the
Mass Spec Search box display a list of the proteins and peptides in the library folder. Clicking on an entry in one of these tables will display more details for the selected protein or peptide. Click on
CTCF in the
Proteins table to bring up a page with more details for this protein. The
Sequence Coverage box displays the sequence, with colored rectangles highlighting the peptides for which there are measurements in the library.
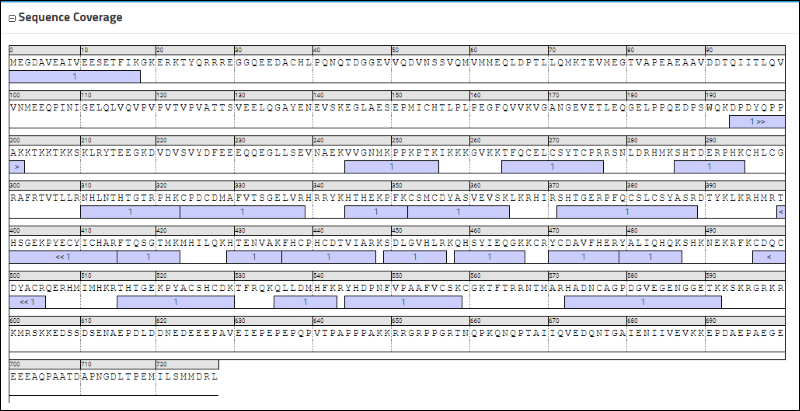
The
Peptides table displays a list of these peptides along with some information that was contained in the uploaded Skyline document, such as the retention time.
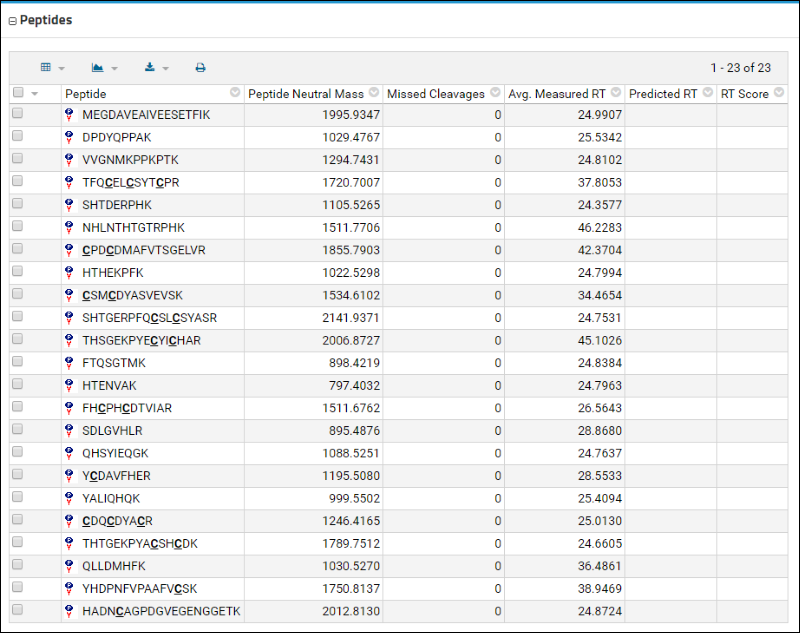
Below the Peptides table is a bar graph that displays the peak areas of the peptides, ordered from the highest to the lowest measured peak area. Retention times are also shown.
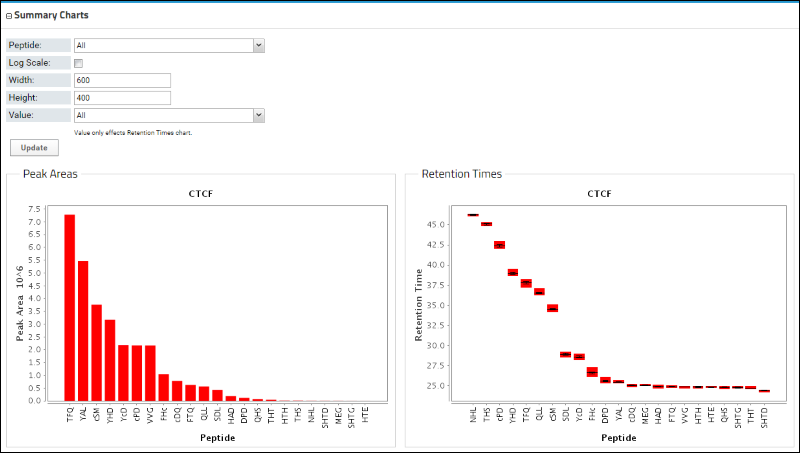
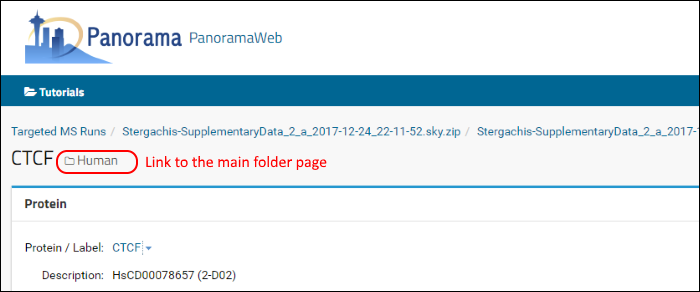
Go back to the home page of your library folder either by clicking your browser's back button or by clicking the
Human (folder name) link near the top of the page.
Updating Chromatogram Libraries
As you develop assays for more proteins or peptides, you can publish Skyline documents containing those assays to the same library folder. Panorama will build a new version of the library each time a Skyline document is published to the folder. Any proteins that were not already included in the library will be added.
Open the file "Stergachis-SupplementaryData_2_b.sky" in Skyline. This file contains another subset of transcription factor assays from "Stergachis et al. 2011|#reference]. This file also contains measurements for the transcription factor MAX that was already included in the first document that you published to the library folder. Two additional peptide measurements are included for this protein in this document.
Publish this document to the "Human" chromatogram library folder on Panorama by doing the following:
- Click the Publish to Panorama
 button in the Skyline toolbar.
- Select the "Human" folder in the Panorama Folders tree of the Publish Document form.
- Click OK.
- Wait for the file import to complete.
- Go to your browser and refresh the library folder page on PanoramaWeb. If you click Yes in Skyline to "view the file in Panorama", you will open a new browser showing the results. Click Human near the top of the page to return to the library folder page.
You will see that a new version of the library is now available in Panorama, as indicated by the higher revision number (2) in the
Chromatogram Library Download box. This library includes the new proteins, peptides and transitions from the Skyline file that you just uploaded, reflected in the updated library statistics. You should also see a warning message below the library statistics about a conflicting protein. This message is displayed because the document you just uploaded contains a protein (transcription factor MAX) which already existed in the library.
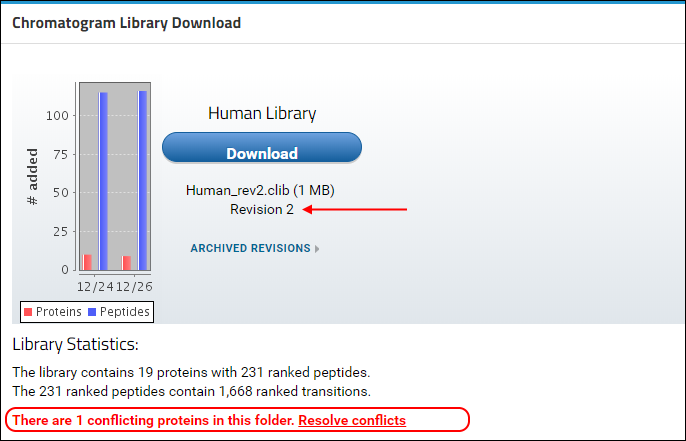
In case of a conflict, Panorama marks the incoming version of the protein as conflicted, and continues to include the older version of the protein in the library, until the conflict is resolved. The library built after uploading "Stergachis-SupplementaryData_2_b.sky" still contains peptides, transitions and chromatograms for protein MAX from the first document that was uploaded to the library folder. To tell Panorama to use the newer version of the protein:
- Click the Resolve conflicts link.
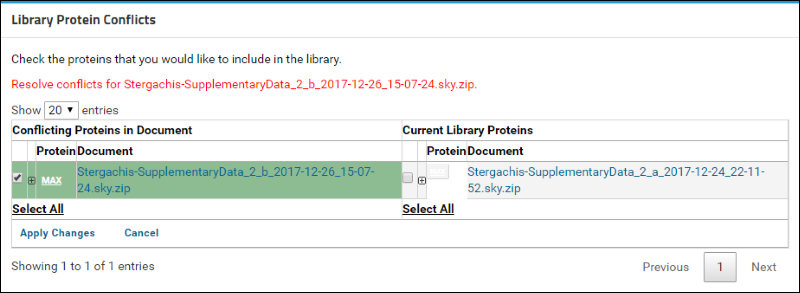
You will now see a table containing a list of conflicting proteins displayed side by side. The left column, titled
Conflicting Proteins in Document, displays the version of the protein contained in the document that you just uploaded. The right column, titled
Current Library Proteins has the version contained in the current library.
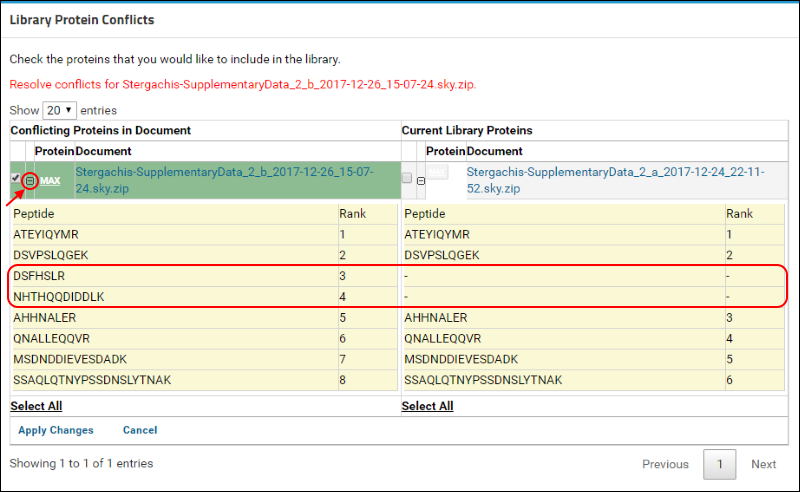
Click on the
(plus) icon next to the protein name to view the list of peptides measured for this protein in the two versions. (When expanded, the icon will become a
(minus). The new document contains measurements for two additional peptides that are marked in the image below.
To resolve this conflict by choosing the new version of the protein, do the following:
- Under Conflicting Proteins in Document, click the check box next to the protein name if it is not already checked.
- Click Apply Changes.
Panorama will now rebuild the library and include the new version of the protein with all its peptides and transitions. Any peptides or transitions that existed only in the older version of the protein will be removed from the library. Once the new library has been built you will be taken to the home page of the library folder where you will see that a new revision (3) of the library is available. The conflict message should no longer be displayed.
- Click on the Download button and save the chromatogram library file (Human_rev3.clib) to your computer.
You will use this library in the next section of the tutorial.
You can access older revisions of the library by clicking on the
Archived Revisions link below the library file name, shown in the image below.
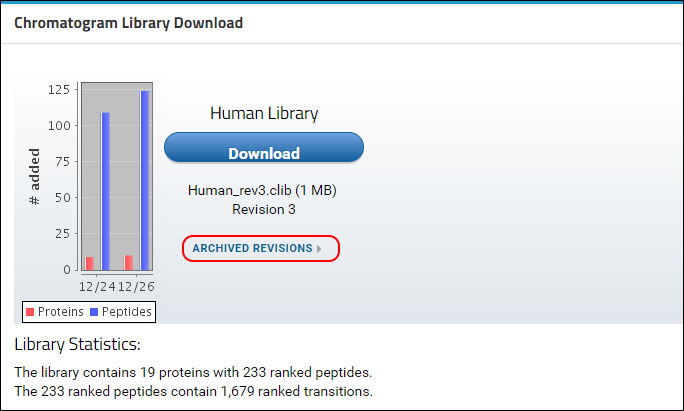
A table with all the library revisions will be displayed. You can download older revisions by clicking on a file name in the Archived Revisions table.

Using Chromatogram Libraries in Skyline
You will now prepare a new Skyline document to measure the proteins CTCF and MAX in another sample. The library you just downloaded from Panorama contains chromatograms for peptides from these proteins. You will use the library to filter the set of peptides and transitions in your Skyline document to the best responding ones contained in the library. You will also see how you can compare fragment ion or transition chromatograms obtained in a new experiment with chromatograms contained in the library to confirm peptide identifications.
Before you begin, make sure that the peptide and transition settings in Skyline are configured correctly, by creating a new file and adjusting its settings as necessary:
- On the File menu in Skyline, click New (Ctrl-N).
Configure the peptide settings as follows:
- On the Settings menu, click Peptide Settings....
- Click the Digestion tab, if it is not already selected.
- In the Enzyme dropdown list, select "Trypsin KR " (if it is not selected by default).
- In the Max Missed Cleavages dropdown list, select "0" (if it is not selected by default).
- In the Background proteome dropdown list, select "None" (if it is not already selected).
- Click the Filter tab.
- In the Min length field, enter "7".
- In the Max length field, enter "23".
- In the Exclude N-terminal AAs field, enter "0".
- Uncheck Exclude potential ragged ends (if it is checked).
- Uncheck any selected options in the Exclude peptides containing: list.
- Check Auto-select all matching peptides (if it is not already checked).
- Click the Library tab.
- Uncheck any selected libraries.
- Click on the Modifications tab.
- Check the "Carbamidomethyl (C)" modification in the Structural modifications list (if it is not already checked).
- Uncheck any other selected modifications in the Structural modifications list.
- Uncheck any selected modifications in the Isotope modifications list.
- Click the OK button in the Peptide Settings form.
Configure the transition settings as follows:
- On the Settings menu, click Transition Settings....
- Click the Filter tab.
- In the Precursor charges field, enter "2".
- In the Ion charges field, enter "1".
- In the Ion types field, enter "y".
- In the Product ions section From dropdown list, select "ion 3".
- In the Product ions section To dropdown list, select "last ion – 1".
- In the Special ions list, uncheck any selected options.
- Make sure that the Precursor m/z exclusion window field is blank.
- Check Auto-select all matching transitions (if it is not already checked).
- Click on the Library tab.
- Uncheck If a library spectrum is available, pick its most intense ions.
- Click on the Instrument tab.
- Enter "50" in the Min m/z textbox.
- Enter "1500" in the Max m/z textbox.
- Uncheck Dynamic min product m/z if it is checked.
- Click the OK button in the Transition Settings form.
The files you downloaded for this tutorial include the file "CTCF_MAX.txt". This file contains sequences for the proteins CTCF and MAX. To add these proteins to the new Skyline document do the following:
- On the File menu, choose Import and click FASTA....
- Browse to and select "CTCF_MAX.txt" in the file browser.
- Click the Open button.
The Skyline window should now look like this:
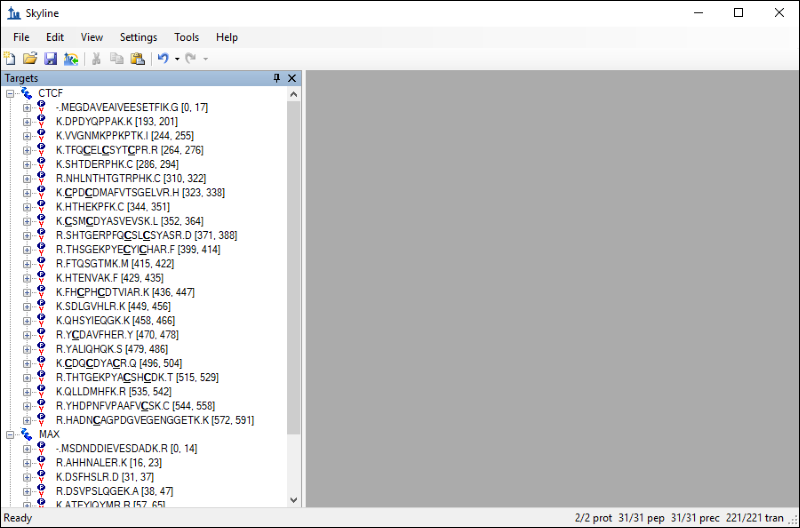
The settings you configured in Skyline have resulted in 31 peptides for the two proteins. If you export a transition list for this document without applying any filtering you would be measuring 220 transitions. However, you can take advantage of the information contained in the chromatogram library to limit your measurements to the best responding precursors and product ions for the two proteins. Follow these steps to filter the list of peptides and transitions:
- On the Settings menu, click Peptide Settings....
- Click the Library tab.
- Click the Edit List button.
- Click the Add... button in the Edit Libraries form.
- In the Name field of the Edit Library form, enter "Panorama Human Library".
- Click on the Browse... button.
- Select the "Human_rev3.clib" chromatogram library file that you downloaded earlier.
- Click the OK button in the Edit Library form.
- Click the OK button in the Edit Libraries form.
- Check the box next to "Panorama Human Library", in the Libraries list.
- In the Pick peptides matching dropdown list that appears, select Library (if it is not selected by default).
- In the Rank peptides by dropdown list, select Peak Area.
- Check the Limit peptides per protein box.
- In the Peptides field, enter "5".
The Peptide Settings form should now look like this:

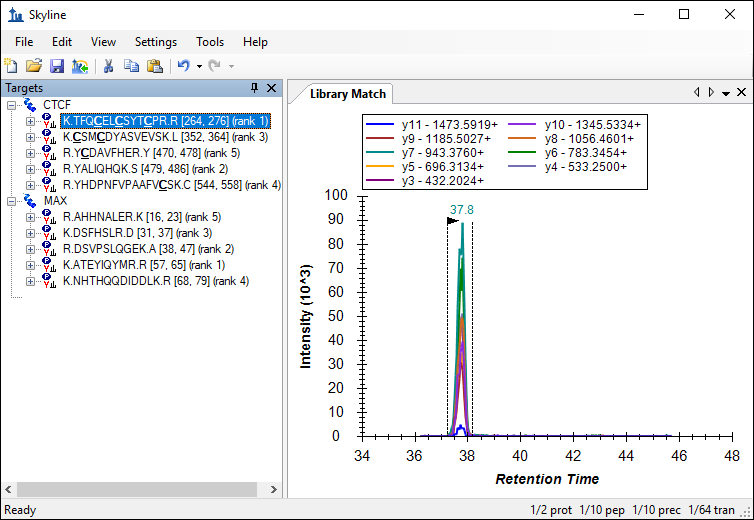
The number of transitions in the document should have decreased from 220 to 64. Skyline also displays a rank for each peptide as indicated in the image below. This rank is based on the total peak area, summing all transition peak areas, for the peptide in the library.
This number can be further reduced by limiting the transitions to the top ranking transitions in the library.
- On the Settings menu, click Transition Settings....
- Click the Library tab.
- Check the box for If a library spectrum is available, pick its most intense ions.
- In the Pick: product ions field that appears, Enter "3".
- Select the From filtered product ions option.
The
Transition Settings form should look like this:
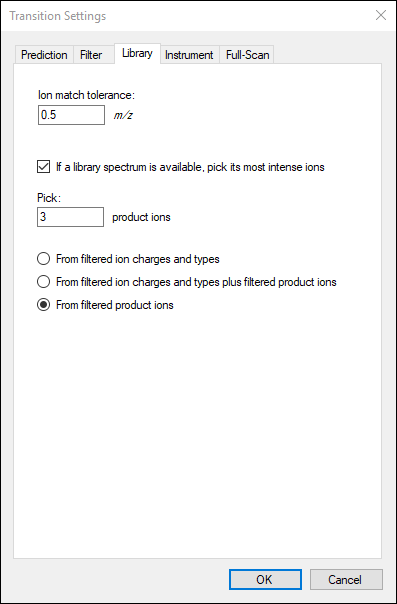
The number of transitions in this document should now be 30.
You can now export a transition list or a native instrument method for this document, and acquire data. Skyline offers the ability to export transition lists and SRM methods for instruments from several different instrument manufacturers.
- On the File menu, choose Export and click either Transition List... or Method....
- To view the list of supported instrument types, use the Instrument type dropdown menu.
Please see the
Targeted Method Editing and
Targeted Method Refinement
Skyline tutorials for more information on exporting transition lists and SRM Methods.
The files you downloaded for this tutorial already contain a document with data acquired on a triple quadrupole mass spectrometer. To begin exploring how acquired data and your new chromatogram library can be used together:
- Open the file "In_vivo_versus_in_vitro_comparison.sky" in Skyline.
- In the Targets view, select the peptide "TFQCELCSYTCPR", under the CTCF protein.
The Skyline window should look like this:
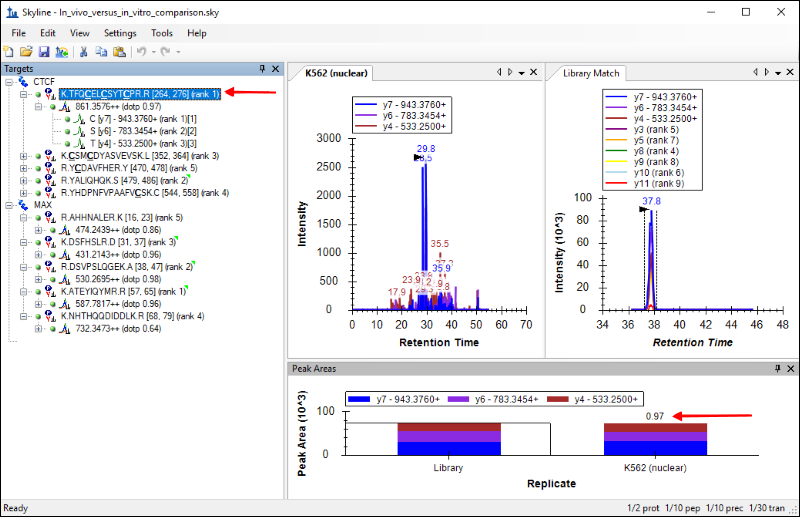
You should see the chromatograms for this peptide from the newly acquired data side-by-side with the chromatograms from the Human_rev3.clib library. The tab titled
K562 (nuclear) has the chromatograms from the new data, and the tab titled
Library Match displays the library chromatograms.
If you do not see the
Library Match tab you can display it as follows:
- On the View menu, click Library Match.
Skyline also calculates a dot product as a measure of similarity between the peak areas in the new data and the library peak areas. This is displayed next to the precursor, as marked in the image above. For the peptide
TFQCELCSYTCPR the similarity is high, with a dot product of
0.97, and that gives a measure of confidence in the peptide identification.
Conclusion
In this tutorial, you have gone through the steps of creating a library folder in Panorama for curated, targeted results. You have built a chromatogram library in Panorama, and used it in Skyline to select the peptides and product ions to measure in a new experimental setting. You have also compared chromatograms acquired in a new experiment with data contained in the library to validate peptide identifications. By using these techniques with your own experimental data, you can build an extensive knowledge base of the targeted assays you have investigated and refined in your laboratory, and avoid duplicating this effort in new experiments. You can share these libraries with collaborators or the general public, as others are already doing, helping others to reproduce your results, or use them for new applications in targeted proteomics.
Reference List
1. Stergachis, A., MacLean, B., Lee, K., Stamatoyannopoulos, J. A., & MacCoss, M. J., Rapid empirical discovery of optimal peptides for targeted proteomics Nature Methods 8,1041–1043 (2011)
Related Topics
button in the Skyline toolbar, shown in the image below. Alternatively, on the File menu, click Publish to Panorama.
button in the Skyline toolbar.